
 Sign In
 Create Account


 Find content
 Male
Male


- Alexvan likes this
2LV8ETR
#25399 Ready Freddy Cruise
 Posted by
on 05 January 2013 - 01:34 PM
Posted by
on 05 January 2013 - 01:34 PM
Go get some garden hose and a screwdriver dude, fuel is cheap as.
#25312 Who wants a cruise?
Posted by
on 13 December 2012 - 06:15 PM
No biggie if you don't come, it wasn't directed at anybody. It's just the usual story, we get interest and then nobody shows. It's happened quite a few times and we cancelled after waiting for people to rock up.
At the end of the day, if you're there - cool. If not - It don't matter. We all have lives that have more importance than a vehicle cruise.
Anyway, in saying that - Luke, I will be bringing your strut brace and another copy of Nissan FAST for you.
Brett, I'll hook up at yours and go from there. What time were you leaving yours?
James, I'll be bringing your hot pink mankini and I want pictures for Gay Pride Monthly.
- Alexvan likes this
#25222 Cam angle sensors
Posted by
on 08 October 2012 - 06:12 PM
The S1 and under are of an all alloy construction, The Neo and R34 GT-R are alloy with a black plastic cover.
Real easy to spot.
And my bad, I don't know what I was thinking but it's S2 and below use the older alloy type
Real easy to spot.
And my bad, I don't know what I was thinking but it's S2 and below use the older alloy type
- evoeta likes this
#25122 Mundaring Powerlines Run
Posted by
on 31 August 2012 - 09:03 PM
A group of us are heading to Mundaring to do a powerlines run. If anyone want to tag along, feel free.
Date: 16th September
Meet: Peak, Corner of Gt Eastern Hwy and Old Sawyer's Valley Rd, Sawyers Valley.
Time: 08:30 for a 09:00 departure.
There will be no changing of date, so if you can't make it you'll have to wait until the next one.
Date: 16th September
Meet: Peak, Corner of Gt Eastern Hwy and Old Sawyer's Valley Rd, Sawyers Valley.
Time: 08:30 for a 09:00 departure.
There will be no changing of date, so if you can't make it you'll have to wait until the next one.
- Alexvan likes this
#24645 4x4 Cruise - Brunswick
Posted by
on 17 May 2012 - 05:02 PM
#23103 What have you personally seen dickheads do to their cars?
Posted by
on 14 September 2011 - 09:52 PM
Yup. That's just fucked.
- 1via likes this
#23003 List of issues with wcc's new website
Posted by
on 08 September 2011 - 07:11 PM
James can post.......
- GreyWolf likes this
#22201 2L-TE Fault Codes - Diagnosis & Clearing
Posted by
on 29 June 2011 - 06:25 PM
Introduction To On Board Diagnostics
A number of components of modern motor vehicles are now controlled by computers electronics and this has lead to significant improvement of the performance and reliability.
However, once things go wrong, it can be a real nightmare. Most symptoms are often occasional symptoms, making the diagnosis very difficult. Moreover, certain symptoms can sometime disappear during the diagnosis process, in which case the cause will be unknown until it strikes again.
Of course, the use of oscilloscope or special inspection tools may come in handy for this sort of tasks but at the same time not all mechanics can have access to such equipment or facility.
Thus the engine management computer, which is often referred to as ECU (Engine Control Unit) comes with a feature which monitors the system network and when a fault is detected, it may switch to so-called 'safety mode' to guarantee safety as well as inform the driver as necessary and records the associated problem areas.
This is the OBD (On Board Diagnostic) system, the self-diagnosis system. The records of problem areas are stored as codes and this can be recalled by carrying out a particular procedure where a specific code is displayed by either flashing a warning light in certain intervals or by providing different voltage from the service socket etc.
This may seem a wonderful system which gives solutions to all problems. NOT! It should be noted that the OBD is never perfect and time to time, they do lie. The OBD may sometimes show the 'normal' code despite the fault is still present and visually evident. Also the OBD cannot detect every single fault on the car either.
Therefore, one should always be prepared that even if the 'normal' code is shown, the fault may still exist within the area outside the scope of the OBD.
Above all, cars still rely heavily on the mechanics who maintain them and nothing can be more precious than skills and experience.
Introduction To Toyota OBD
Toyota's OBD system is one of the most user-friendly and no major change has been made since the it was first introduced.
The design of service connectors may differ from model to model as well as year to year but the main procedures are mostly identical.
Early service sockets were round shaped and voltage meter had to be connected in order to obtain the code. The code was obtained by counting the number of times the voltage changes from 0 volts to 5 volts in given intervals.
However, modern service sockets are mostly square shaped and do not require a voltage meter. Instead it blinks the CHECK ENGINE warning light.
Initially, codes were displayed in 1 digit figure, but as the OBD became capable of tracking more areas, it was no longer possible to cope with just 1 digit number thus most modern models display codes in 2 digits figure. Furthermore, some models are equipped with dual mode detection, which in addition to the ordinary diagnostic function, the system has a secondary mode which is capable of detecting instantaneous faults.
Obtaining The Diagnostic Code
There are two service connectors. One is located at various locations in the engine compartment depending on models, while the second one is located inside the car, usually below the driver's side dashboard and either of them can be used to carry out the test.
NORMAL MODE Testing
NORMAL MODE displays code(s) for the present faults as well as the faults occurred in the past.
1. Turn the ignition key to ON position and make sure the 'Check Engine' warning lights on the dash board comes on.
2. Turn the ignition key to OFF position.
3. Open the cover of the service socket located in the engine compartment.
4. Link the terminal marked TE1 and E1 together with a piece of wire.
Note: Terminals are often filled with grease to prevent corrosion and this sometimes creates difficulties seeing each terminal, hence care should be taken to ensure the right terminals are linked.
5. Turn the ignition key to ON position, but do not start the engine.
6. The CHECK ENGINE warning light on the dash board should start to flash. The code can be obtained by counting the number of flashes.
If the CHECK ENGINE warning light does not flash, the vehicle may be fitted with one of the early OBD systems which require a voltage meter to obtain the code. In such case, + probe of the voltage meter should be connected to terminal marked VF and - probe to E1 terminal and count the number of times the voltage moves between 0 to 5 volts.
7. With the number of flashes, it can be determined whether the system uses 1 digit code display or 2 digits code display.
8. The code differs from model to model but if the system is normal, code number 1 will shown where the CHECK ENGINE warning light blinks continuously. If there is a fault, there will be a pause between the blinks. The first set of blinks show the first digit of the code and second set of blinks after the pause indicates the second digit of the code. For instance, code 41 will blink 4 times in a row and pause, then it blinks once. If there was more than one code being stored in the ECU, it displays from the lower number and goes back to the beginning after displaying all the relevant codes.
TEST MODE Testing
TEST MODE is capable of detecting faults which cannot be detected under NORMAL MODE described in previous section. This method can be used to track instantaneous faults such as loose connectors, as well as for test drive after a service to double check everything is in good order.
1. First of all, it is vital to check everything is fine under NORMAL MODE. If there is a fault, it should be rectified before proceeding.
2. If the diagnostic codes which were previously stored under NORMAL MODE, they must be cancelled.
3. Pull the service socket located inside the car out. This is usually located under the driver's side dash board.
4. With the ignition key in OFF position, link the terminal marked TE2 and E1 together with a piece of wire.
5. Turn the ignition key to ON position and ensure the CHECK ENGINE warning light on the dash board flashes.
Note: It is important that from this point onwards, the ignition key must never be switched back to OFF position until the test is completed.
6. Turn the ignition key and start the engine. During this process, the starter motor signal is been checked. If the car was started other than using the ignition key, error code showing the STARTER SIGNAL ERROR will be displayed.
7. Take the car to a test drive. During the test drive, the speed must exceed 5 km/h otherwise SPEED SENSOR error will be recorded by the system.
8. After the test drive, stop the car but even at this point, the ignition key must never be switched back to OFF position yet.
9. On the service socket located inside the car, link the terminal marked TE1 and E1 together using another piece of wire.
10. The code will be shown in the manner described in the previous section.
Note: At any time during the process, if the ignition key was accidentally switched back to OFF position, the test has to be carried out from scratch since the code stored during TEST MODE will be cancelled automatically whenever the ignition key is switched to OFF position.
Cancelling The Diagnostic Code
The error codes stored in the ECU by the OBD will remain there until they are cancelled. Whenever a fault is rectified or a routine maintenance has been completed, it is vital to cancel the code.
For most vehicles, removing the EFI fuse for at least 10 seconds will cancel the code stored in the ECU. For certain cars with diesel engines, they may have a fuse named ECD or AM2 instead.
However, there are always few exceptions where codes cannot be cancelled in this manner. If this is the case, there should be a fuse named ECU so this should be removed to cancel the code. Alternatively, disconnecting the battery or ECU connector will undoubtedly cancel the code.
After cancelling the code, run the test again and double check to make sure they are actually cancelled. If they remain, either the cancellation procedures are incomplete or the fault area has not been rectified.
Cars With An Automatic Gearbox
For certain models, automatic gearbox management system is built-in into the ECU. For these models, the OBD will also check the automatic gearbox system when the test is carried out. However, OBD for automatics will flash O/D OFF warning light instead of the CHECK ENGINE warning light.
Hence, if during the test, the O/D OFF warning light starts to flash, it means that the automatic system is also being checked. The method of obtaining the code is the same as described earlier and necessary action should be taken according to the result.
Results From Codes
1 - Normal
2 - Turbo boost pressure sensor
4 - Coolant temperature sensor
5 - Correction resistance (Pump)
6 - Pump speed sensor (Pump)
7 - Throttle position sensor
8 - Intake air temperature sensor
9 - Vehicle speed sensor
10 - Starter switch
11 - Switch sign (Vehicle not in P or N or A/C on)
12 - Timer control valve (Pump)
13 - Crank position sensor
To clear any codes either disconnect the battery or remove the ECD relay for one minute.
- fuelguy likes this
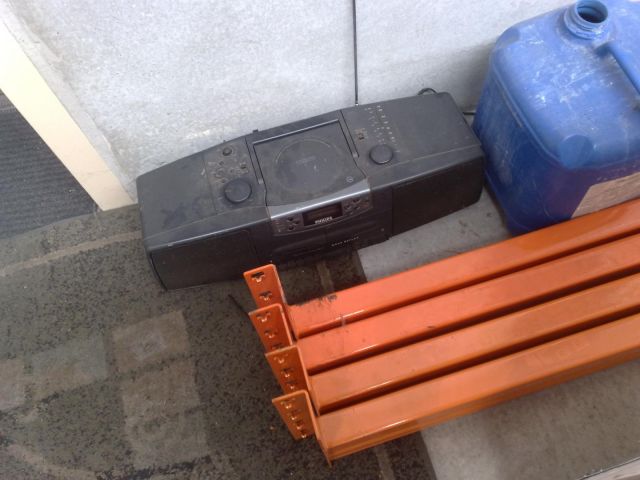
#19616 How To Fuck Up A Radio
Posted by
on 03 March 2011 - 07:26 PM
My boss at work loves opera and classical music. I don't.
There's nothing worse than listening to some fat skank, warbling on like a dying rhino with a tree log up its arse. I fucking hate it, and it does my head in.
So I hatched a plan while he was out one day, and here's what you do to overcome the dilemma, and get a bit of peace back into your life.
The offending radio:
Take a bit of normal electrical wire and strip off the plastic insulation.
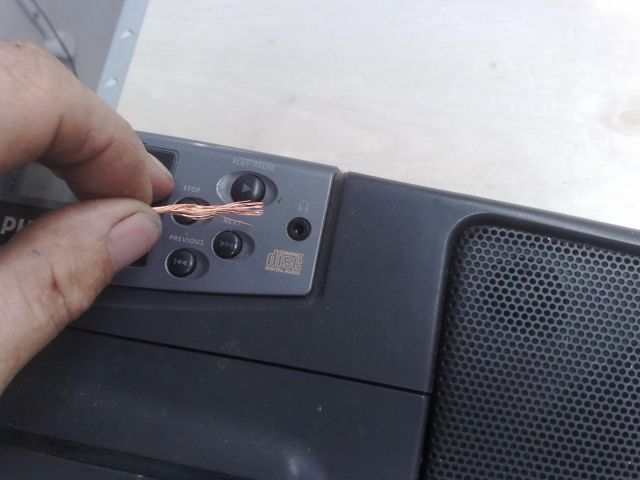
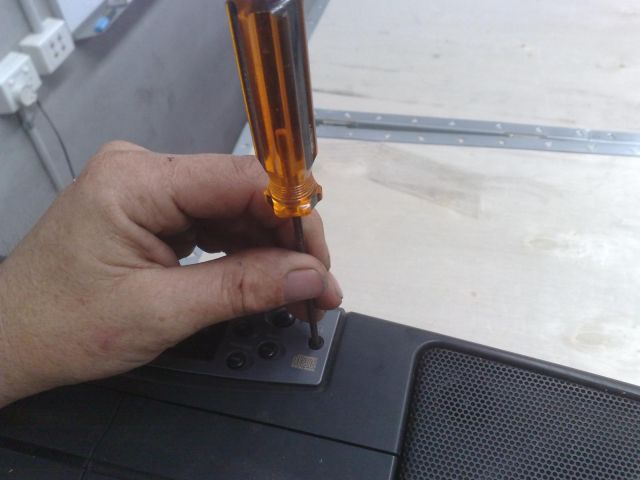
Fold the wire into half, then half again. Locate the headphone jack and force the wire into the socket.
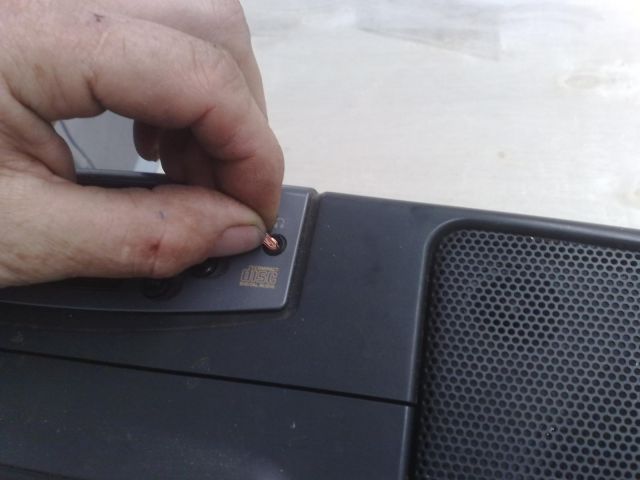
Stuff the wire down until you hear the music stop.
After returning from his outing he'll ask you what happened to the radio....
Me: "I dunno, it just stopped, maybe there's a power cut at the station or something."
Boss fiddles with radio.
Boss: "There's power to it."
Boss fiddles with tuning knob.
Me: " That's wierd, there's power to it but no volume."
Boss fiddles with every other switch and knob.
Boss kicks radio.
Boss unplugs radio and casts aside on unused desk.
Me: "Wierd."
The outcast and offending piece of electronic equipment.
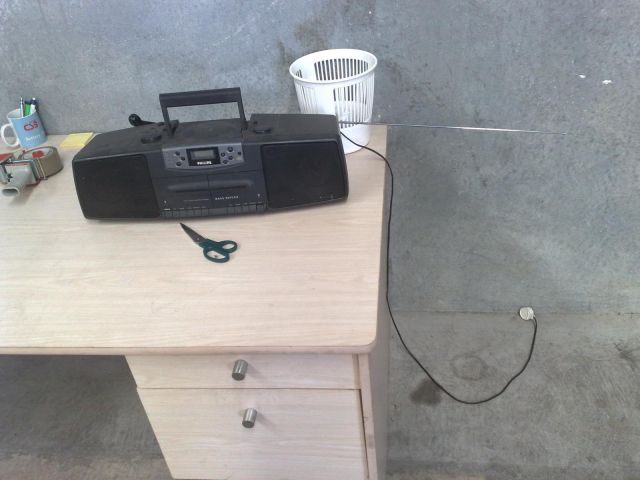
The ulimate result!

There's nothing worse than listening to some fat skank, warbling on like a dying rhino with a tree log up its arse. I fucking hate it, and it does my head in.
So I hatched a plan while he was out one day, and here's what you do to overcome the dilemma, and get a bit of peace back into your life.
The offending radio:
Take a bit of normal electrical wire and strip off the plastic insulation.
Fold the wire into half, then half again. Locate the headphone jack and force the wire into the socket.
Stuff the wire down until you hear the music stop.
After returning from his outing he'll ask you what happened to the radio....
Me: "I dunno, it just stopped, maybe there's a power cut at the station or something."
Boss fiddles with radio.
Boss: "There's power to it."
Boss fiddles with tuning knob.
Me: " That's wierd, there's power to it but no volume."
Boss fiddles with every other switch and knob.
Boss kicks radio.
Boss unplugs radio and casts aside on unused desk.
Me: "Wierd."
The outcast and offending piece of electronic equipment.
The ulimate result!
- SirAskALot likes this
#8970 Posting WCC Cruises On Other Sites
Posted by
on 26 July 2010 - 11:24 AM
If people are wishing to post a notification of WCC cruises on another site, please adhere to the following rules:
1: Post the cruise information as described on WCC after dates and locations have been decided as shown below.
Topic - Socs's Cruise
Date: Saturday 19th June 2010
Time: 18:30 meet, 19:00 departure
Meet Point: Whitfords shopping centre top roof carpark
Map: Simple Simon
Link: Socs's Cruise - West Coast Cruisers
2: Keep the chat restricted to cruise information only.
3: Respect the website's rules and policies pertaining to forum posting.
Please adhere to these rules as we wish to maintain a good relationship with other websites.
- Socrates likes this
#1341 Back by popular demand - Twisted Sister Cruise
Posted by
on 15 October 2009 - 07:20 PM
Where: Subway, Albany Hwy, Maddington.
Date: Saturday 17th October.
Time: 8:00PM for an 8:30PM departure.
Map: Twisted Sister.
A very twisty night driver's run.
Date: Saturday 17th October.
Time: 8:00PM for an 8:30PM departure.
Map: Twisted Sister.
A very twisty night driver's run.
- Ten Four likes this
#385 Nissan RB30 DOHC Conversion Guide
Posted by
on 10 September 2009 - 04:38 PM
 Nissan RB30 DOHC Conversion Guide.pdf 371.2KB
16 downloads
Nissan RB30 DOHC Conversion Guide.pdf 371.2KB
16 downloadsA quick rundown:
Nissan did not produce this engine, but it refers to a turbocharged engine featuring an RB30E block with a twin-cam head conversion. Common hybrid in Australasia (referred to as the RB25/30 or RB26/30) using a RB30E bottom end mated to a RB25DE,RB25DET or RB26DETT cylinder head and turbo (RB20DE and DET heads are not used as the bores are different in size, RB30 86.0mm RB20 78.0mm, but were originally modified and used on the Tommy Kaira Rb30de as the RB25 engine did not exist). The RB25DE cylinder head from the A31 Cefiro C33 Laurel or R32 skyline (aka: Non VCT) can be used, and fits perfectly on (although better valve springs are recommended, GT-R valve springs are a decent upgrade). The RB25DET (from the R33 Skyline or C34 Laurel or Stagea) head is also used, however an external oil feed must be fabricated for the variable cam timing (VCT) on the RB25DET, and the galleries at the front of the engine do not line up. The variable cam timing may be disconnected altogether. Also it is wise to change the oil restrictors in the block to 1.5mm and get a full face oil pump drive collar machined onto the crank which solves it shattering at high RPM, with the use of a twin cam oil pump.
The fitment of a twin cam head from any of these engines onto a standard compression RB30E bottom end gives an ideal compression ratio for a mild to moderately modified street turbo engine around 8.2:1, (but always check your compression when building this engine as it may vary), making the conversion popular amongst those who would otherwise convert their RB30E to a high compression RB30ET using original ET bolt on externals.
Although it has a larger displacement than the RB26DETT, maximum possible horsepower is less, as the RB30 block lacks the RB26 block's internal cast-in bracing, and consequently cannot rev as high due to harmonic issues at ~7500 rpm. To compensate, the RB30DET produces more torque at lower revs due to its longer stroke. However they have been known to reach engine speeds up to 11,000 rpm with a lot of balancing and the use of the RB26 head with solid lifters. Power of the RB30det in this form can far exceed that of an RB26DETT, RB30DET's are usually only found in rwd cars as it's a lot easier to install, with the 4wd setup in the GTR or GTS4 an adapter plate has to be made to fit the 4wd sump as its bolt pattern is different to the RB30, as there is a adapter plate between the sump it sits off on the gearbox bolt holes, they will have to be modified to fit.
There is also an 'RB30DETT' kit manufactured by OS Giken of Japan, which bolts an extension on top of the RB26 engine block, and fits liners, to give an 86 mm bore x 86 mm stroke. It is available as an assembled short block, containing billet chrome-molybdenum crank, billet chrome-molybdenum H-beam connecting rods, forged pistons, and costs 1,500,000 yen.
In recent times, Rotorua Import Pro Shop (RIPS), a tuning garage located in Rotorua, New Zealand has emerged as one of the foremost tuners using the RB30DET engines, The vast majority of engines they do are RB30's. They have found that the stock Bottom end can easily withstand in excess of 600hp reliably, with many of their engines capable of running a Skyline in the 10 second range 0-400m sprint. RIPS also has produced the world's most powerful RB30, installed in a Nissan 240Z, this car has run 0-400m in 7.86 seconds at 177.4 MPH, running 1400hp+ using a stock unfilled block, stock crank, stock cradle, stock mains bolts, and stock wet sump without engine failure. That particular engine has now been installed into a purpose-built front engine dragster with a current best of 7.26 seconds and they are now going for 6 second 1/4 mile times at 200+ MPH. Another one of their developments is a 3.3 litre RB30DET dubbed the "RB33" by using a crankshaft with an extended stroke.
- foxsay likes this

Community Forum Software by IP.Board
Licensed to: West Coast Cruisers, 2012
