Sign In
 Create Account

There's nothing overly complicated about it, just be a little anal and ensure that your timing marks line up and all will be sweet.
Removal:
1: Disconnect the battery earth lead.
2: Drain the cooling system.
3: Remove the radiator.
4: Remove the cooling fan and pulley.
5: Remove all of the drive belts.
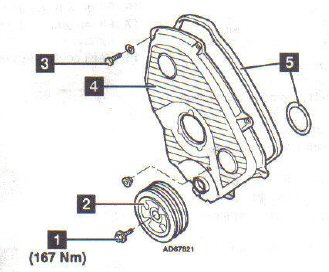
6: Remove the harmonic balancer pulley bolt and washer (image 2 item 1).
7: Using a suitable puller, remove the harmonic balancer pulley (image 2 item 2).
8: Remove the timing belt cover bolts (image 2 item 3).
9: Remove the timing belt cover and seal (image 2 item 4 & 5).
10: Refit the harmonic balancer pulley and turn the engine to TDC on number 1 ensuring that the timing marks 6, 7 & 8 align (image 1, items 6, 7 & 8).
11: Loosen tensioner retaining bolt (image 1 item 9).
12: Using a screwdriver, lever the tensioner away from the timing belt and lightly re-tighten to keep the tension off the belt.
13: Remove the belt guide from the crank sprocket. This looks like a large washer.
14: Remove the timing belt.
At this point even though it is not necessary, I would recommend replacing the tensioner and idler guide bearing. There is a kit available that has everything you need to do this which include a cam and crank seal. You may as well do it while you're here.
Installation:
1: Double check to make sure that timing marks 6, 7 & 8 are aligned. I must stress that this is important!
2: Starting at the crank sprocket (image 1 item CS), fit the timing belt keeping it tight between the sprockets in the following sequence - tensioner (image 1 item T), injector pump sprocket (image 1 item IP), camshaft sprocket (image 1 item CA), and idler guide sprocket (image 1 item G).
3: Loosen the tensioner bolt so it rests again on the timing belt.
4: Refit the harmonic balancer pulley bolt and turn the engine 4 complete rotations to ensure that the timing marks 6, 7 & 8 align again.
5: Tighten the tensioner bolt to 44 Nm.
6: Refit the belt guide, the timing belt cover and seal.
7: Remove the harmonic balancer pulley bolt, refit the harmonic balancer pulley and bolt into place to 167 Nm.
8: Refit the remainder of the components in reverse order of removal.
9: Refill and bleed the cooling system.
10: Drive away!
Image 1:
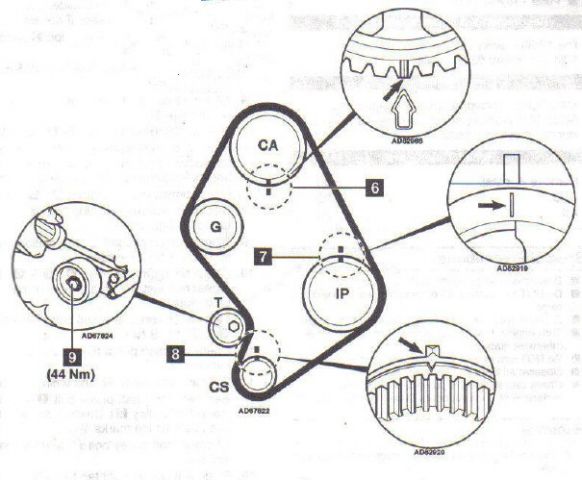
Image 2:

 Back to top