
 Sign In
 Create Account
Okay kids, here we go for the first step by step buildup from scratch. I will be doing 2 of these for myself in a RWD setup, and Brett and I will be doing an AWD setup for his Gts-4. My target for this build will be an easily obtainable 300-400rwhp. The other one, a 26/30 will be 600-800rwhp, and Brett will be chasing that same figure in AWD.
The reason for doing this is that there is so much out there at the moment, but there is no step by step build that the average Joe with half a brain cell on crack couldn't accomplish in his/her sleep.
I have studied a lot of the buildups out there, but what a lot of people are failing to do is to take pictures and explain each step as they do it. In most cases, the threads are filled with dribble from other people asking inane questions, dragging a 5 page writeup out to over 200 pages in some cases. Other times, they opt to send their bits and pieces to a workshop to be done at a greater expense.
What I will be doing is exactly what I did in the 2L-TE engine rebuild writeup that is easy to follow, explained in detail, and is accompanied by large images. To date, the 2L-TE rebuild thread has been hit over 6000 times. Not bad for an obscure engine from a 4x4, and no doubt has helped many people.
Again, I will lock this thread and keep it that way until the build is finished, so people who want to perform this conversion may do so without having to read fifty posts of questions for every one post of useful information. Another thing I will do as I go along that I didn't do with the 2L-TE buildup is to make a running count on the money I've spent, to provide you all with an idea of what you will be looking at to do what I have done. Be aware though that prices will fluctuate according to your country of purchase, your location (whether isolated or in a populated area), availability, quality of parts, and other variables.
This first build will take a couple of months and will be a cheap and fast way to improve on the stock RB20DET. As most of you know, my RB20 was no slouch after I modified the hell out of it and achieved well over 300rwhp running 28psi of boost. There will be no forged bottom end, or massive turbo going on this engine. The purpose of this build is just to improve the smallest member of the RB family, cheaply.
Now for the disclaimer - One thing I will stress here is that I am taking responsibility for my build only. If you follow this guide and your engine fails, that's your problem, not mine. I am confident with what I am doing and I've built many engines, but I cannot take responsibility for what you do. Use this as a guide only, and if you have access to a workshop manual, then I suggest you follow that, and not the scratchings of a lunatic such as myself who abused drugs, alcohol, and stray women until yesterday. No, the day before. No, last week. I can't remember. What was I saying?
Enough with the preliminary jargon, now on to the build.

R32 RB25/30DET Conversion
Started by 2LV8ETR, Jun 29 2011 07:12 PM
#1

 Posted 29 June 2011 - 07:12 PM
2LV8ETR
-
- Vice President
-

- 3017 posts
Grampa Spec Cockhead
- Real Name:Allen
- LocationArmadale WA
- Car(s):RB30DET R32 Gts-t Sedan, Hilux SSR-G Surf 4x4
- Bike(s):Hyosung GT250-R, My wife...
 Back to top
#2
Posted 29 June 2011 - 08:21 PM
2LV8ETR
-
- Vice President
-
- 3017 posts
Grampa Spec Cockhead
- Real Name:Allen
- LocationArmadale WA
- Car(s):RB30DET R32 Gts-t Sedan, Hilux SSR-G Surf 4x4
- Bike(s):Hyosung GT250-R, My wife...
Step 1: Accumulation Of Parts
Engine Block
What you need here is a Series 2+ RB30E block. The reason for this is that these blocks come equipped with oil and water feed/return points, whereas the series 1 blocks don't.
Cost - $100.00
Total Spent - $100.00
Head
With this build, I have opted for the RB25DE head from an R32/A31 NA Skyline/Cefiro. The reason for this is that the RB25DE head bolts straight up to the RB30E bottom end. All of the water and oil galleries line up perfectly, and the cams and springs are interchangeable with those from the RB20DET.
The RB20DET also has smaller ports and much smaller valves to the RB25DE head, 5mm smaller on the inlet side, and 2.5mm smaller on the exhaust side. The ports are still not as large as the R33 RB25DET or RB26DETT heads but I'm not chasing big power for this build. If I can get 350rwhp from my stock RB20DET head, I can easily get 400rwhp using the RB25DE head. Not an issue as far as I'm concerned, but if you're chasing more than 400rwhp, get the head ported to flow your desired target.
Another added bonus for using the RB25DE head is that the inlet manifold from the RB20DET will hook up nicely with only a millimetre or so port difference, and not cause the following problems:
The R33 RB25DET head sensors are incompatible with the R32 wiring loom. This means having to rewire the car to take an R33 ECU.
The R33 RB25DET inlet manifold is taller and causes fouling issues under the bonnet (or hood if you're a Yank).
The R33 RB25DET uses side feed injectors, while the RB25DE and RB26DETT heads use top feed injectors. And R33 ECU is required to run them.
The R33 RB25DET has VCT/NVCS and this requires welding of the head's VCT oil feed and you will have to tap in to the oil gallery and run an oil feed to it.
The R33 RB25DET requires you to plumb in an external head oil return.
As you can see, using an R33 RB25DET head is a major pain in the arse.
The only downside of using the RB25DE head is that the valve springs have less tension than the RB20DET springs, which may cause issues when running big boost. A good solution to this is to swap the springs over from the RB20DET head, or even better, source some from an RB26DETT head which have even better tension. I won't be running huge boost on this build, so I'll be using the RB20DET springs.
On the exhaust side of things, the RB20DET, RB25DE, and RB25DET all share the same configuration so there's no issues there.
Cost - $350.00
Total Spent - $450.00
Oil Restrictor
The RB30E's head oil feed restrictors are approximately 1.8mm dia, the RB20DET uses a 2.4mm restrictor, and the RB25DET uses a 1.5mm restrictor. The smaller restrictors will prevent excessive oil being thrown in to the top end when being revved hard for long periods of time. I will be using a 1.5mm restrictor for this build.
Oil Pump
It is best to use an oil pump from a twin cam motor as these provide greater flow and pressure and all RB oil pumps are interchangeable. RB pumps do have a reliability issue and crack if used at 6500+rpm and high km’s without a crank collar.
Ensure you use lock tight on the bolts when assembling the oil pump as they are known to rattle loose causing a gradual loss of oil pressure.
Sump
Grind off the splash fins towards the back of the RB20DET sump, the rb30 crank has a longer stroke and will interfere. The RB30 sump has no clearance issues in the R32 so you have the option of using this instead.

#3
Posted 29 June 2011 - 08:21 PM
2LV8ETR
-
- Vice President
-
- 3017 posts
Grampa Spec Cockhead
- Real Name:Allen
- LocationArmadale WA
- Car(s):RB30DET R32 Gts-t Sedan, Hilux SSR-G Surf 4x4
- Bike(s):Hyosung GT250-R, My wife...
Step 2: Preparation
Turbocharger Supply Locations & Engine/AC Brackets
I have painted arrows on the right hand side of the RB30 block to show where the supply locations are for the turbo. The upper-left arrow points to the oil feed, the lower arrow points to the oil return, and the upper-right arrow points to the water return.
Download Full Size Image
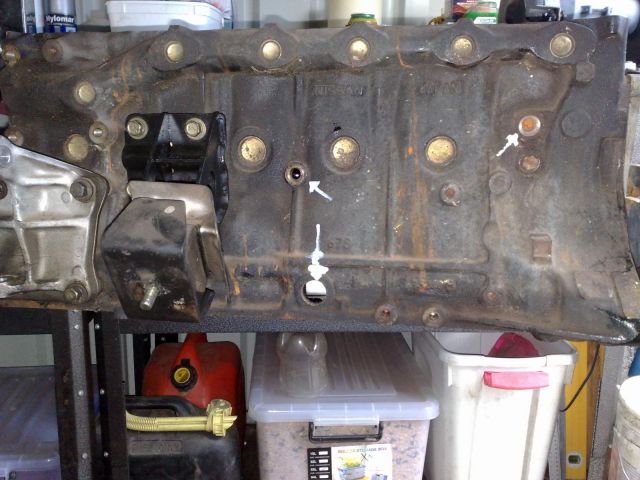
When you first obtain the block, these points will be blocked off with bungs, which you will need to remove.
You can also see that I have fitted the engine mount and A/C compressor brackets. They line up perfectly.
Also keep in mind that in these following images I am using the block that I have set aside for my RB26/30DET build. As it is completely stripped down, it's easy to move around and rotate. The block I have set aside for this build is under a neoprene tarp awaiting my attention.
Turbocharger Supply Locations & Engine/AC Brackets
I have painted arrows on the right hand side of the RB30 block to show where the supply locations are for the turbo. The upper-left arrow points to the oil feed, the lower arrow points to the oil return, and the upper-right arrow points to the water return.
Download Full Size Image
When you first obtain the block, these points will be blocked off with bungs, which you will need to remove.
You can also see that I have fitted the engine mount and A/C compressor brackets. They line up perfectly.
Also keep in mind that in these following images I am using the block that I have set aside for my RB26/30DET build. As it is completely stripped down, it's easy to move around and rotate. The block I have set aside for this build is under a neoprene tarp awaiting my attention.
#4
Posted 02 July 2011 - 07:22 PM
2LV8ETR
-
- Vice President
-
- 3017 posts
Grampa Spec Cockhead
- Real Name:Allen
- LocationArmadale WA
- Car(s):RB30DET R32 Gts-t Sedan, Hilux SSR-G Surf 4x4
- Bike(s):Hyosung GT250-R, My wife...
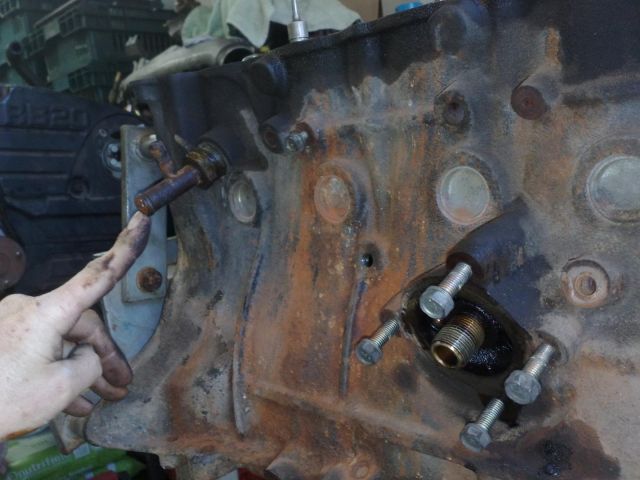
Left Hand Engine Mount Bracket
Here, the bracket from the RB20 also lines up perfectly.
Download Full Size Image

Here, the bracket from the RB20 also lines up perfectly.
Download Full Size Image
#5
Posted 02 July 2011 - 07:43 PM
2LV8ETR
-
- Vice President
-
- 3017 posts
Grampa Spec Cockhead
- Real Name:Allen
- LocationArmadale WA
- Car(s):RB30DET R32 Gts-t Sedan, Hilux SSR-G Surf 4x4
- Bike(s):Hyosung GT250-R, My wife...
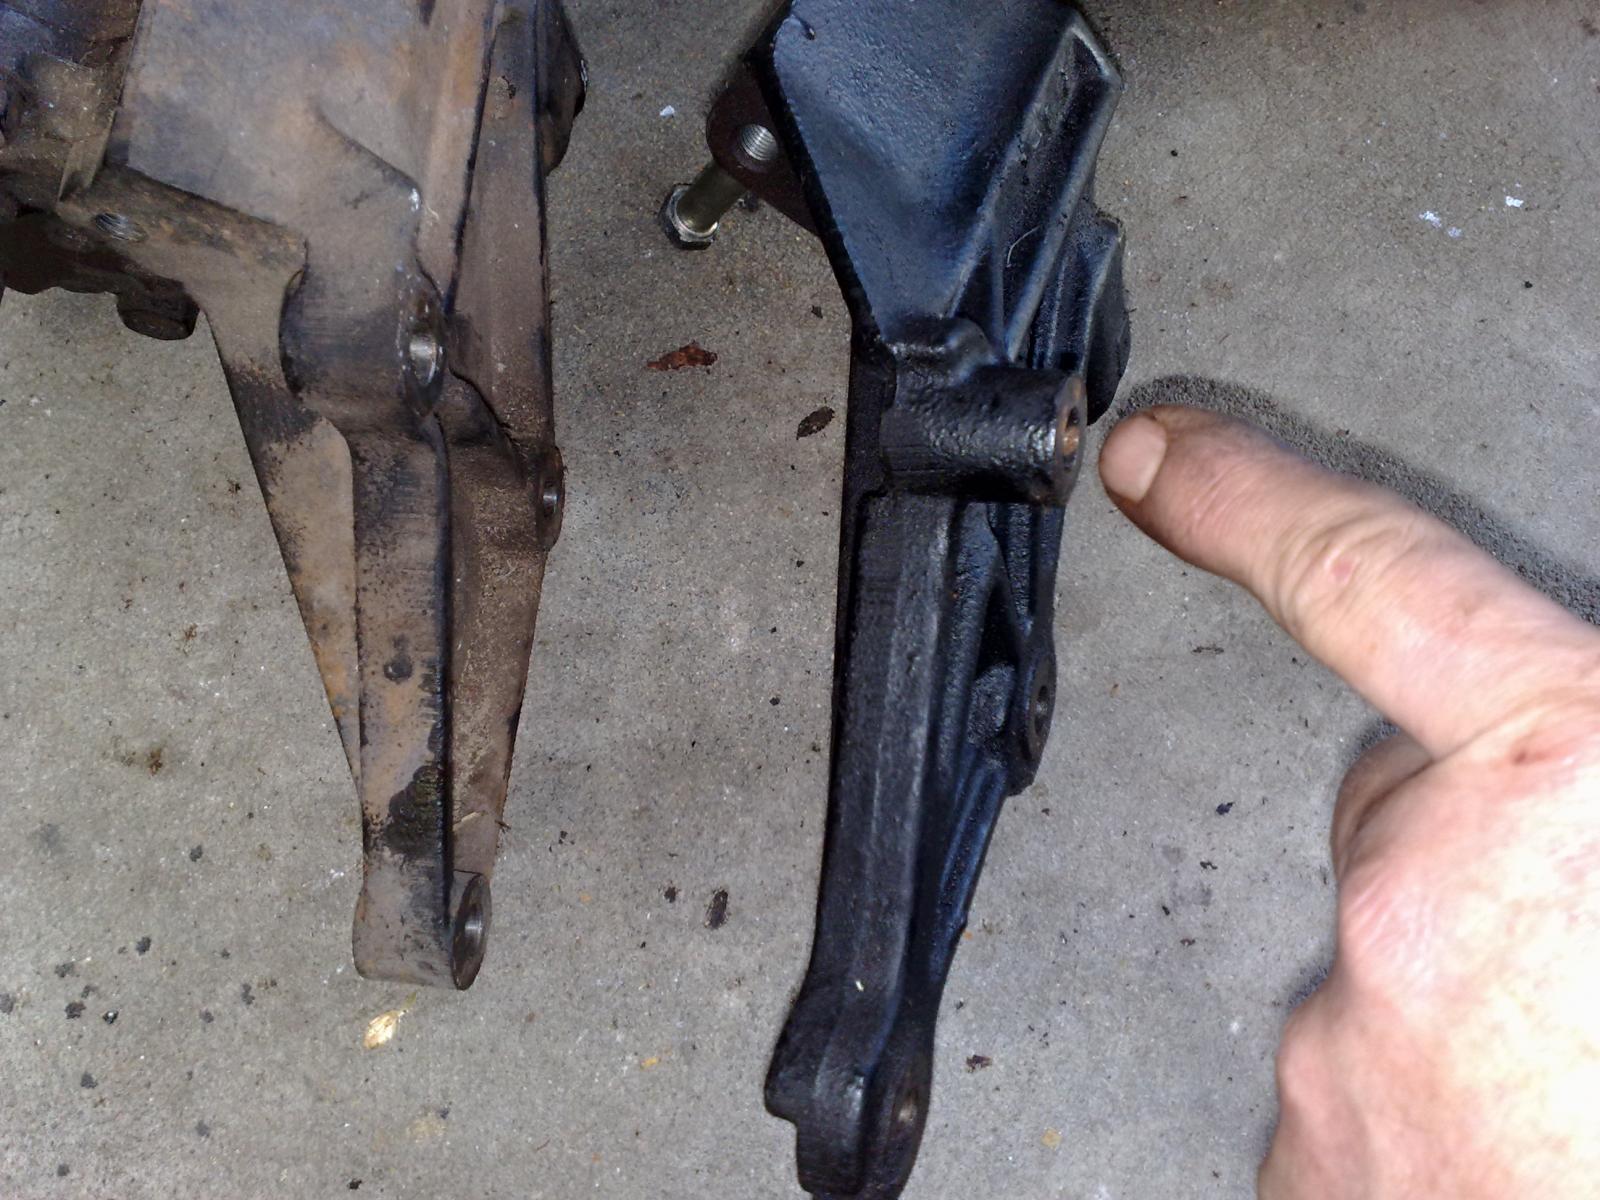
Power Steering
Okay, here's our first snag, though it's an easy fix.
Firstly, you can see by the image below that the RB30 and RB20 brackets have exactly the same bolt pattern. The RB30 is shown in the top of the image.
Download Full Size Image
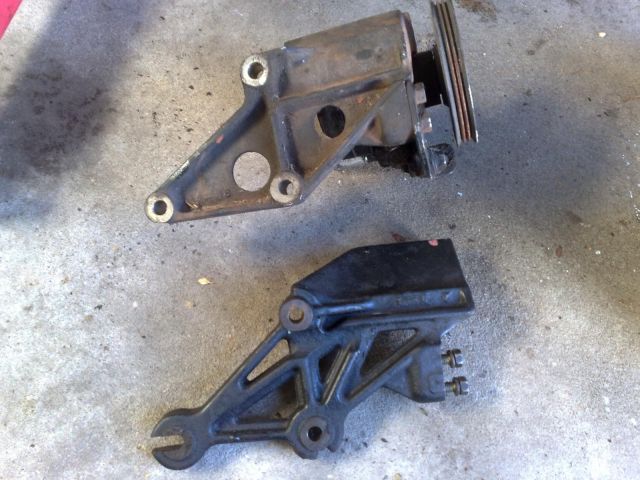
Here's the issue. The RB20 bracket has a riser that will need to be cut off in order to fit on the RB30 block. This riser is there to accomodate for the fixing to the head on an RB20. The RB30 is taller so this point attaches to the block.
The best way to determine where to cut is to use a flat piece of sheet metal, or another flat thin rigid item, and lay it across the two level surfaces. Then make a mark from the top of the riser to the underside of the sheet metal and there's your cutting point. Use a cutting wheel on your angle grinder and you're set.
Download Full Size Image

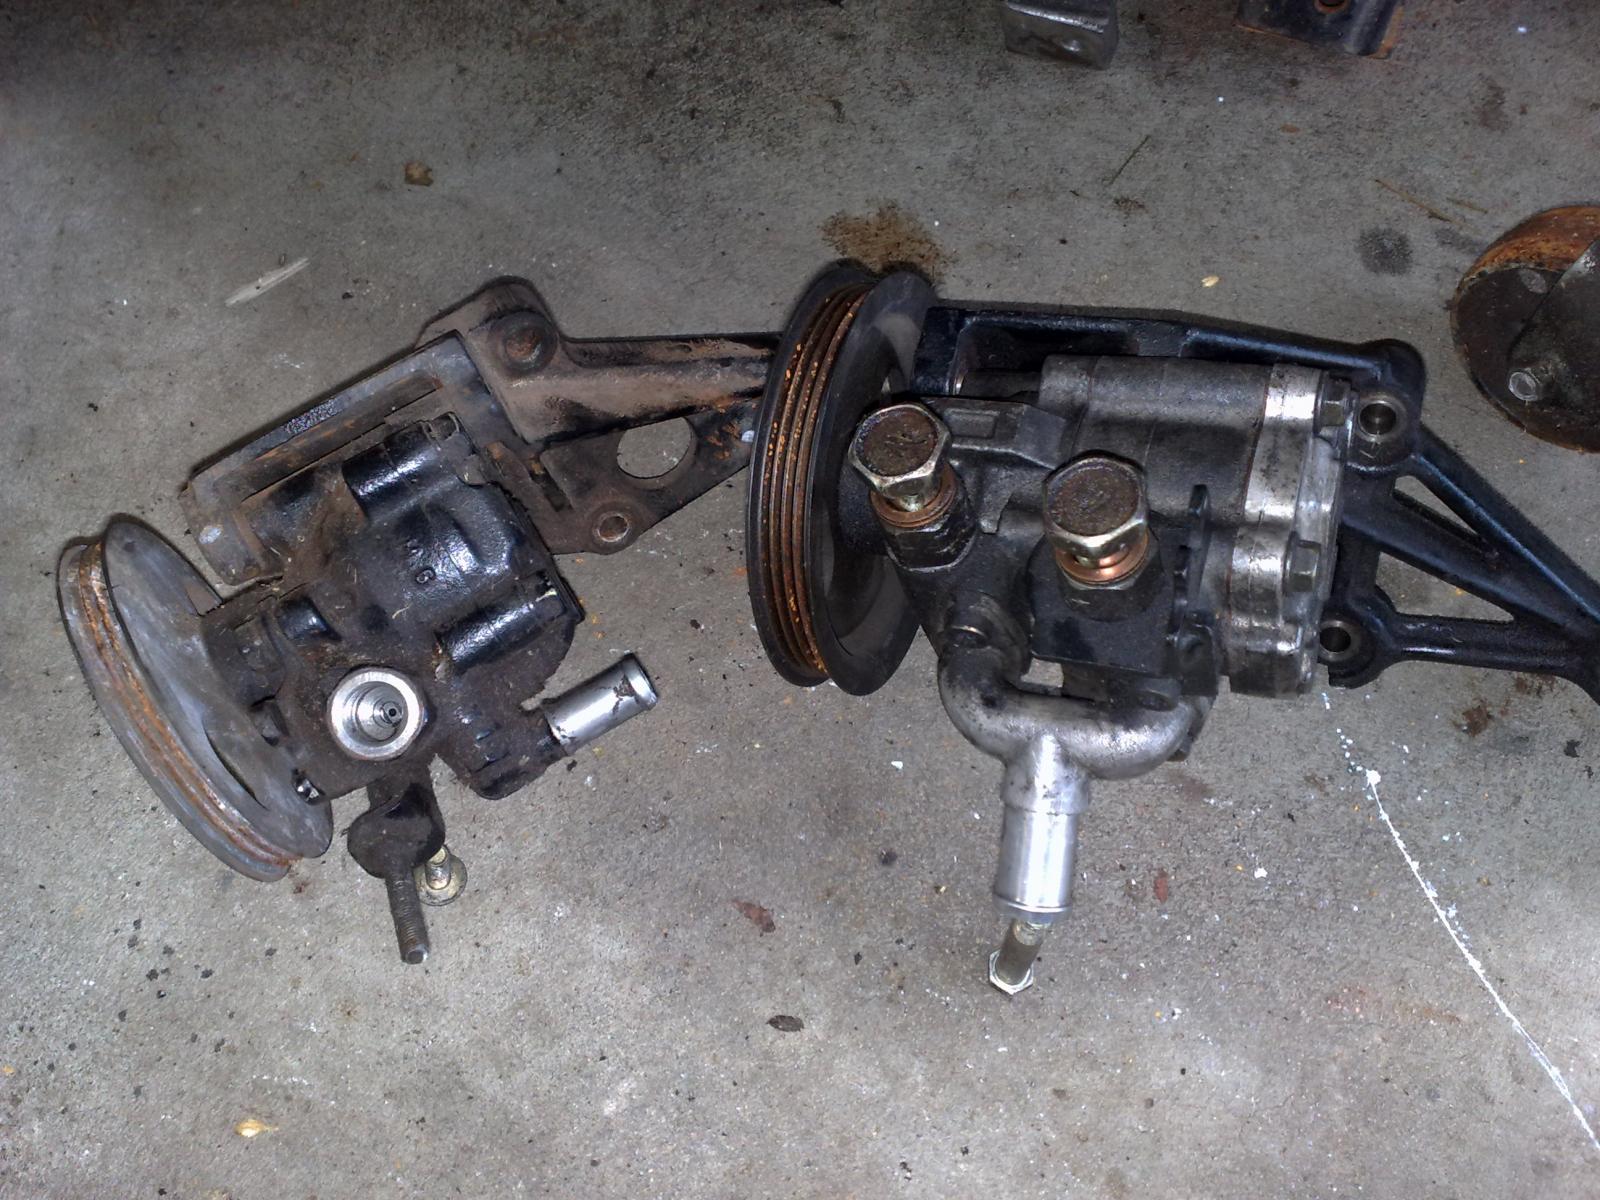
Shown here are the power steering pumps for comparison. The RB30 is on the left. You can see that the RB30 pump has a single feed, while the RB26 has two, this is due to the HICAS.
Download Full Size Image
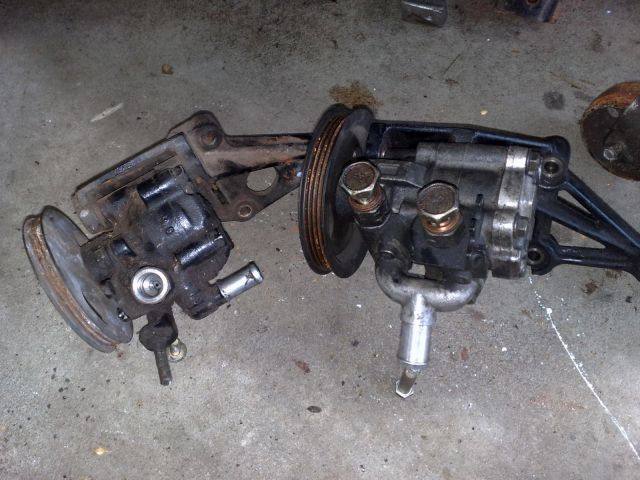
I will not be using the RB20/26 power steering pump because I am removing the HICAS completely from the car. I'll only need the one outlet from the pump to power the steering rack and as a result, I'll be using the the RB30 power steering bracket and pump. My angle grinder will remain packed away for now. I will only need to do a little modification to hoses and whatnot, but to me it's worth the effort.
Yes, I know what you're thinking...... I will lose the speed sensitive steering feature that the HICAS provides. Ummm.. to put it mildly, I don't give a fuck. It's as stupid as HICAS. You may not agree, but each to their own.
Okay, here's our first snag, though it's an easy fix.
Firstly, you can see by the image below that the RB30 and RB20 brackets have exactly the same bolt pattern. The RB30 is shown in the top of the image.
Download Full Size Image
Here's the issue. The RB20 bracket has a riser that will need to be cut off in order to fit on the RB30 block. This riser is there to accomodate for the fixing to the head on an RB20. The RB30 is taller so this point attaches to the block.
The best way to determine where to cut is to use a flat piece of sheet metal, or another flat thin rigid item, and lay it across the two level surfaces. Then make a mark from the top of the riser to the underside of the sheet metal and there's your cutting point. Use a cutting wheel on your angle grinder and you're set.
Download Full Size Image
Shown here are the power steering pumps for comparison. The RB30 is on the left. You can see that the RB30 pump has a single feed, while the RB26 has two, this is due to the HICAS.
Download Full Size Image
I will not be using the RB20/26 power steering pump because I am removing the HICAS completely from the car. I'll only need the one outlet from the pump to power the steering rack and as a result, I'll be using the the RB30 power steering bracket and pump. My angle grinder will remain packed away for now. I will only need to do a little modification to hoses and whatnot, but to me it's worth the effort.
Yes, I know what you're thinking...... I will lose the speed sensitive steering feature that the HICAS provides. Ummm.. to put it mildly, I don't give a fuck. It's as stupid as HICAS. You may not agree, but each to their own.
#6
Posted 02 July 2011 - 08:04 PM
2LV8ETR
-
- Vice President
-
- 3017 posts
Grampa Spec Cockhead
- Real Name:Allen
- LocationArmadale WA
- Car(s):RB30DET R32 Gts-t Sedan, Hilux SSR-G Surf 4x4
- Bike(s):Hyosung GT250-R, My wife...
Dipstick
Okey dokey. The dipstick and holder on the RB30 is shorter. The RB20 setup is longer as it needs to clear the DOHC inlet manifold. Have a gander at the images below to see what I'm on about. The RB30 is the image on top.
Download Full Size Image
Download Full Size Image
Again, it's an easy fix.
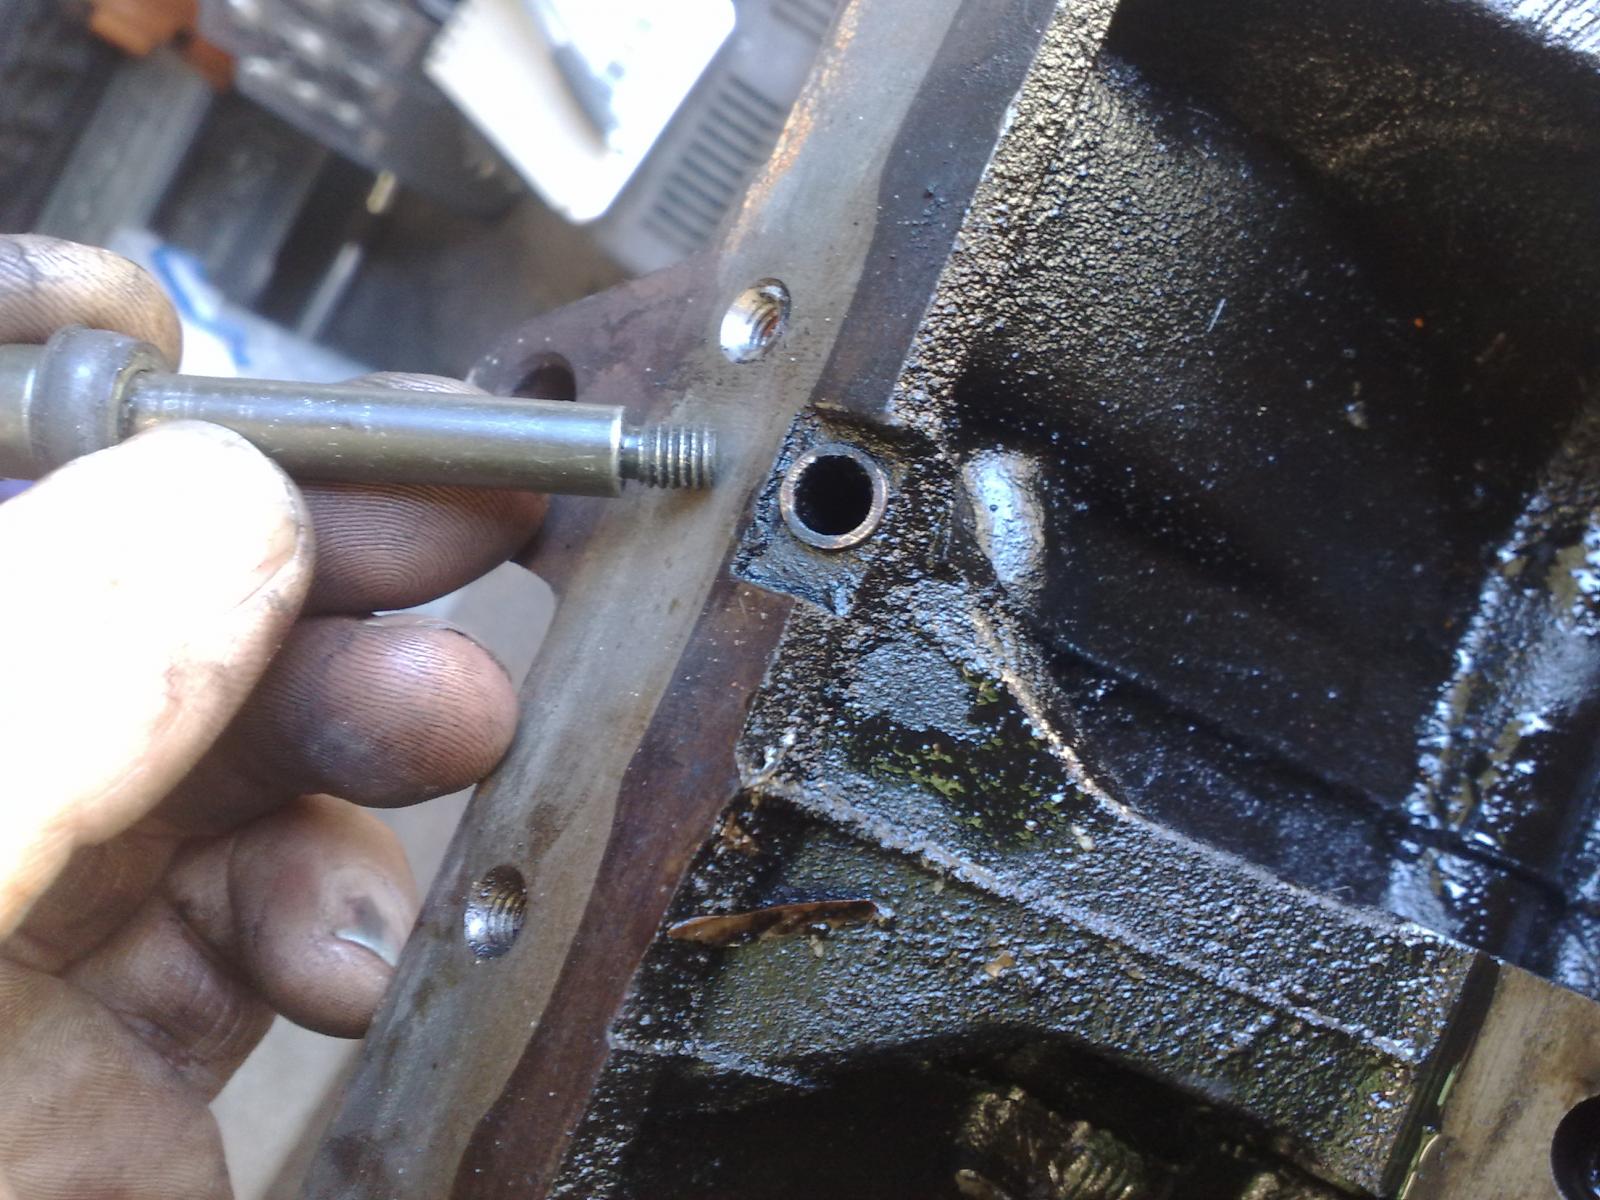
You'll need to remove the head from the RB30 anyway, so you'll have the perfect tool for the job. There's a bolt for the timing cover that you'll see in the images below. The sump will also need to be removed, so you will have access to the underside of the holder. Use the bolt to tap the holder out of the block from the crankcase.
Download Full Size Image

Download Full Size Image

Here's the holders side by side for comparison.
Download Full Size Image
The dipstick holder also interferes with the RB20 thermostat housing.
Download Full Size Image

Okey dokey. The dipstick and holder on the RB30 is shorter. The RB20 setup is longer as it needs to clear the DOHC inlet manifold. Have a gander at the images below to see what I'm on about. The RB30 is the image on top.
Download Full Size Image
Download Full Size Image
Again, it's an easy fix.
You'll need to remove the head from the RB30 anyway, so you'll have the perfect tool for the job. There's a bolt for the timing cover that you'll see in the images below. The sump will also need to be removed, so you will have access to the underside of the holder. Use the bolt to tap the holder out of the block from the crankcase.
Download Full Size Image
Download Full Size Image
Here's the holders side by side for comparison.
Download Full Size Image
The dipstick holder also interferes with the RB20 thermostat housing.
Download Full Size Image
#7
Posted 02 July 2011 - 08:39 PM
2LV8ETR
-
- Vice President
-
- 3017 posts
Grampa Spec Cockhead
- Real Name:Allen
- LocationArmadale WA
- Car(s):RB30DET R32 Gts-t Sedan, Hilux SSR-G Surf 4x4
- Bike(s):Hyosung GT250-R, My wife...
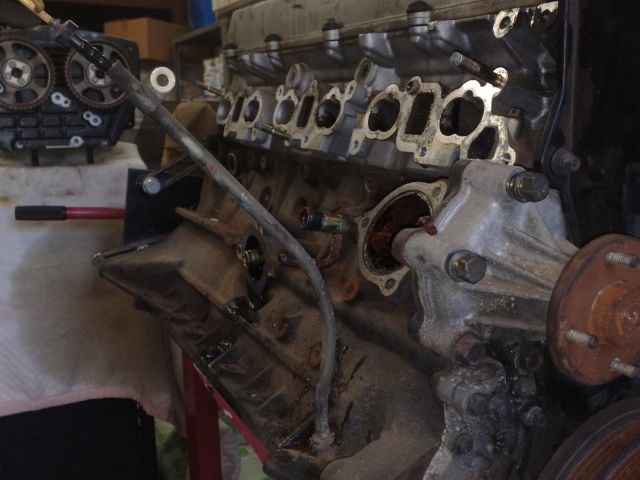
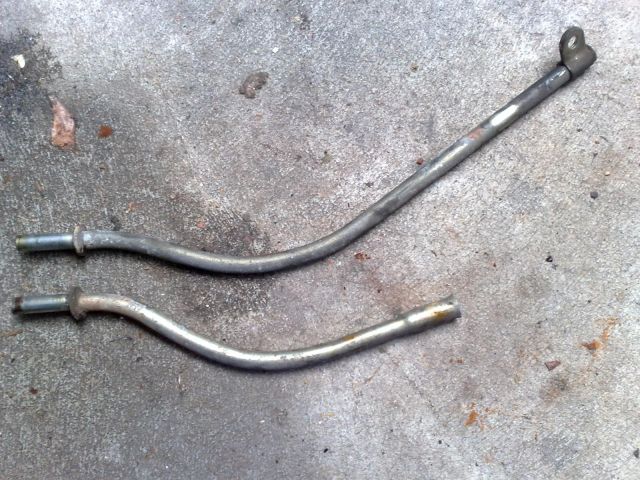
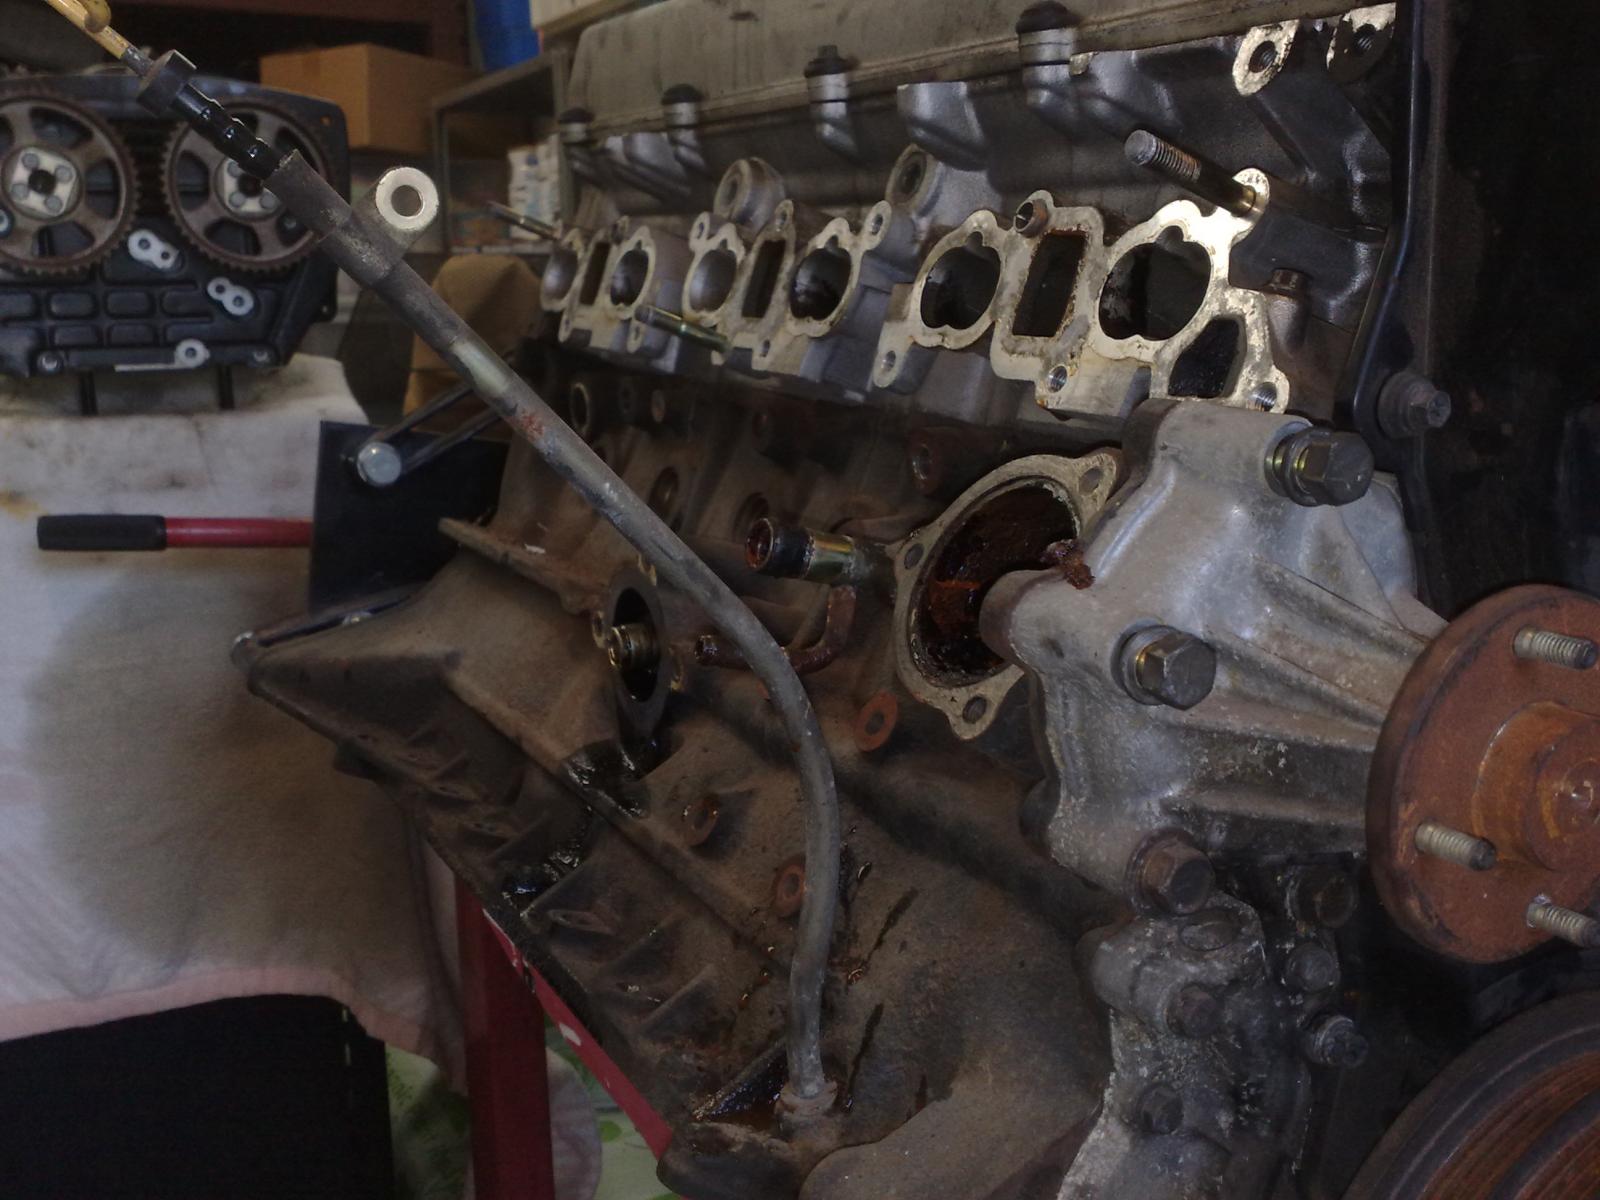
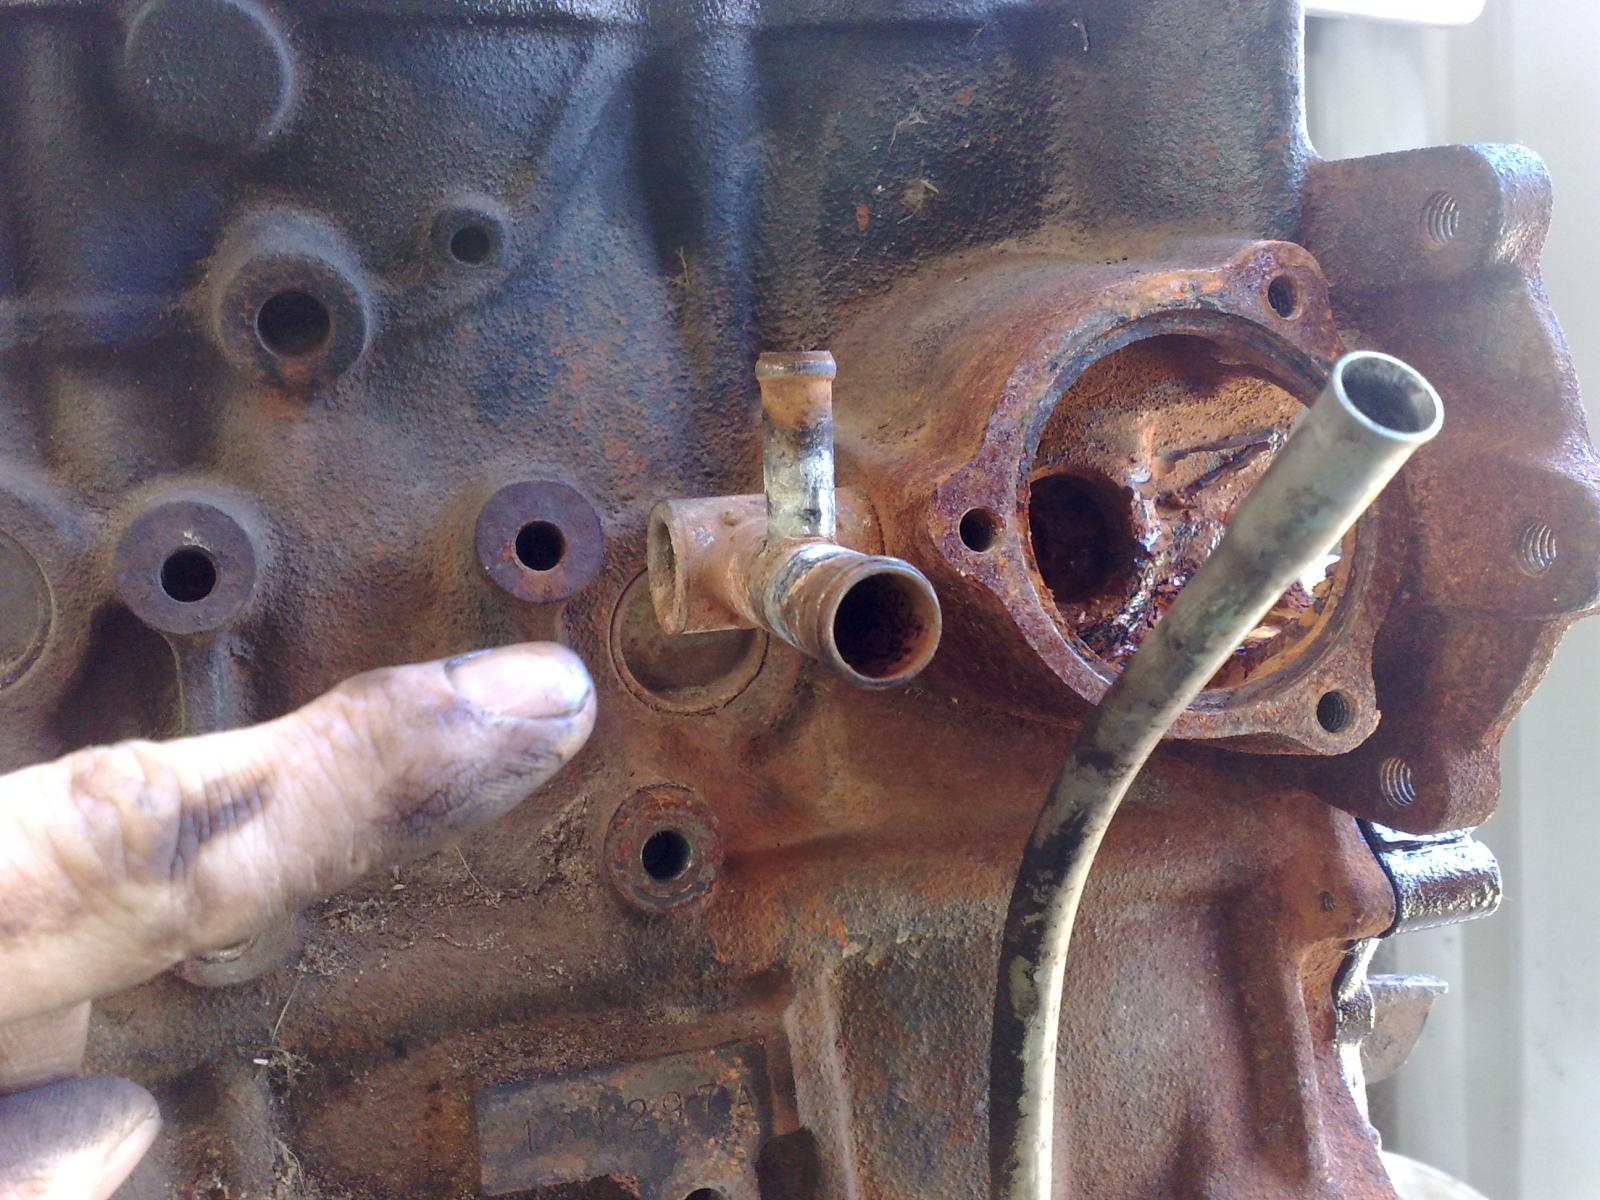
Heater Hose Feeds & Returns
The heater hose feeds and returns are also different and require swapping out. Have a look in the images below and you'll see the difference. The RB20 is shown in the top image.
Download Full Size Image
Download Full Size Image

Download Full Size Image
Download Full Size Image
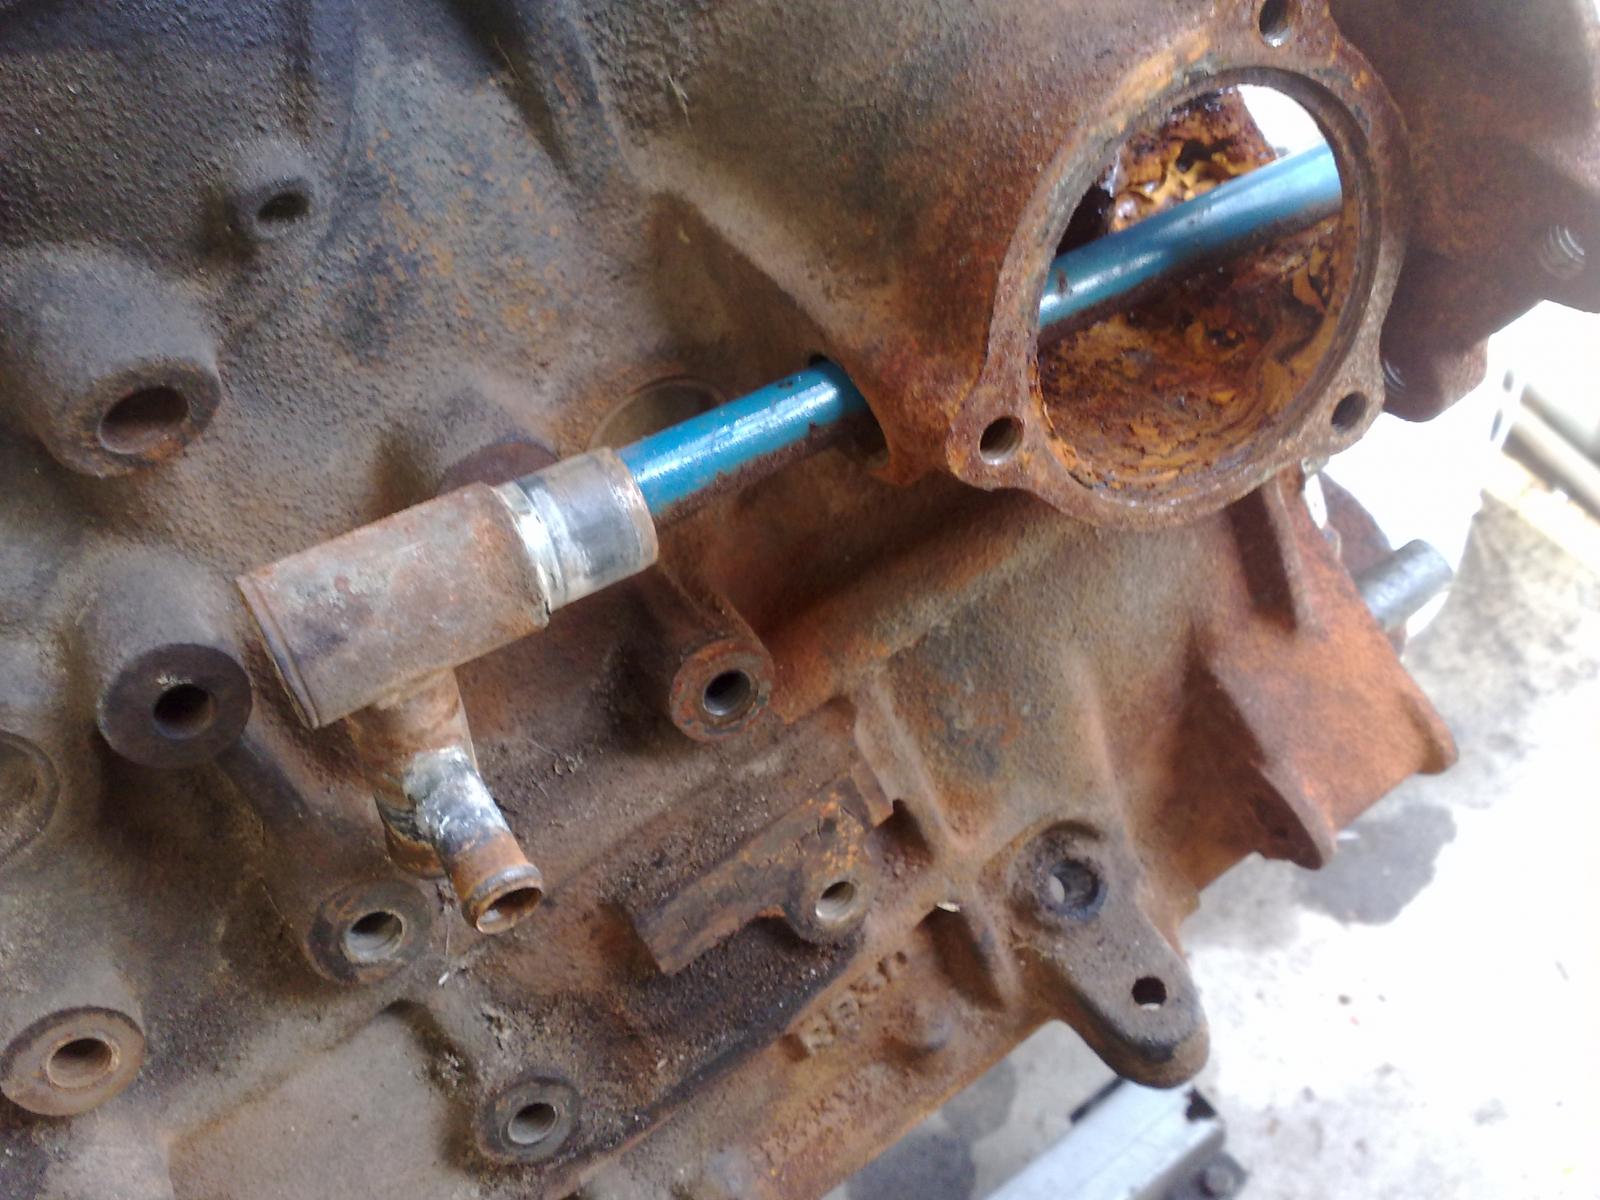
The return is easy enough to remove. Just use a spanner to extract it and you're set. The feed requires a little bit of a different approach.
These fittings are basically push fit and sealed with a bit of goop. Now don't grab hold of a pair of pliers and try and reef the bastard out, you'll only succeed in trashing the fitting.
Remove the water pump. Yes, you heard me. Remove it. Seriously, are you going to spend a lot of time, effort, and money doing this build and then skimp on a measley $80.00 for a brand new water pump? If your answer is yes, then slip on a loin cloth and go live in the desert.
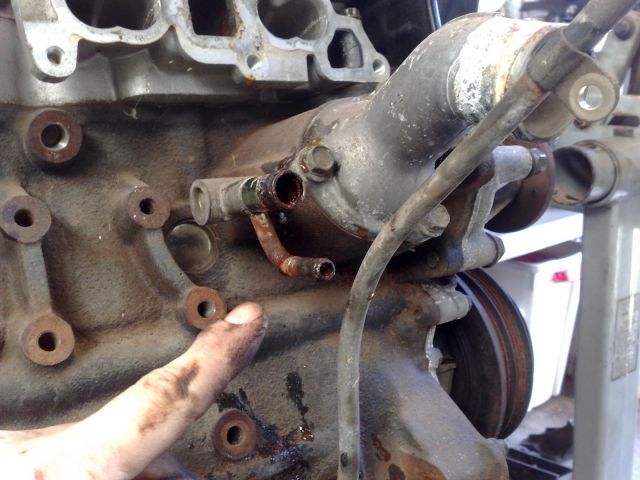
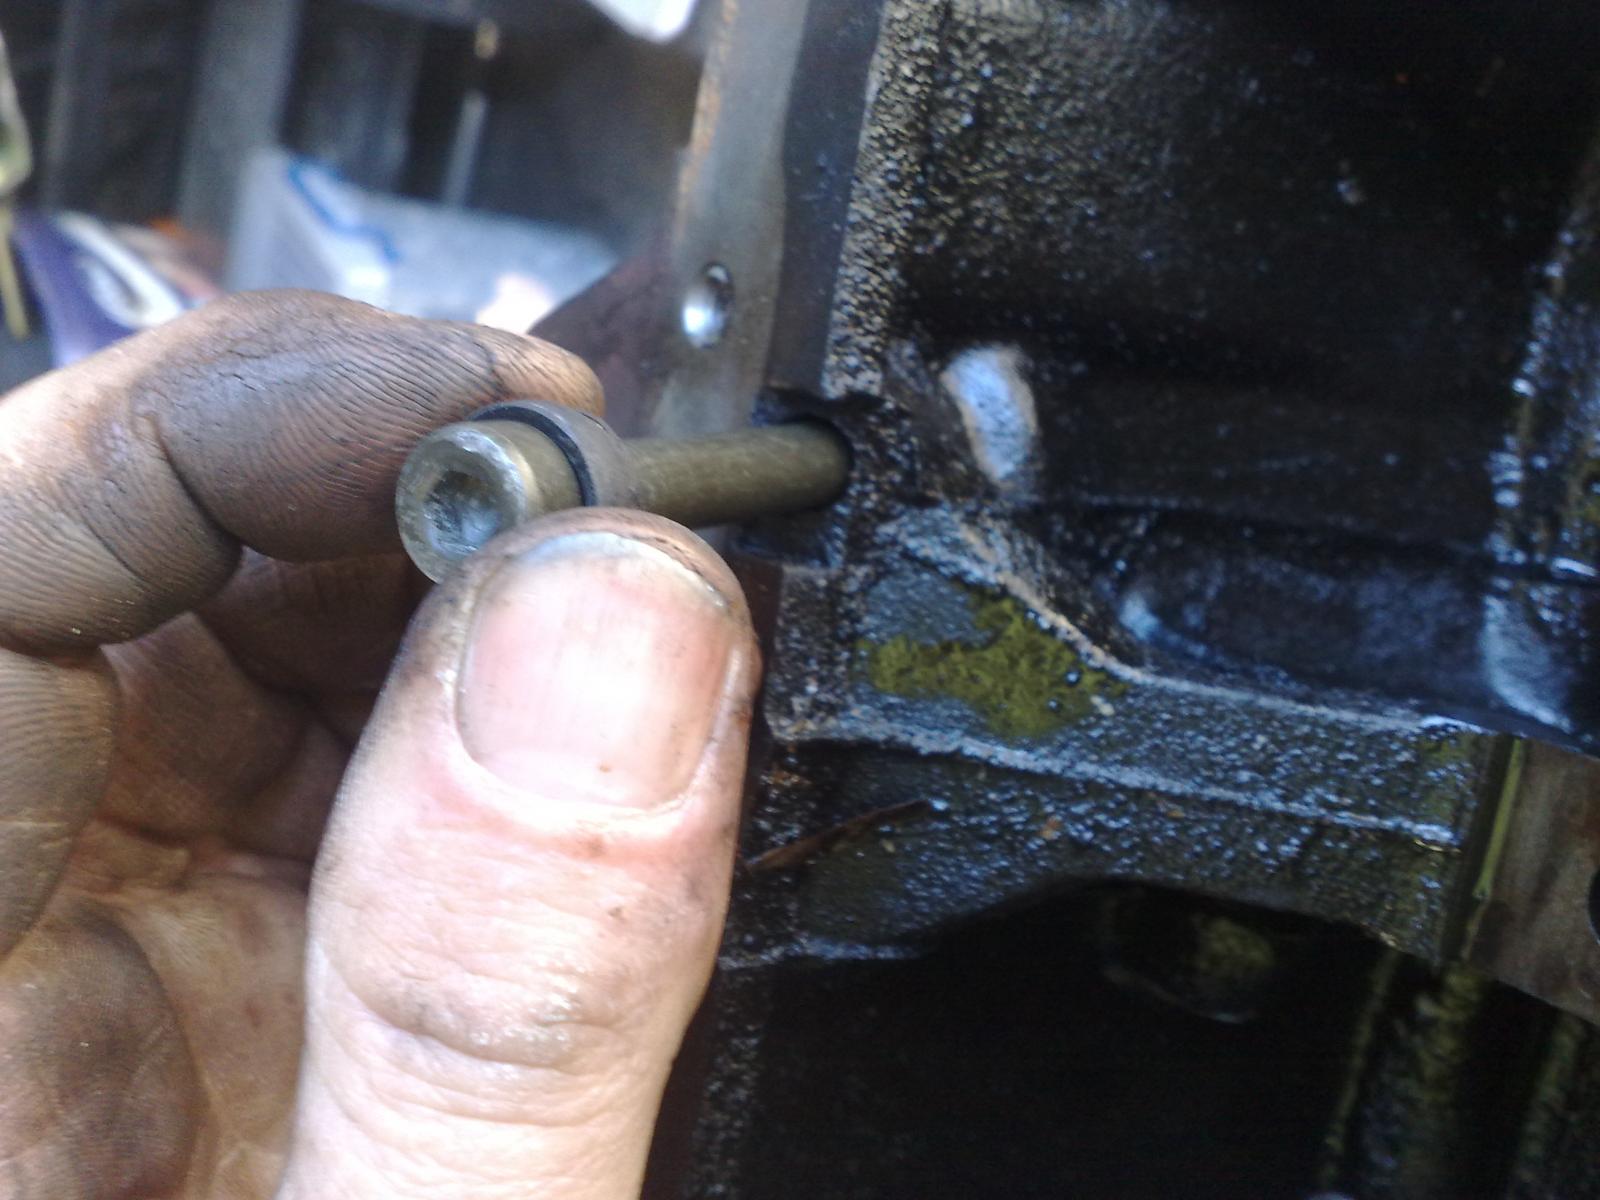
Once the pump is removed, you have a clear access point to gently tap out the fittings. Have a look in the images below and see how it's done.
Download Full Size Image
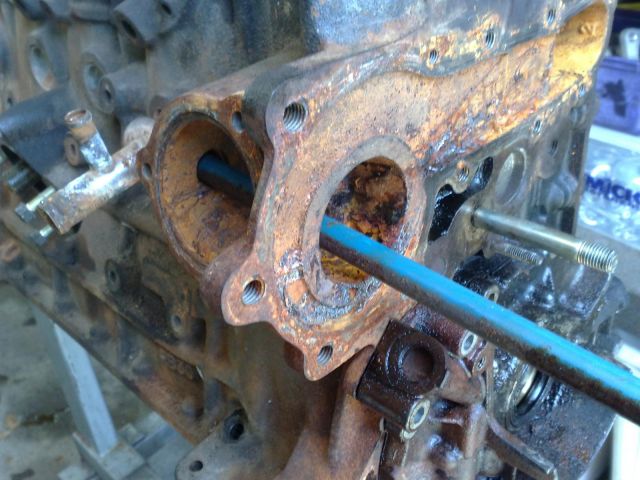
Just use a steel rod, a drift, or a socket extension and come in through the now vacant water pump cavity. Rest the drift up against the back of the fitting and GENTLY tap it out of it's seat.
Download Full Size Image

The heater hose feeds and returns are also different and require swapping out. Have a look in the images below and you'll see the difference. The RB20 is shown in the top image.
Download Full Size Image
Download Full Size Image
Download Full Size Image
Download Full Size Image
The return is easy enough to remove. Just use a spanner to extract it and you're set. The feed requires a little bit of a different approach.
These fittings are basically push fit and sealed with a bit of goop. Now don't grab hold of a pair of pliers and try and reef the bastard out, you'll only succeed in trashing the fitting.
Remove the water pump. Yes, you heard me. Remove it. Seriously, are you going to spend a lot of time, effort, and money doing this build and then skimp on a measley $80.00 for a brand new water pump? If your answer is yes, then slip on a loin cloth and go live in the desert.
Once the pump is removed, you have a clear access point to gently tap out the fittings. Have a look in the images below and see how it's done.
Download Full Size Image
Just use a steel rod, a drift, or a socket extension and come in through the now vacant water pump cavity. Rest the drift up against the back of the fitting and GENTLY tap it out of it's seat.
Download Full Size Image
#8
Posted 02 July 2011 - 08:46 PM
2LV8ETR
-
- Vice President
-
- 3017 posts
Grampa Spec Cockhead
- Real Name:Allen
- LocationArmadale WA
- Car(s):RB30DET R32 Gts-t Sedan, Hilux SSR-G Surf 4x4
- Bike(s):Hyosung GT250-R, My wife...
Knock Sensors
I was a bit puzzled at this one. With the research I had done, I was led to believe that you cannot use the knock sensors with the RB30 block.
Ummmmm.......
Download Full Size Image
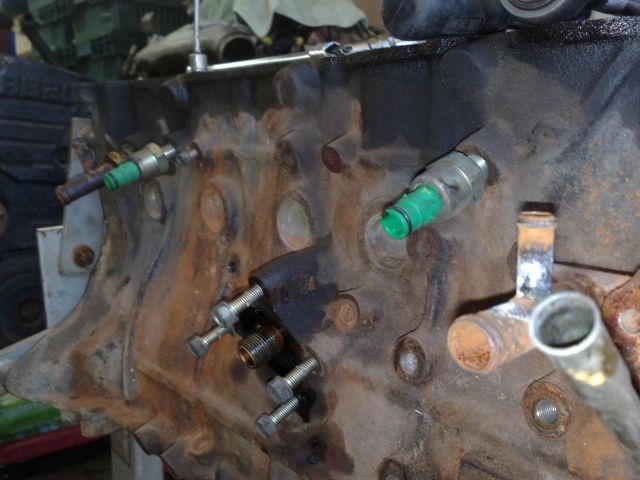
You see those green things in the image above? Those are the knock sensors screwed into position.
Update I have since discovered that the issue is with the RB26 knock sensors.
I was a bit puzzled at this one. With the research I had done, I was led to believe that you cannot use the knock sensors with the RB30 block.
Ummmmm.......
Download Full Size Image
You see those green things in the image above? Those are the knock sensors screwed into position.
Update I have since discovered that the issue is with the RB26 knock sensors.
#9
Posted 02 July 2011 - 08:54 PM
2LV8ETR
-
- Vice President
-
- 3017 posts
Grampa Spec Cockhead
- Real Name:Allen
- LocationArmadale WA
- Car(s):RB30DET R32 Gts-t Sedan, Hilux SSR-G Surf 4x4
- Bike(s):Hyosung GT250-R, My wife...
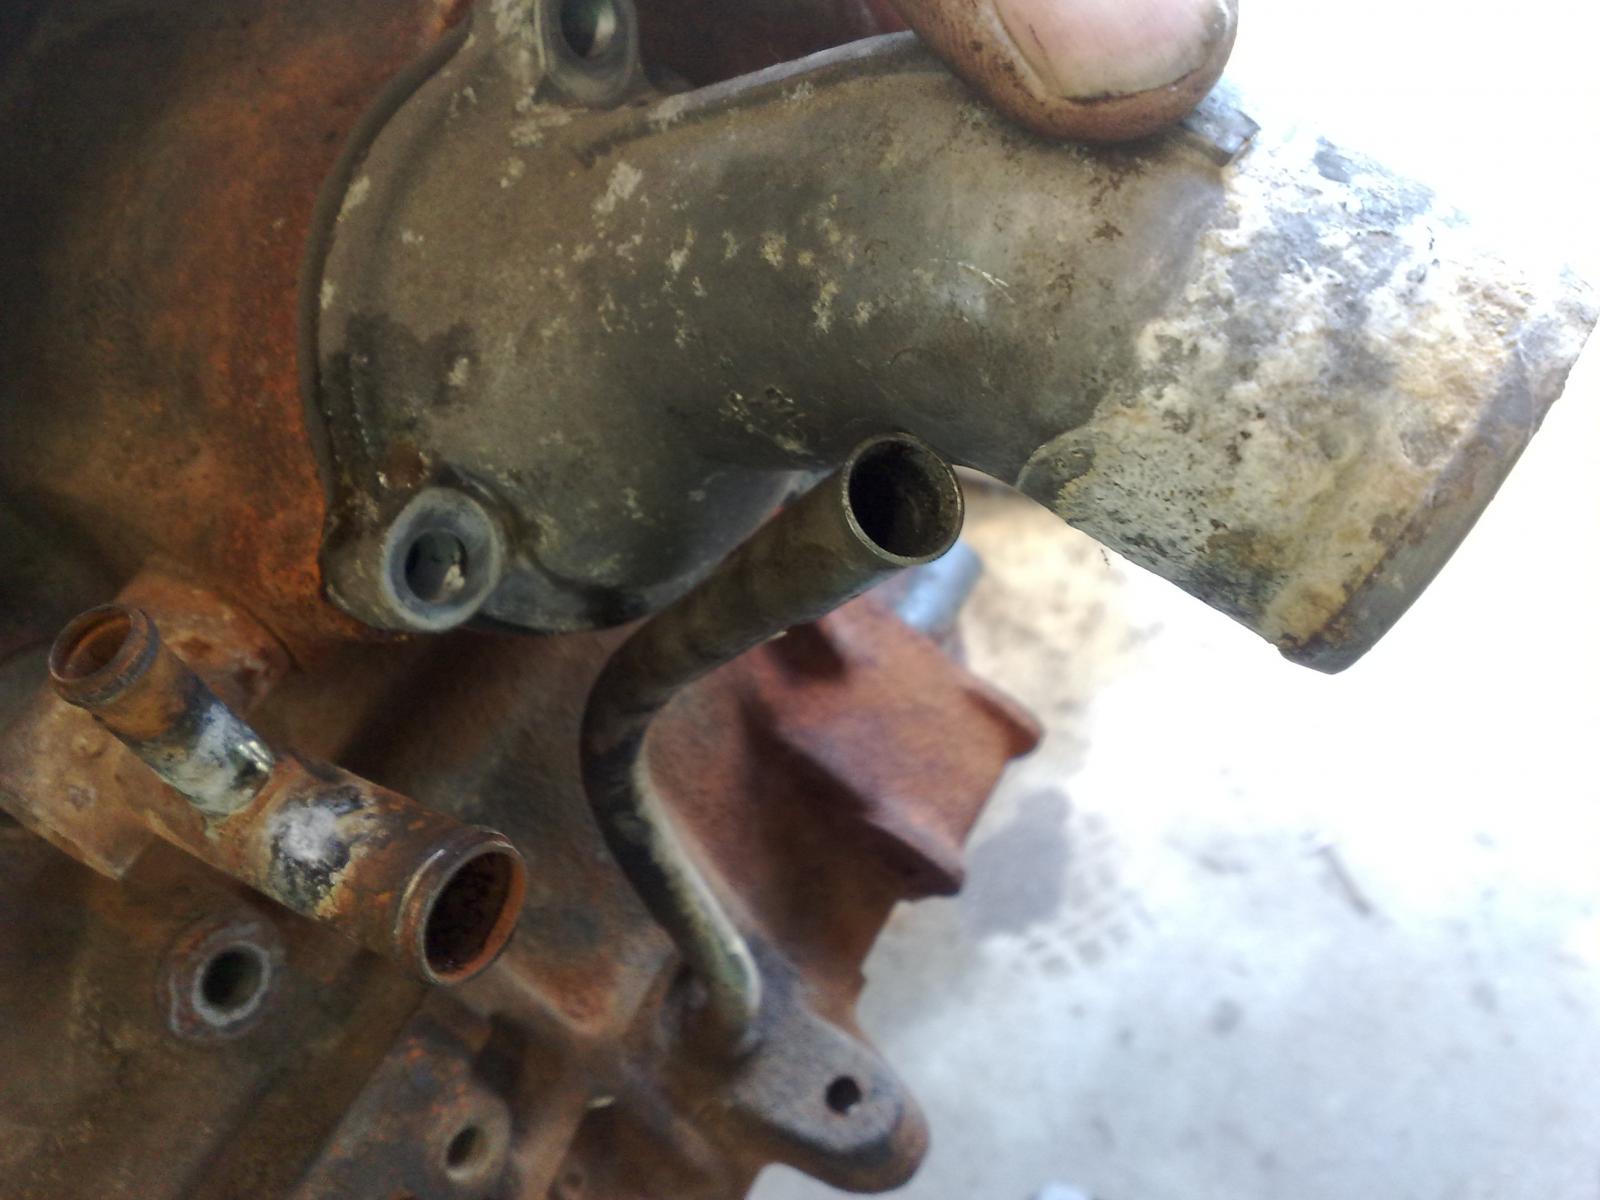
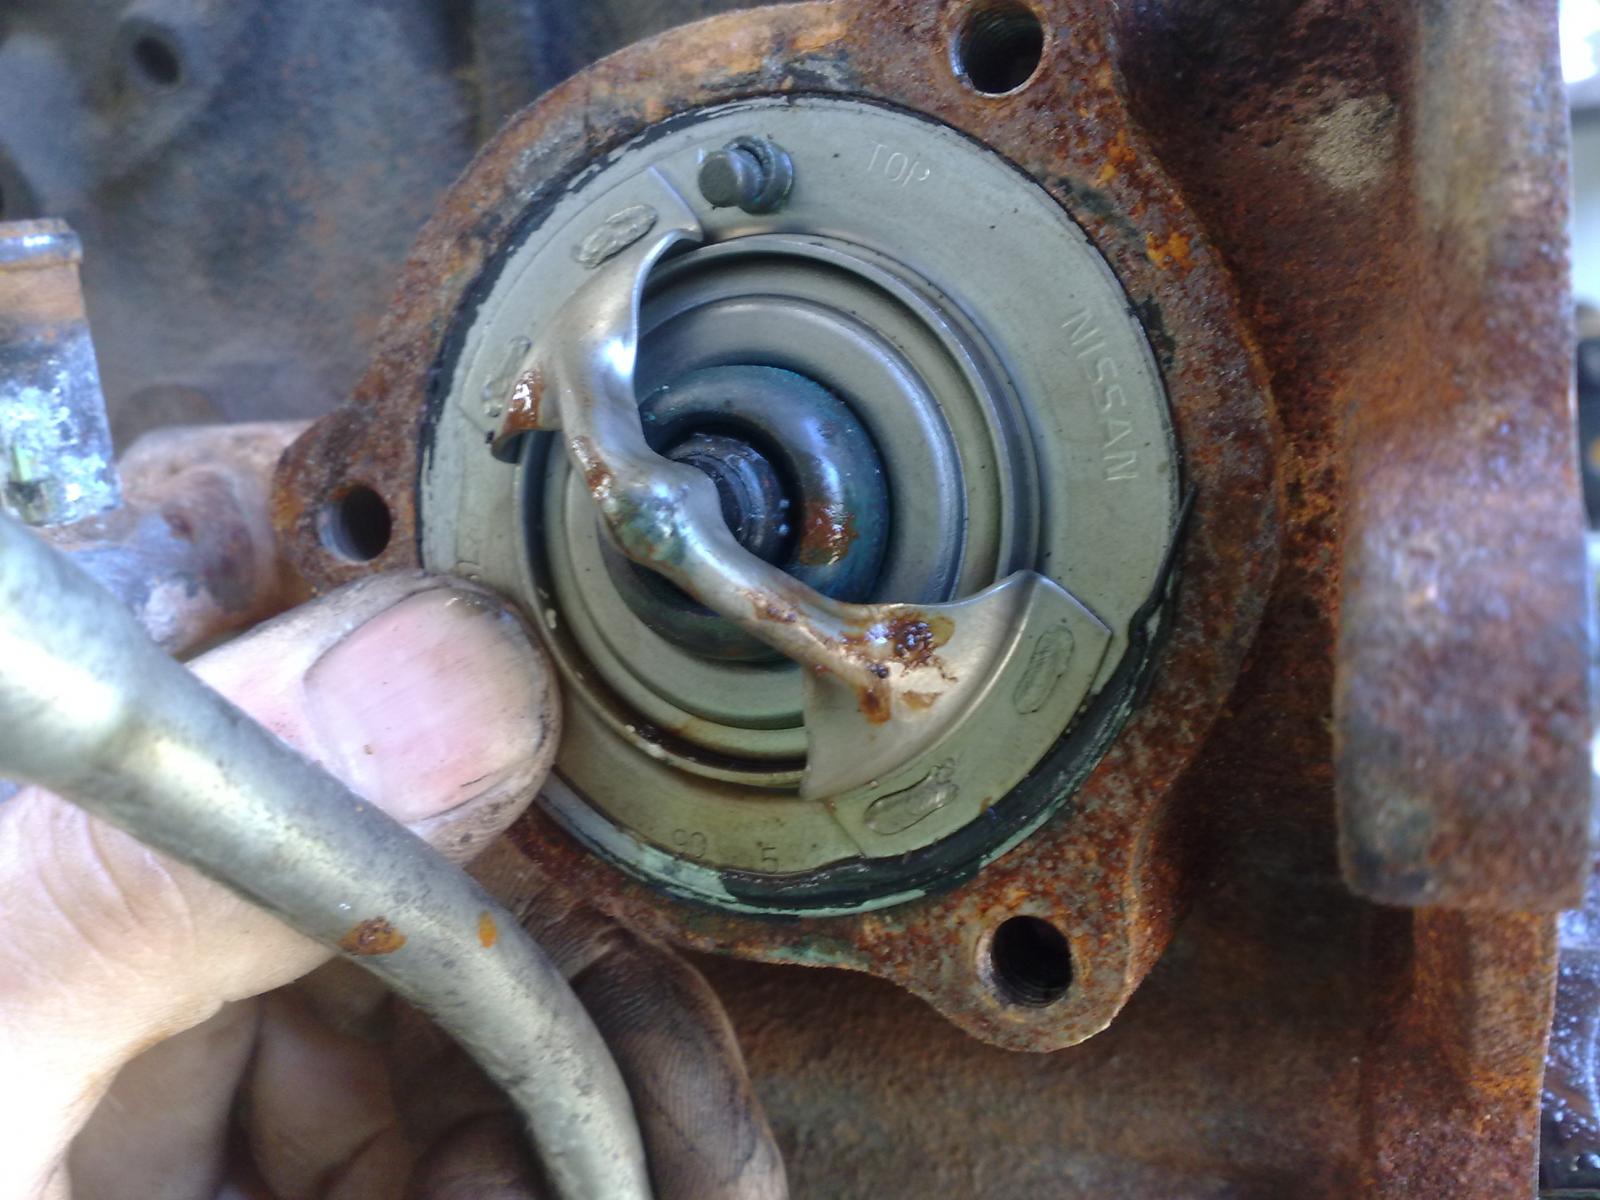
Water Pump, Thermostat & Housing
All GTR, R32 RB20/25 & VL/R31 RB30 water pumps and thermostats are interchangeable. R33 RB25 water pumps have a slightly different bolt up pattern. The RB26 N1 water pump has an anti-cavitation feature and a higher flow rate.
You will be required to use the RB20 thermostat housing to allow for stock hose positioning. The top image shows the RB20 housing in it's location, the second is the RB30 in location, and the third shows the RB20 thermostat in the RB30 seat.
The fouling with the dipstick holder was addressed in another section above.
Download Full Size Image

Download Full Size Image
Download Full Size Image

All GTR, R32 RB20/25 & VL/R31 RB30 water pumps and thermostats are interchangeable. R33 RB25 water pumps have a slightly different bolt up pattern. The RB26 N1 water pump has an anti-cavitation feature and a higher flow rate.
You will be required to use the RB20 thermostat housing to allow for stock hose positioning. The top image shows the RB20 housing in it's location, the second is the RB30 in location, and the third shows the RB20 thermostat in the RB30 seat.
The fouling with the dipstick holder was addressed in another section above.
Download Full Size Image
Download Full Size Image
Download Full Size Image
#10
Posted 02 July 2011 - 09:21 PM
2LV8ETR
-
- Vice President
-
- 3017 posts
Grampa Spec Cockhead
- Real Name:Allen
- LocationArmadale WA
- Car(s):RB30DET R32 Gts-t Sedan, Hilux SSR-G Surf 4x4
- Bike(s):Hyosung GT250-R, My wife...
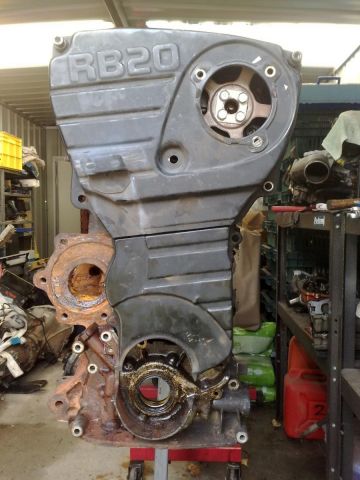
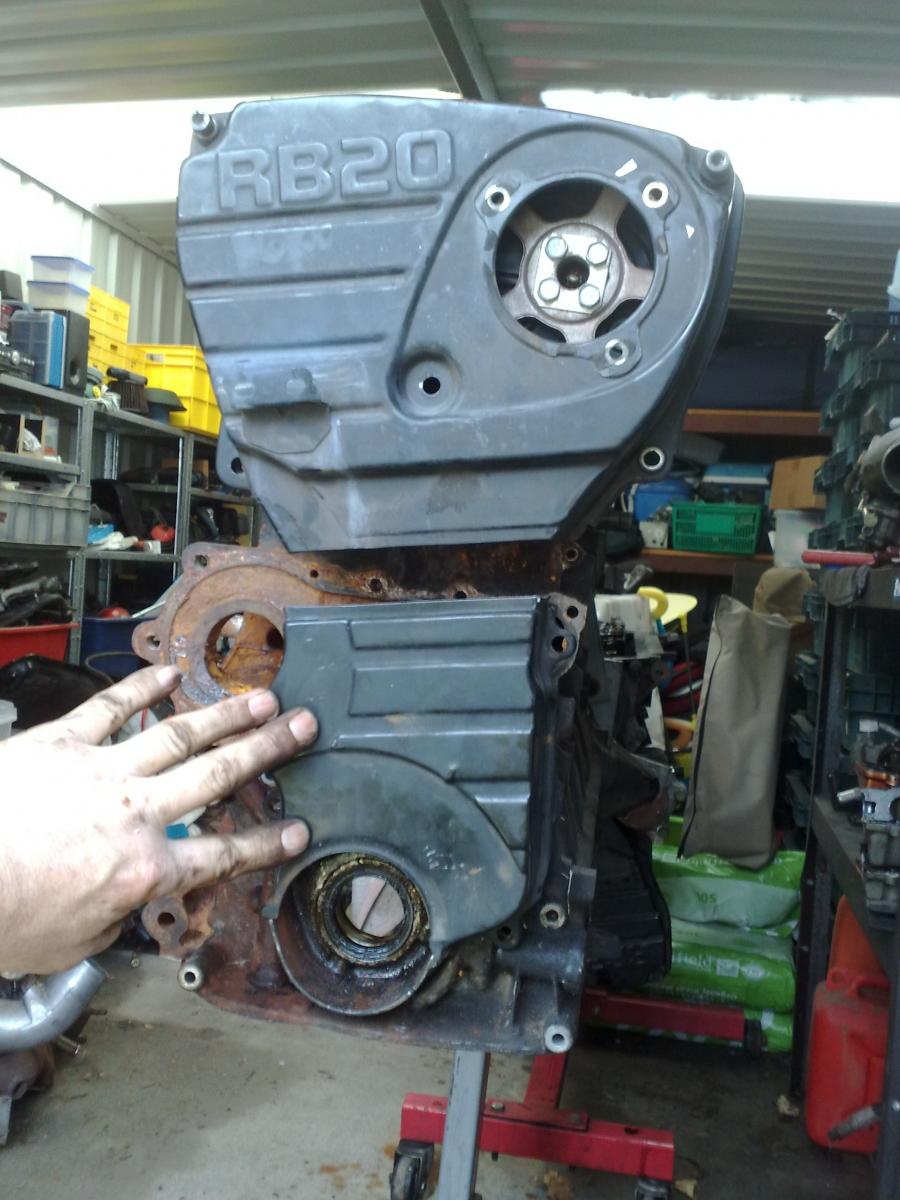
Timing Belt Covers
This is a problem that I will address a little bit later on. Because the RB30 is a taller block, the timing covers won't marry up and seal. I think my solution to this will be to make up an extension for the lower cover by either using a piece of another cover, or to fabricate an extension. Either way, I will endeavour to seal it up.
You may wish to keep the covers off altogether and go for the racey look, but the last thing I need is to be pulled over by the pigs and be defected for something so obvious. I have a hard enough time from the pricks as it is, and I don't want to have to swap in a stock RB20 every time I get hassled by the wankers. Anyway, back on track.
I temporarily fitted the RB25DE head to the RB30 block to get a rough indication of what I'll be having to tackle. This image shows the covers nipped up and sealed. Take note of the lower area where the harmonic balancer will reside.
Download Full Size Image
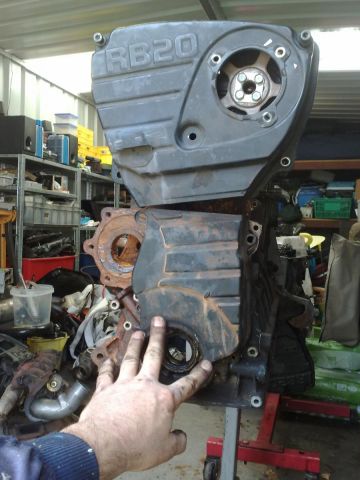
Now have a look at when I set the lower cover into it's home. Notice the gap.
Download Full Size Image
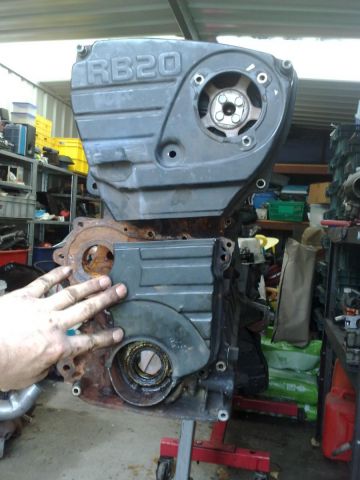
This is the gap where I'll need to make something up.
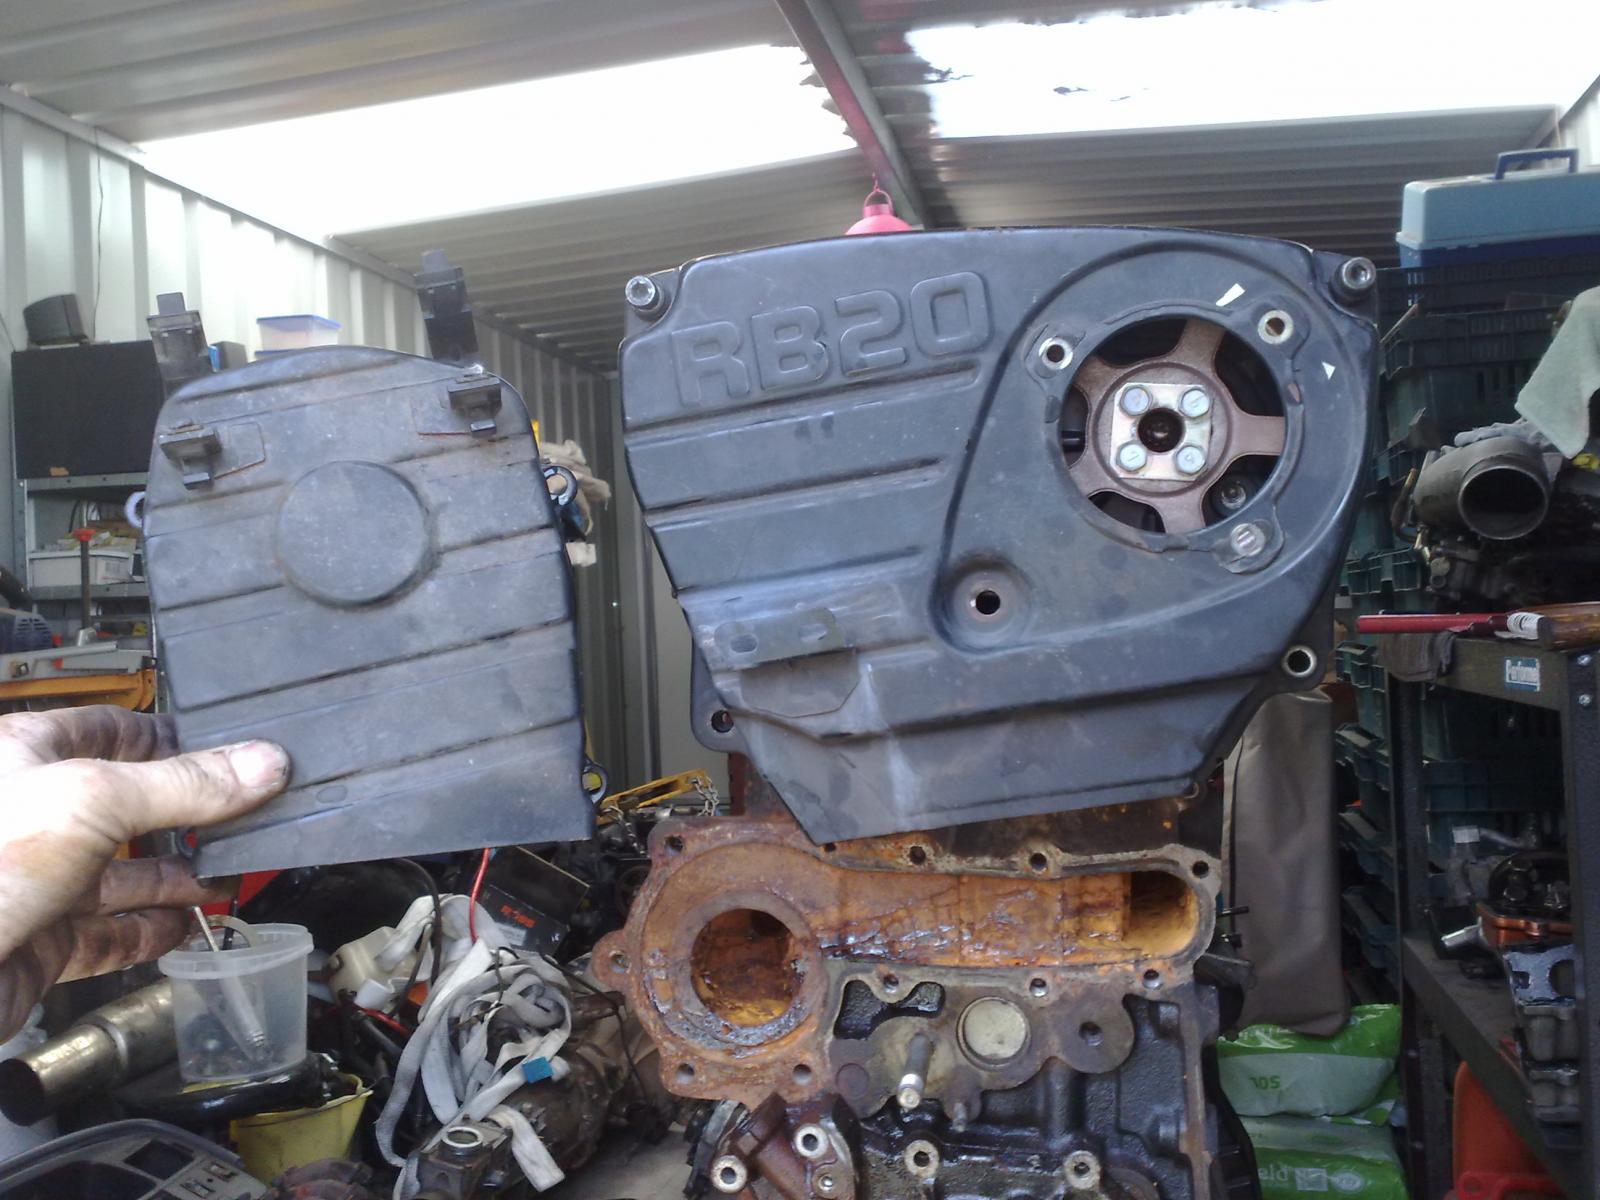
Just out of curiosity, I have taken a pic of the RB30 lower timing cover held into position.
Download Full Size Image
Which way I go at this point in time is a mystery, but I will address the issue and let you know how I went about solving it.
Just for posterity, I have taken a pic of the RB20DOHC and RB30SOHC upper timing covers side by side for comparison.
Download Full Size Image

This is a problem that I will address a little bit later on. Because the RB30 is a taller block, the timing covers won't marry up and seal. I think my solution to this will be to make up an extension for the lower cover by either using a piece of another cover, or to fabricate an extension. Either way, I will endeavour to seal it up.
You may wish to keep the covers off altogether and go for the racey look, but the last thing I need is to be pulled over by the pigs and be defected for something so obvious. I have a hard enough time from the pricks as it is, and I don't want to have to swap in a stock RB20 every time I get hassled by the wankers. Anyway, back on track.
I temporarily fitted the RB25DE head to the RB30 block to get a rough indication of what I'll be having to tackle. This image shows the covers nipped up and sealed. Take note of the lower area where the harmonic balancer will reside.
Download Full Size Image
Now have a look at when I set the lower cover into it's home. Notice the gap.
Download Full Size Image
This is the gap where I'll need to make something up.
Just out of curiosity, I have taken a pic of the RB30 lower timing cover held into position.
Download Full Size Image
Which way I go at this point in time is a mystery, but I will address the issue and let you know how I went about solving it.
Just for posterity, I have taken a pic of the RB20DOHC and RB30SOHC upper timing covers side by side for comparison.
Download Full Size Image
#11
Posted 02 July 2011 - 09:24 PM
2LV8ETR
-
- Vice President
-
- 3017 posts
Grampa Spec Cockhead
- Real Name:Allen
- LocationArmadale WA
- Car(s):RB30DET R32 Gts-t Sedan, Hilux SSR-G Surf 4x4
- Bike(s):Hyosung GT250-R, My wife...
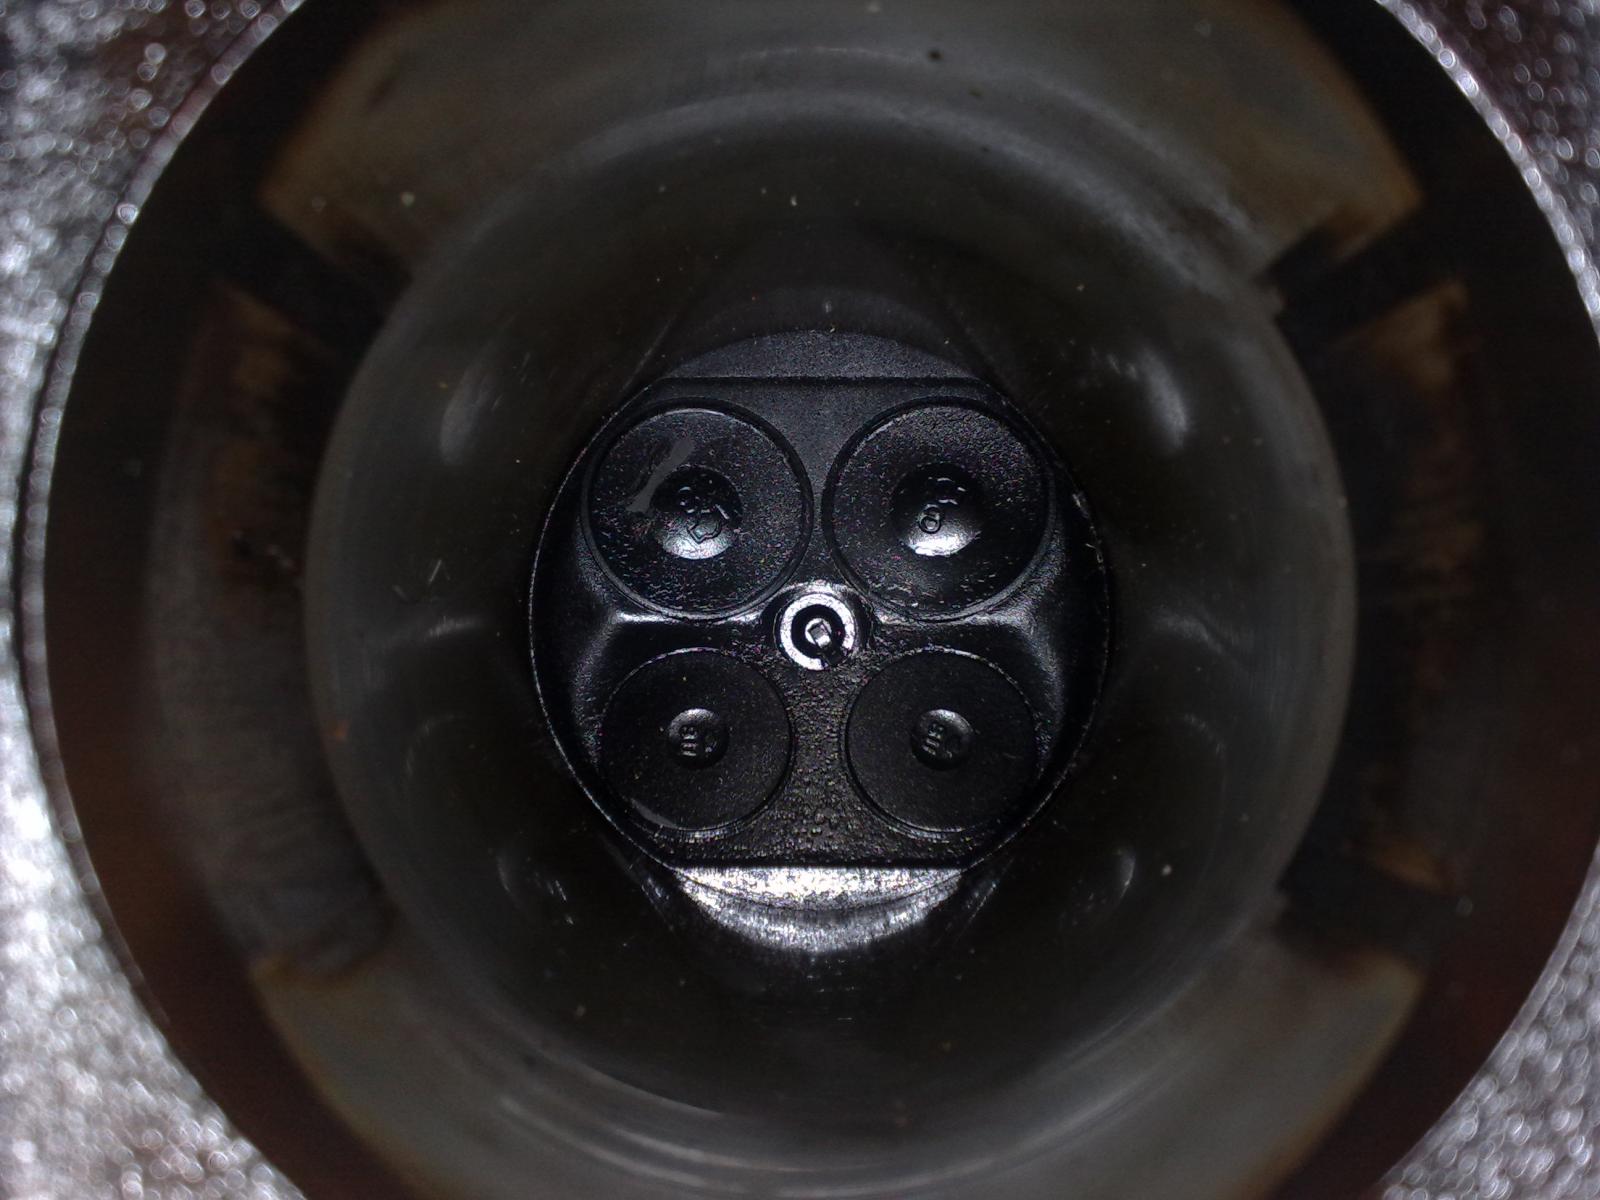
Head
This has nothing to do with anything. But while I had the head on the block, I took a pic through the bore to the head. Why you ask? Fuck knows. I just did.
Download Full Size Image

This has nothing to do with anything. But while I had the head on the block, I took a pic through the bore to the head. Why you ask? Fuck knows. I just did.
Download Full Size Image
#12
Posted 02 July 2011 - 09:30 PM
2LV8ETR
-
- Vice President
-
- 3017 posts
Grampa Spec Cockhead
- Real Name:Allen
- LocationArmadale WA
- Car(s):RB30DET R32 Gts-t Sedan, Hilux SSR-G Surf 4x4
- Bike(s):Hyosung GT250-R, My wife...
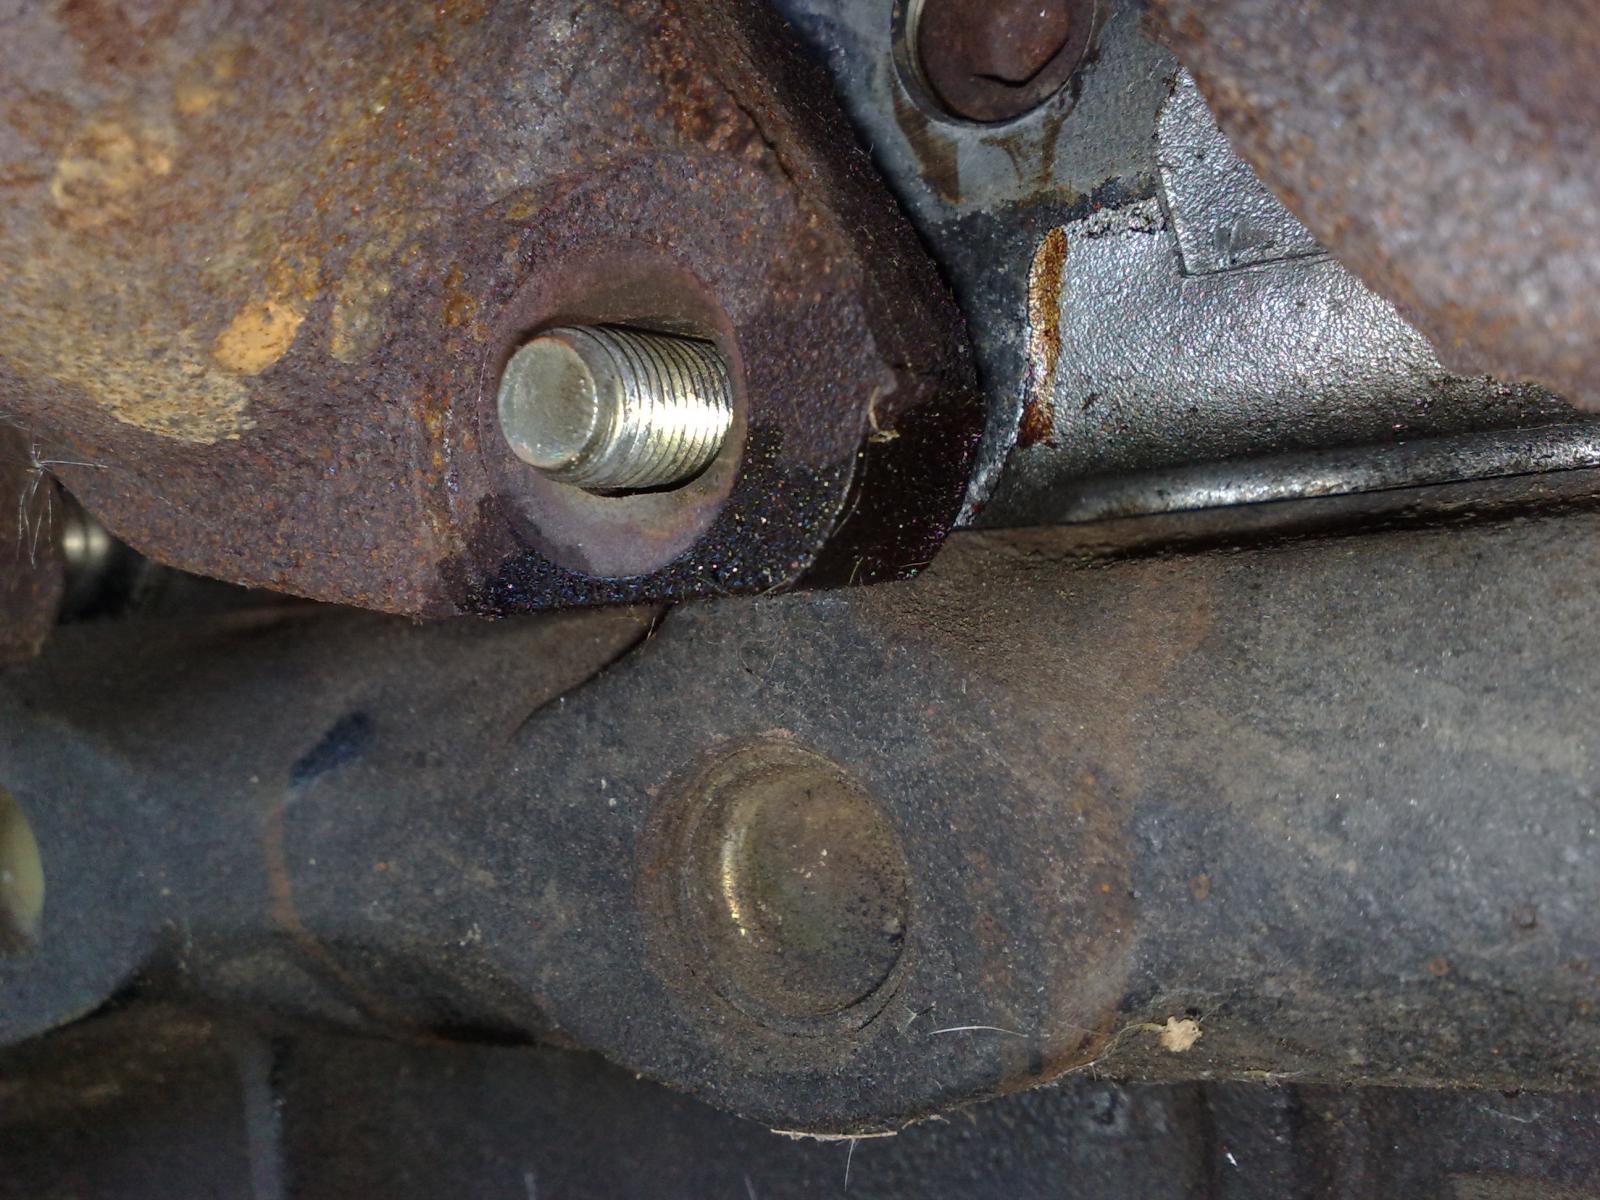
Exhaust Manifold
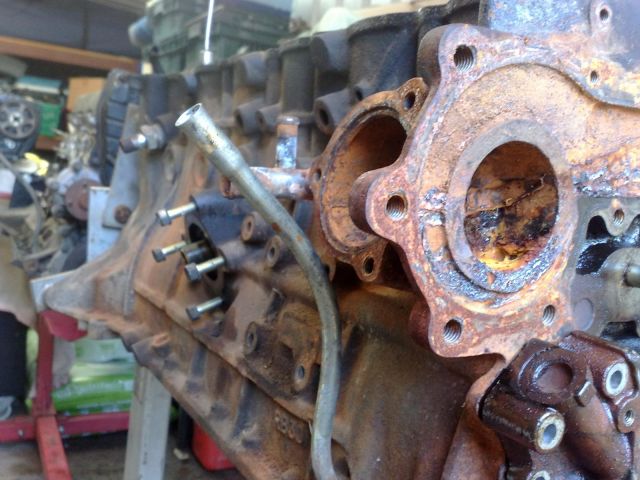
There is an issue with the exhaust manifold and the RB30 block. Have a look in the image below, it shows the head on the block, and the fouling with the casting on the block.
Download Full Size Image
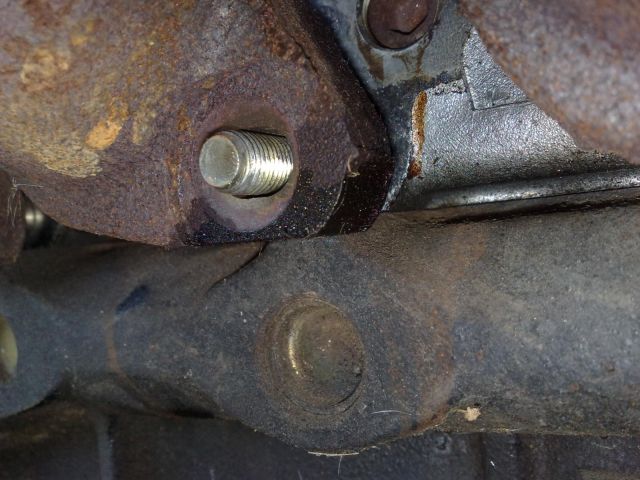
I drew a line in pencil at the bottom of the manifold, then removed it. What you now see below is the amount of material that needs to be ground off so that clearance can be achieved.
Download Full Size Image
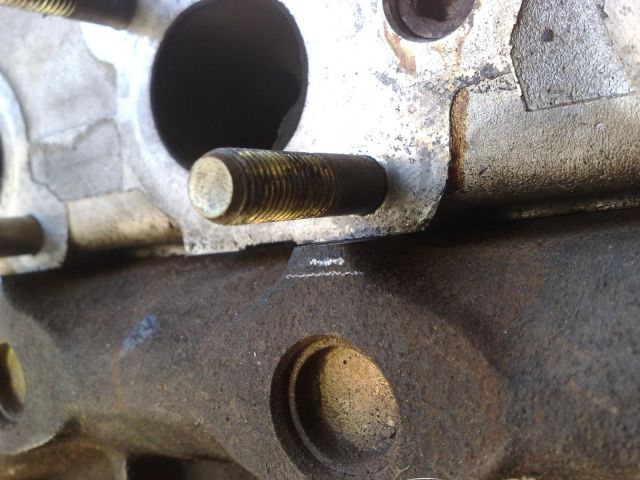
I'll get into this a little later down the track and show you how I went about things. Just try to keep in mind that at the moment, everything is all just trial fitting to see what I'm up against. All of the detailed step by step work will follow.
There is an issue with the exhaust manifold and the RB30 block. Have a look in the image below, it shows the head on the block, and the fouling with the casting on the block.
Download Full Size Image
I drew a line in pencil at the bottom of the manifold, then removed it. What you now see below is the amount of material that needs to be ground off so that clearance can be achieved.
Download Full Size Image
I'll get into this a little later down the track and show you how I went about things. Just try to keep in mind that at the moment, everything is all just trial fitting to see what I'm up against. All of the detailed step by step work will follow.
#13
Posted 02 July 2011 - 09:37 PM
2LV8ETR
-
- Vice President
-
- 3017 posts
Grampa Spec Cockhead
- Real Name:Allen
- LocationArmadale WA
- Car(s):RB30DET R32 Gts-t Sedan, Hilux SSR-G Surf 4x4
- Bike(s):Hyosung GT250-R, My wife...
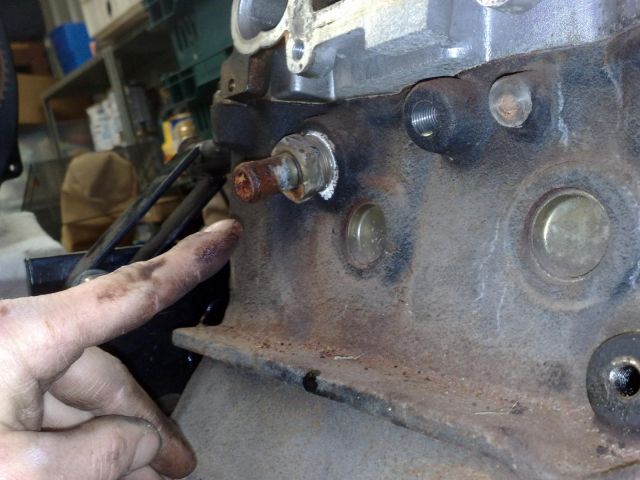
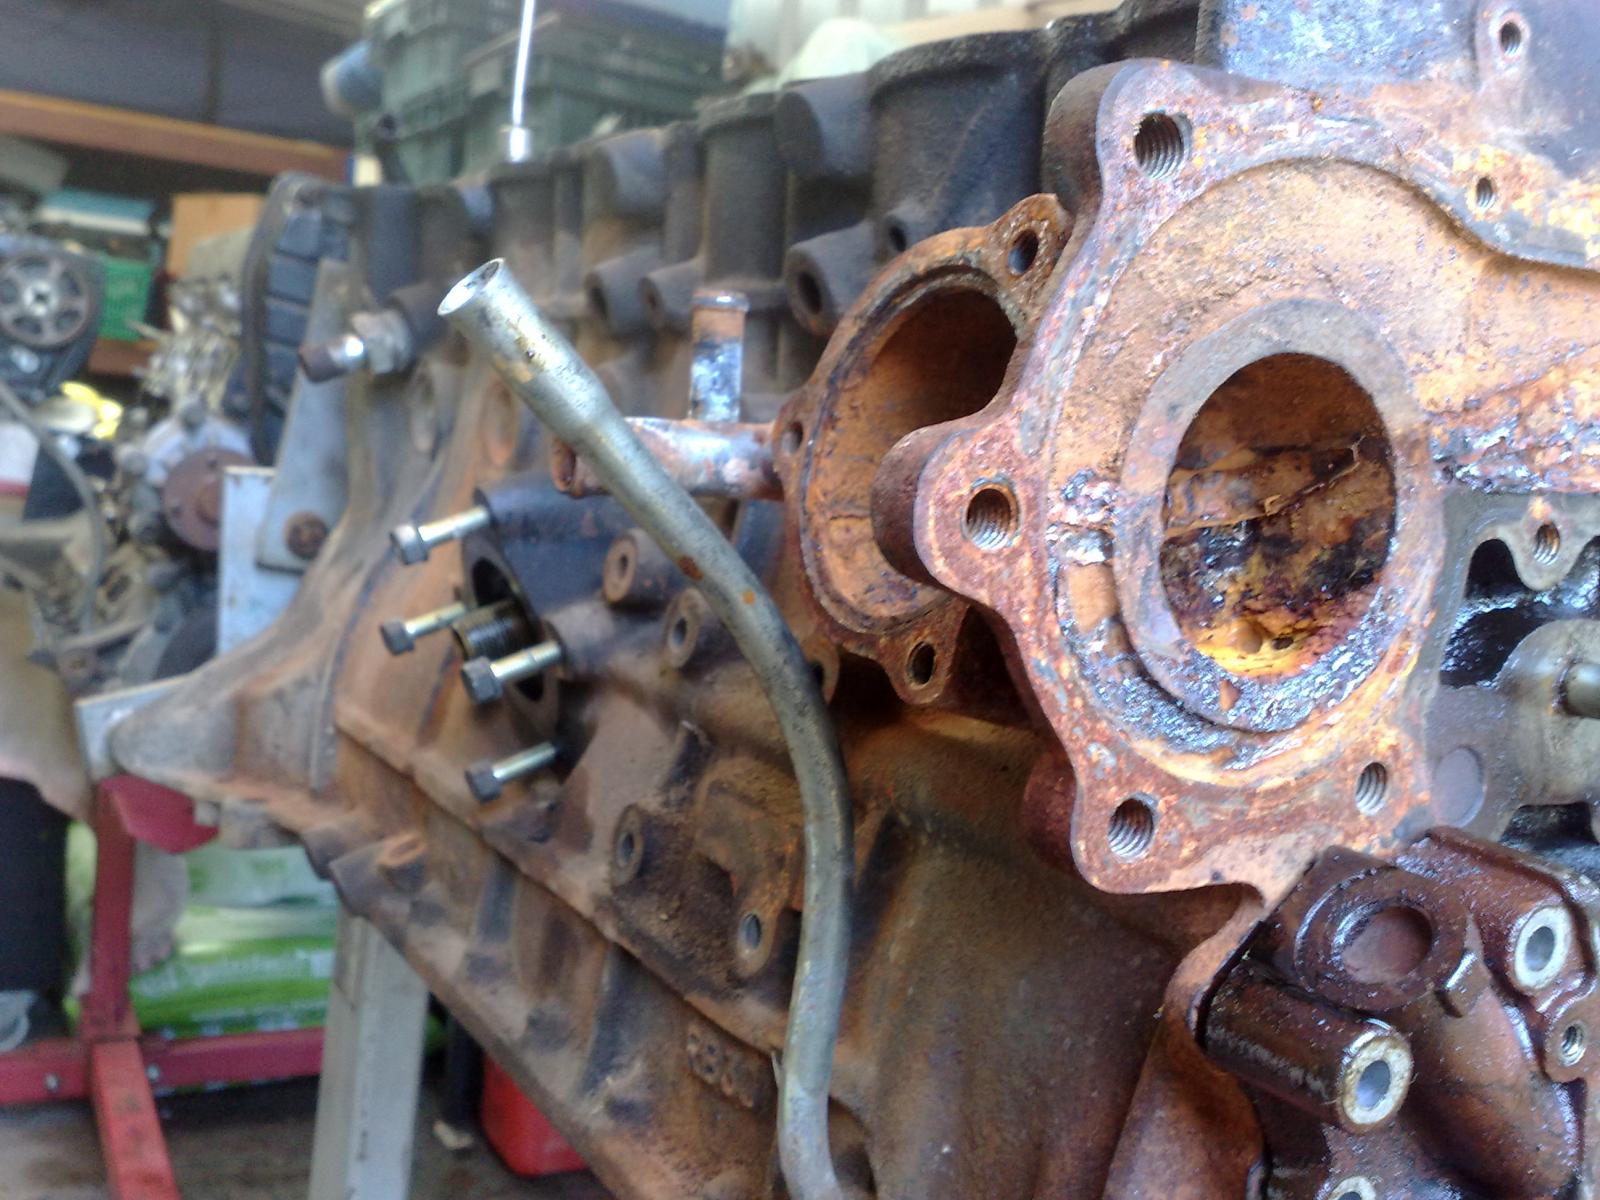
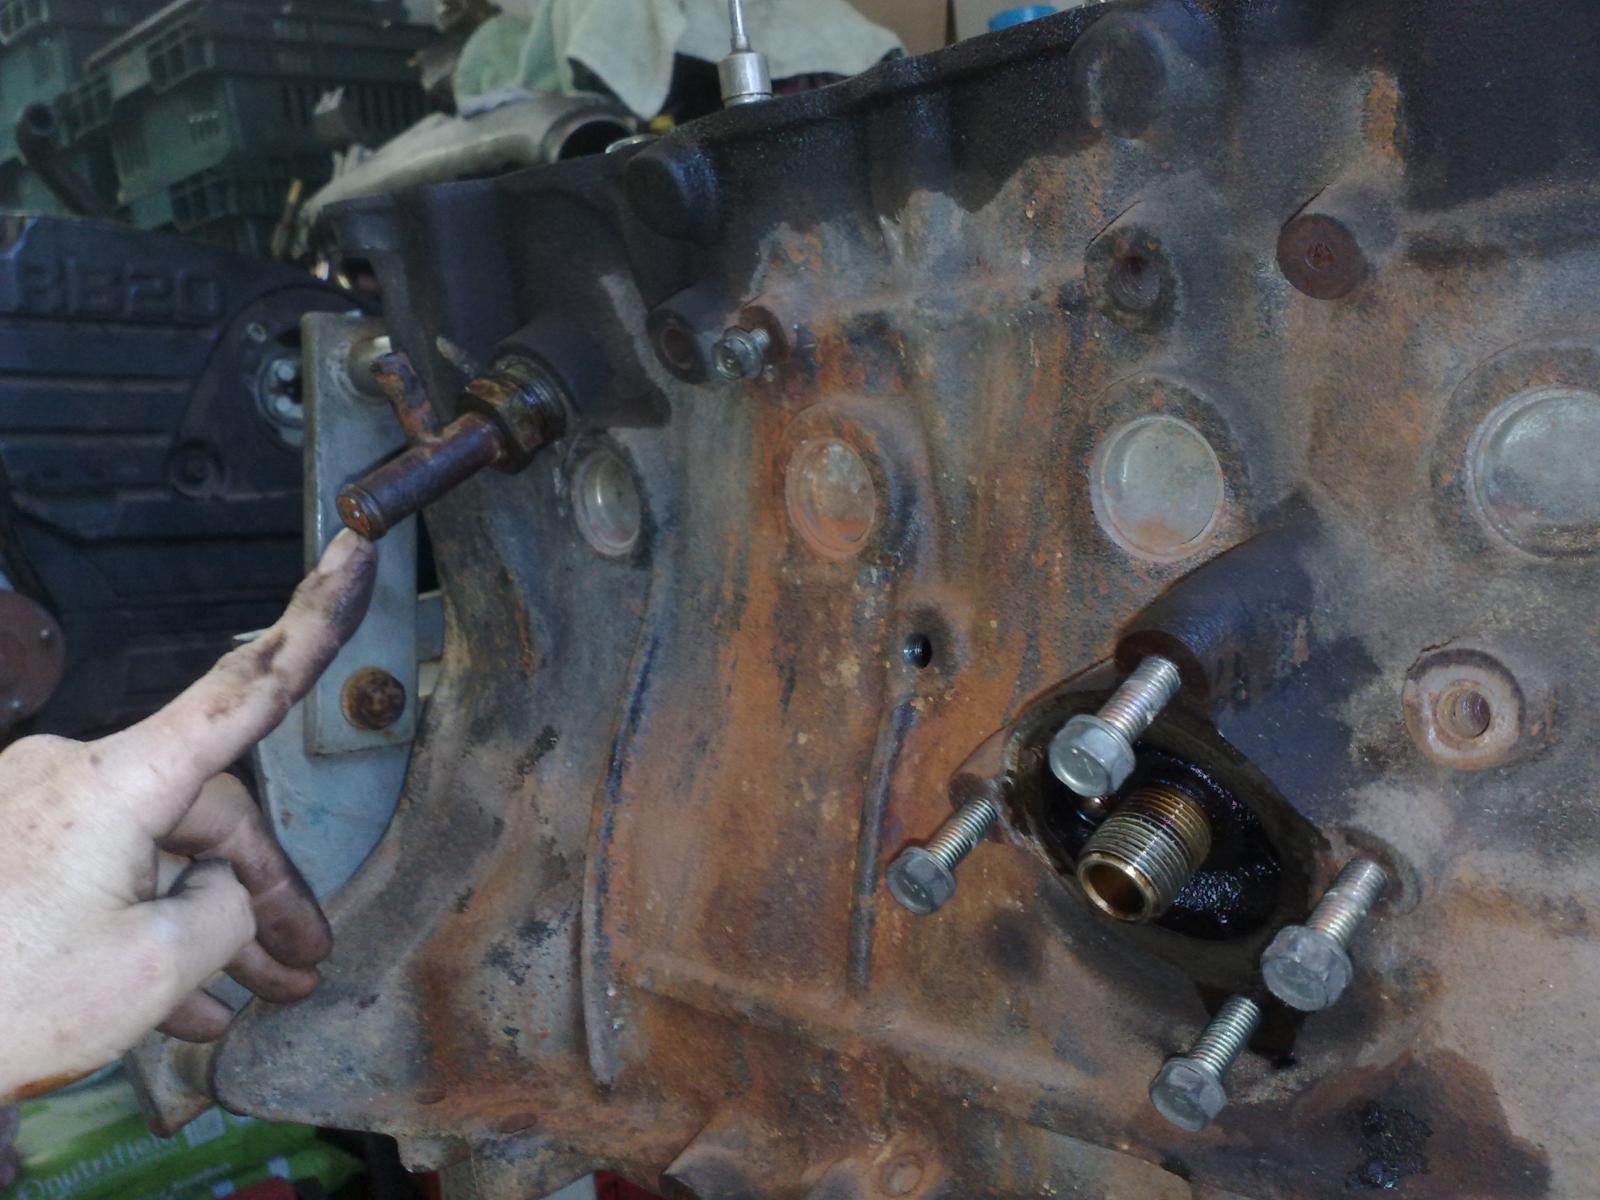
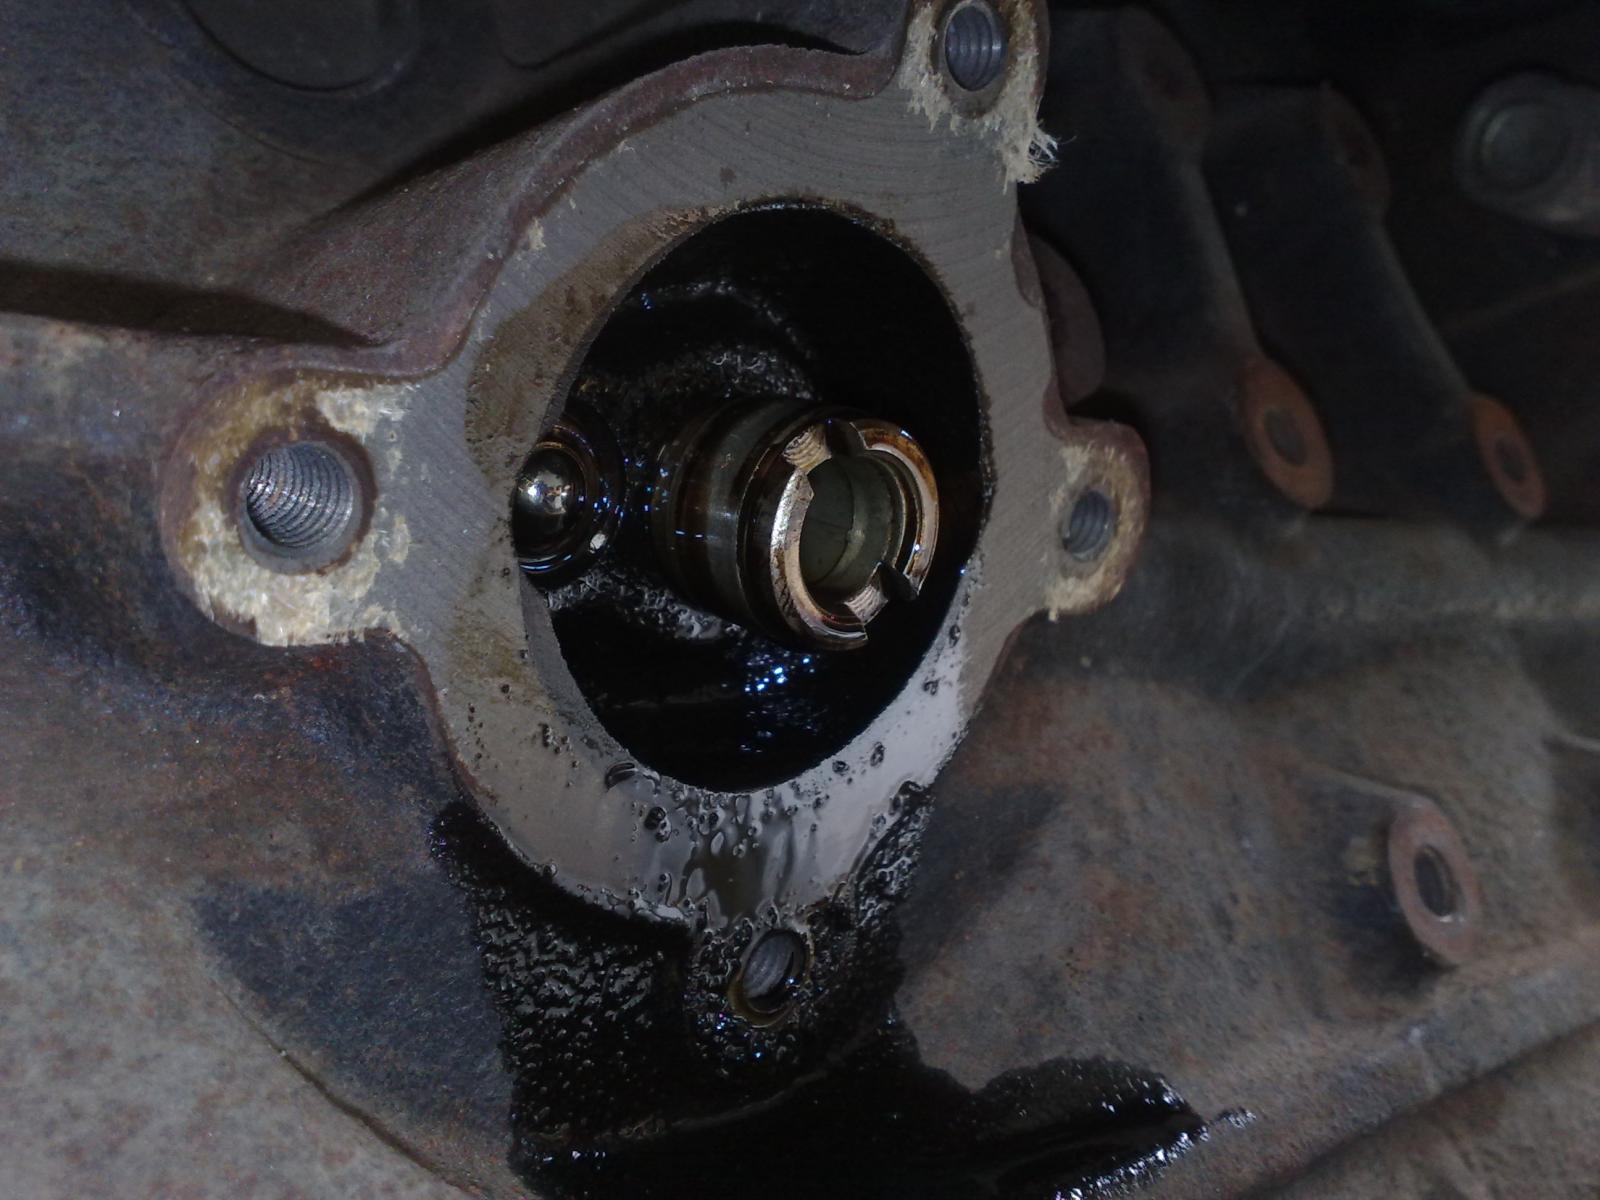
Oil Filter
There is a slight difference with the way that the RB20 and RB30 attach the oil filter. With the RB20 an extension is used and the filter seats onto this. With the RB30, the filter seats straight onto the block.
Here's the RB20 setup with the extension removed.
Download Full Size Image
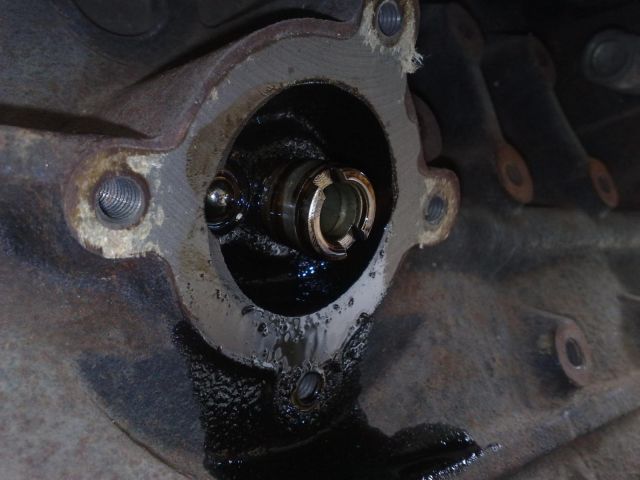
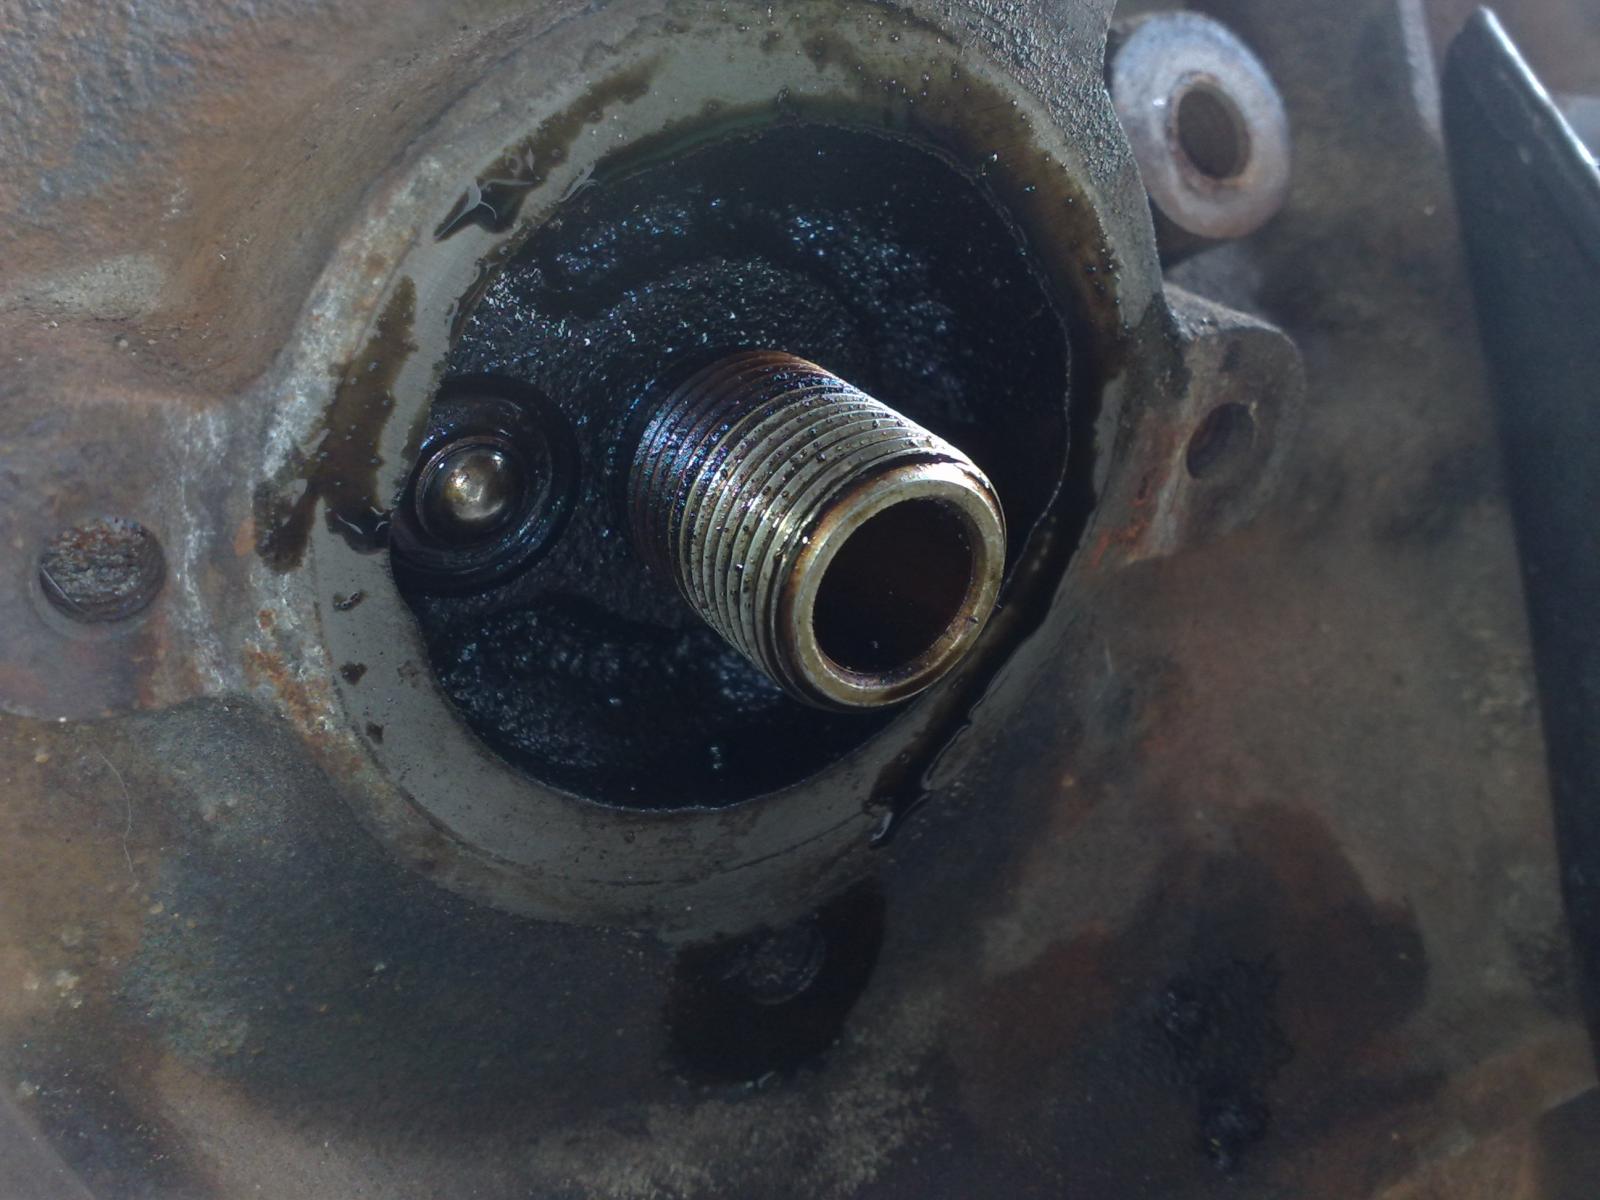
And here is the RB30. As you can see, it's all thread.
Download Full Size Image

I'll get back to this soon and update you on what I do.
There is a slight difference with the way that the RB20 and RB30 attach the oil filter. With the RB20 an extension is used and the filter seats onto this. With the RB30, the filter seats straight onto the block.
Here's the RB20 setup with the extension removed.
Download Full Size Image
And here is the RB30. As you can see, it's all thread.
Download Full Size Image
I'll get back to this soon and update you on what I do.
#14
Posted 02 July 2011 - 09:38 PM
2LV8ETR
-
- Vice President
-
- 3017 posts
Grampa Spec Cockhead
- Real Name:Allen
- LocationArmadale WA
- Car(s):RB30DET R32 Gts-t Sedan, Hilux SSR-G Surf 4x4
- Bike(s):Hyosung GT250-R, My wife...
Okay, I had a busy weekend but here's what happened. Saturday: Did a few small jobs for a member, and in the arvo went and picked up my RB30 for this build. Sunday: Did the wife's brakes in the morning and after lunch I pulled the sump off the RB30 after setting it on an engine stand. I found a heap of sludge in the engine and bits of crap. The oil smelled burned and there looked to be excessive heat around the crank. Fuck.... I stripped the engine down to nothing and now the plan is to rebuild it from the ground up with new rings and bearings. Next week, I'll clean the block and components up and hone it out. I still won't be forging this one because it'll be kept to below 400hp, so stock components will be used.
#15
Posted 14 September 2011 - 12:52 PM
2LV8ETR
-
- Vice President
-
- 3017 posts
Grampa Spec Cockhead
- Real Name:Allen
- LocationArmadale WA
- Car(s):RB30DET R32 Gts-t Sedan, Hilux SSR-G Surf 4x4
- Bike(s):Hyosung GT250-R, My wife...
Step 3: Block Machining
As some of you know, I stuffed my back up at work and I've had to go easy on it for quite some time. Now I'm almost 100% and things are starting to move again.
So far I have de-ridged 2 of the bores and I wasn't happy with the results, so I will send it away for a .5mm rebore.
While the block is there, I will also ask for it to be slightly decked to remove some pitting and water marks from a previous head gasket failure.
I have had the block delivered to a workshop to get some work done on it and I was told that unless I spend thousands of dollars forging it and all sorts of other crap, they wouldn't do the work.
Get fucked. I went somewhere else.
I found a guy who now works from home to keep overheads down and he's been 100% on track with what I want done.
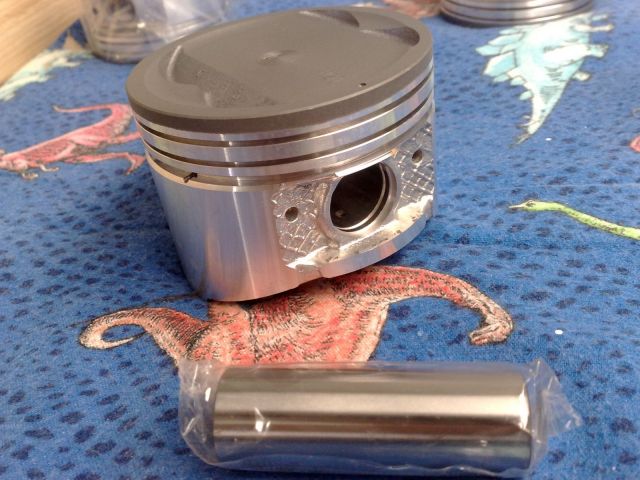
I will need to buy new pistons to suit the oversize, so I'm going with Hypatec Anodized stock RB30ET replacements with Hastings chrome rings. As I mentioned earlier, I am not chasing big numbers with this build, so the stock ET pistons will cope with 400hp. I also went with chrome rings instead of moly because at high temps, moly has a propensity to blister. As you may know, the RB30 does not have oil squirters under the pistons to help with cooling so heat may be an issue. Again, big numbers aren't on the menu, so chrome will be fine.
I have also given the crank to the machinist to polish. I noticed a few very minor shudder marks, and for the cost, it's worth doing for piece of mind.
When the block and crank come back, I will be drilling and tapping the hole for the extra timing belt tensioner and I'll also be starting the assembly.
My mood at present -
As some of you know, I stuffed my back up at work and I've had to go easy on it for quite some time. Now I'm almost 100% and things are starting to move again.
So far I have de-ridged 2 of the bores and I wasn't happy with the results, so I will send it away for a .5mm rebore.
While the block is there, I will also ask for it to be slightly decked to remove some pitting and water marks from a previous head gasket failure.
I have had the block delivered to a workshop to get some work done on it and I was told that unless I spend thousands of dollars forging it and all sorts of other crap, they wouldn't do the work.
Get fucked. I went somewhere else.
I found a guy who now works from home to keep overheads down and he's been 100% on track with what I want done.
I will need to buy new pistons to suit the oversize, so I'm going with Hypatec Anodized stock RB30ET replacements with Hastings chrome rings. As I mentioned earlier, I am not chasing big numbers with this build, so the stock ET pistons will cope with 400hp. I also went with chrome rings instead of moly because at high temps, moly has a propensity to blister. As you may know, the RB30 does not have oil squirters under the pistons to help with cooling so heat may be an issue. Again, big numbers aren't on the menu, so chrome will be fine.
I have also given the crank to the machinist to polish. I noticed a few very minor shudder marks, and for the cost, it's worth doing for piece of mind.
When the block and crank come back, I will be drilling and tapping the hole for the extra timing belt tensioner and I'll also be starting the assembly.
My mood at present -
#16
Posted 24 September 2011 - 04:45 PM
2LV8ETR
-
- Vice President
-
- 3017 posts
Grampa Spec Cockhead
- Real Name:Allen
- LocationArmadale WA
- Car(s):RB30DET R32 Gts-t Sedan, Hilux SSR-G Surf 4x4
- Bike(s):Hyosung GT250-R, My wife...
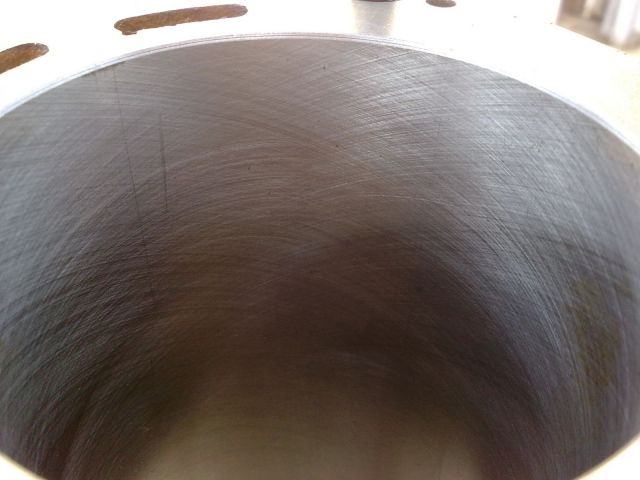
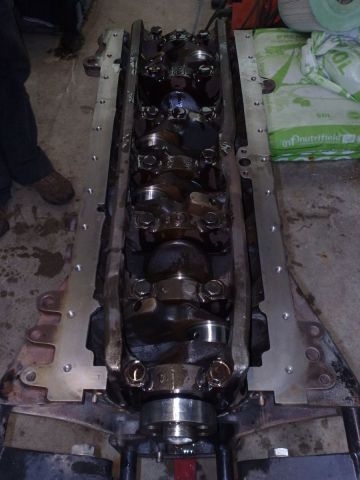
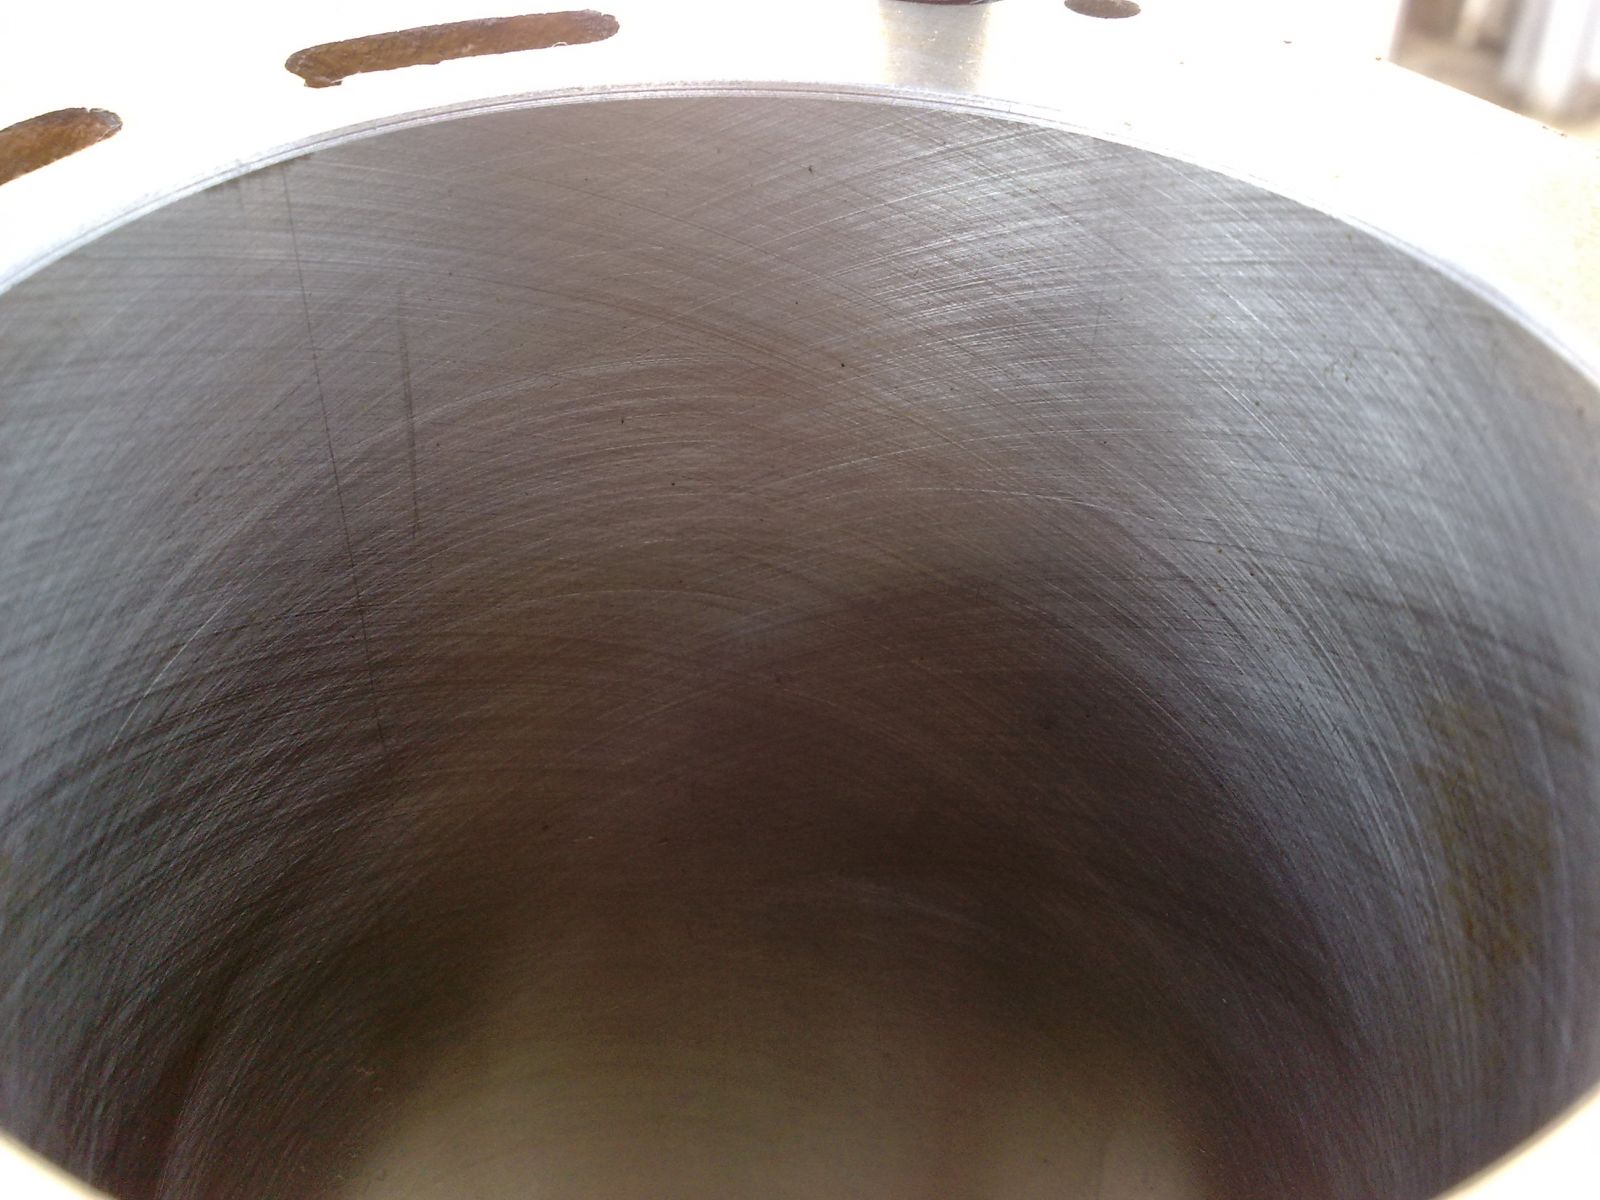
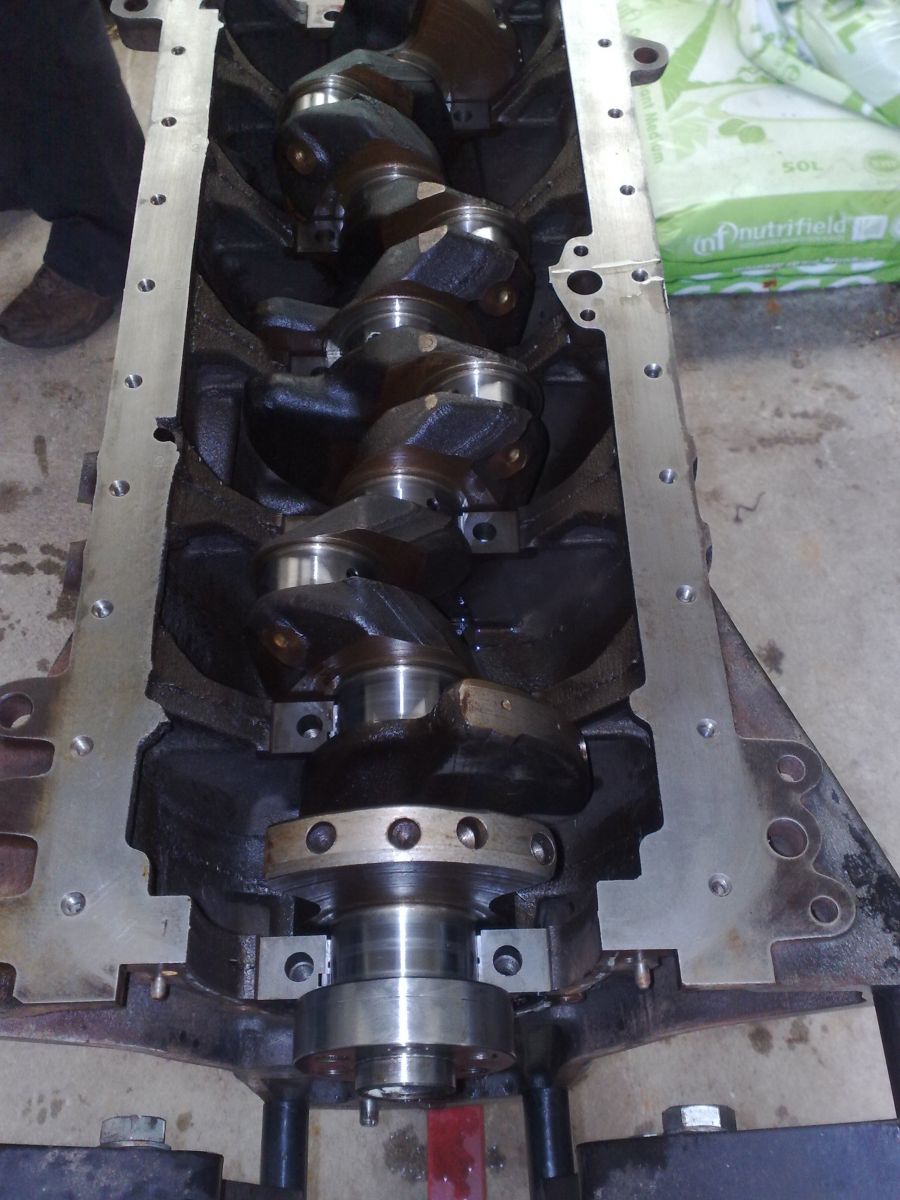
I got the block back from the machinist, and I must say I was very impressed with his quality of work. The cross-hatching in the bores was spot on, and the new head mating surface is smooth as baby's butt.
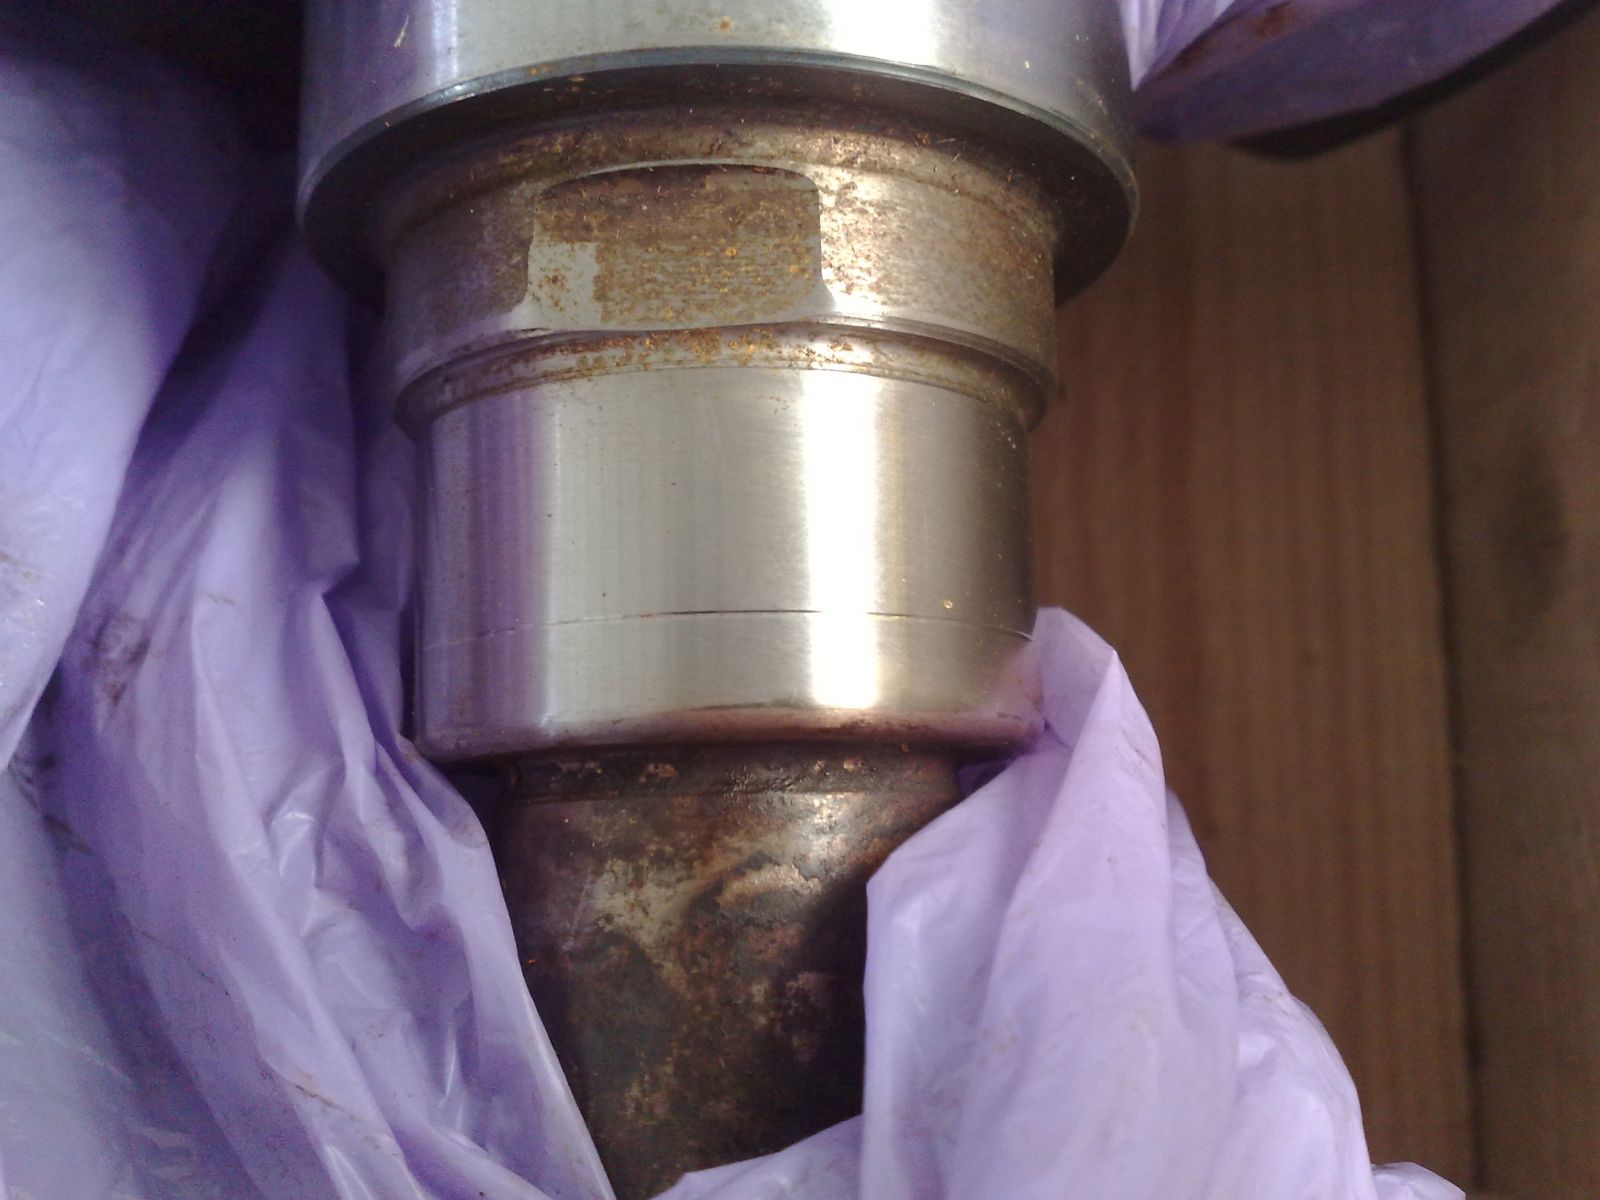
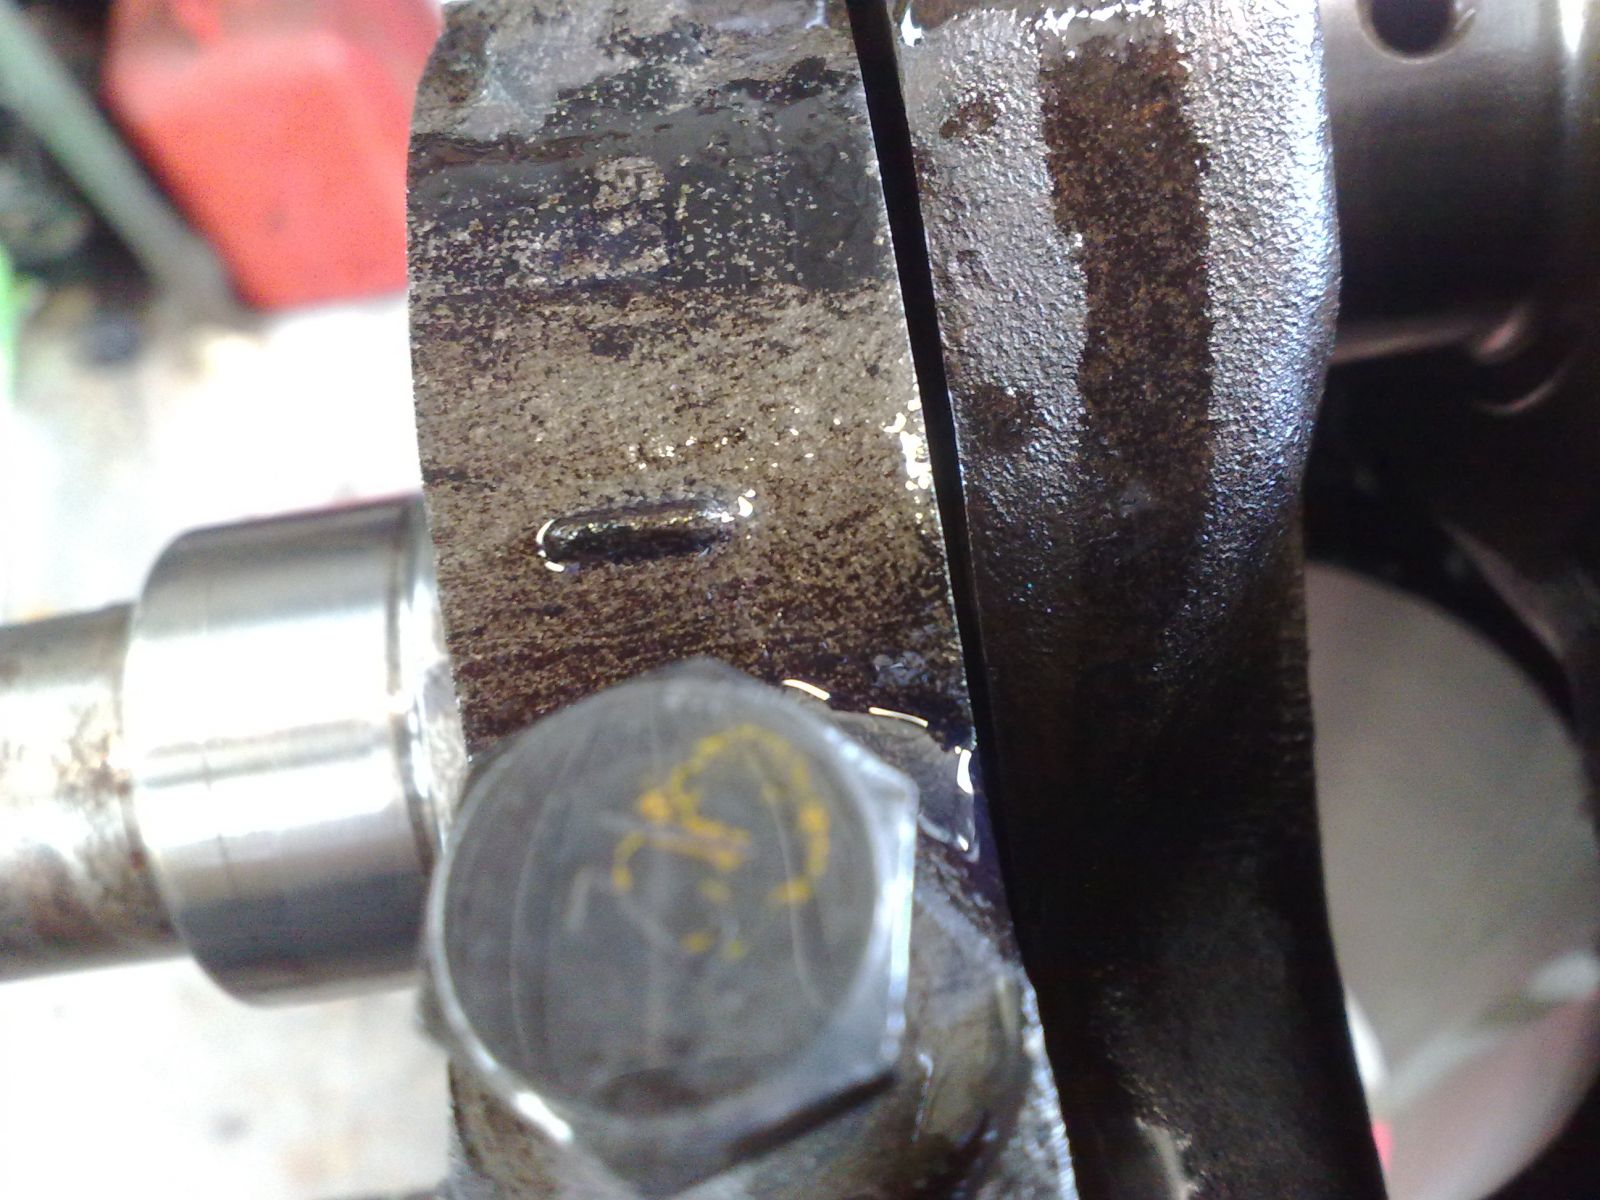
The crank came back with the seal surfaces polished down to minimum. There is still a small ridge remaining, but it's an acceptable level. The bearing surfaces were polished up and remain standard. Now that I know this, I can order the bearings for the build.
Tomorrow I will clean the block.
The bores:
Download Full Size Image
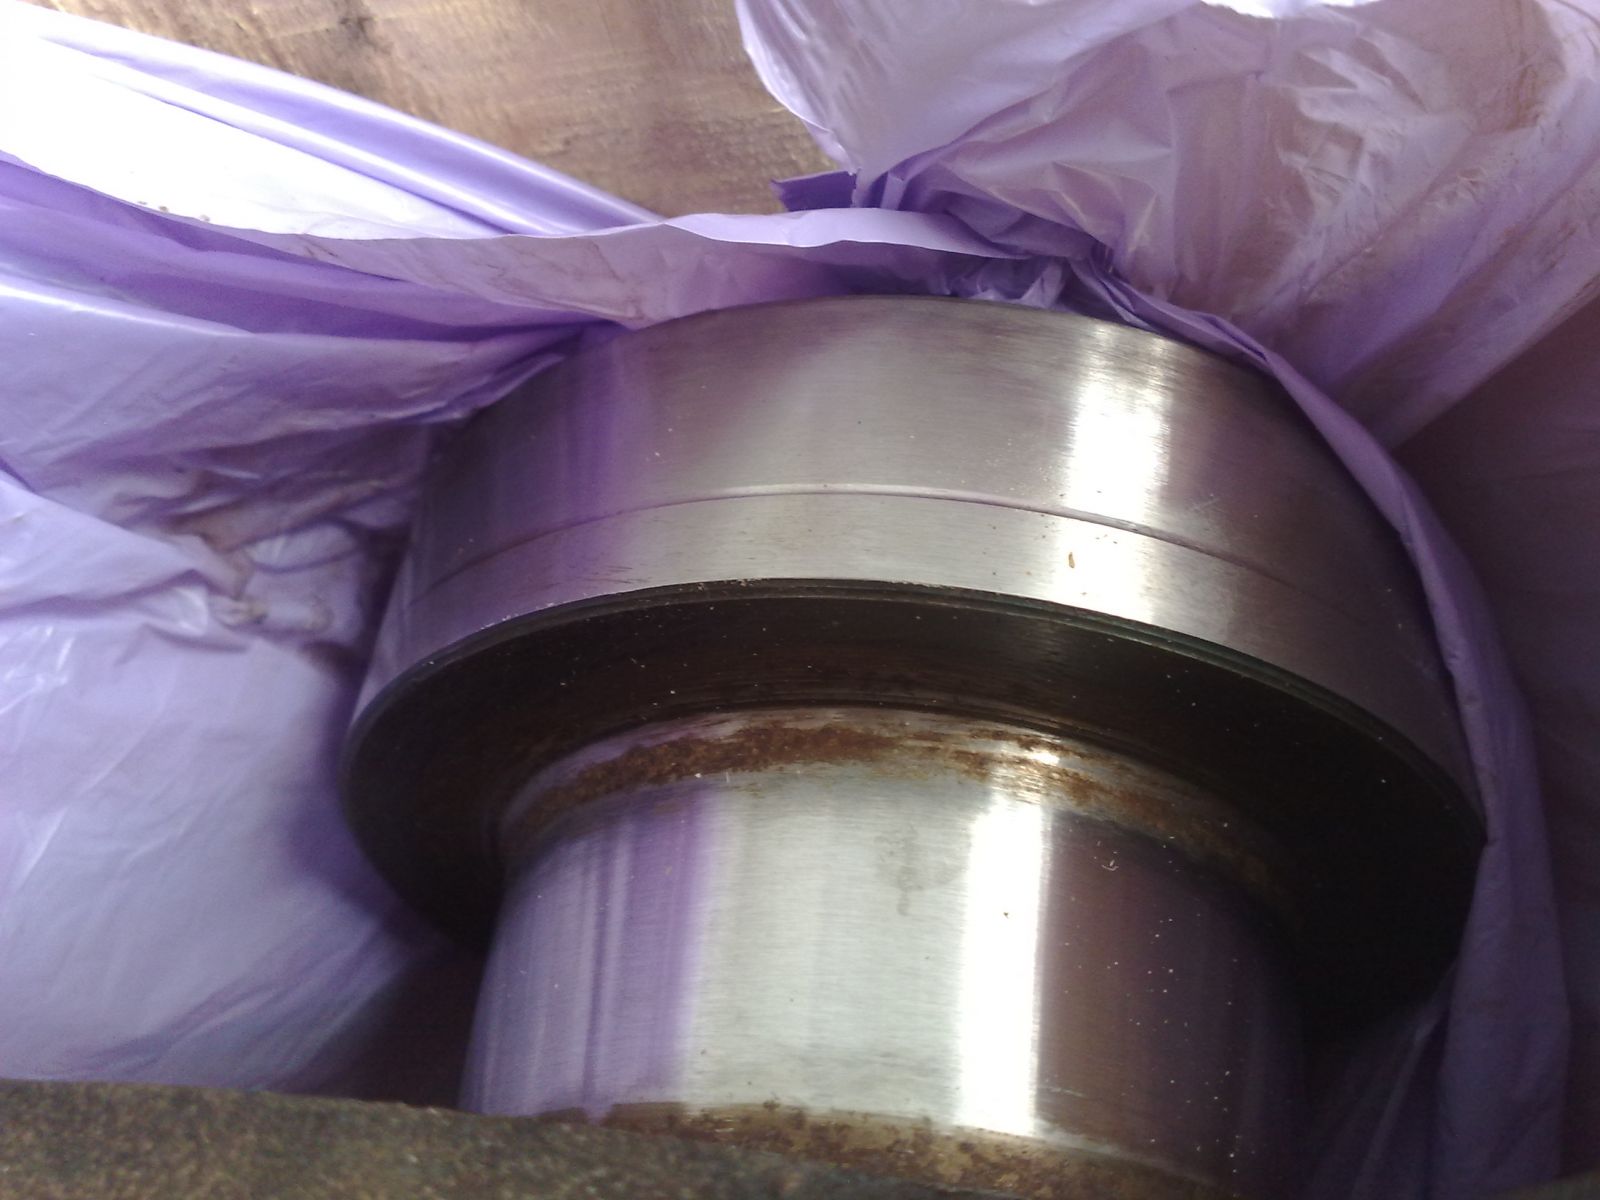
The crank:
Download Full Size Image

Download Full Size Image

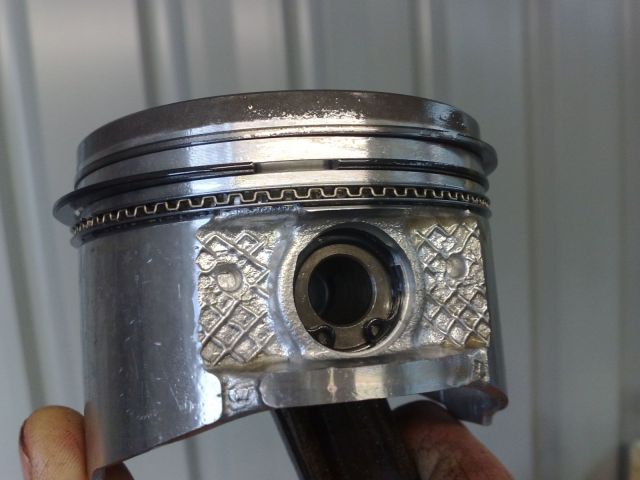
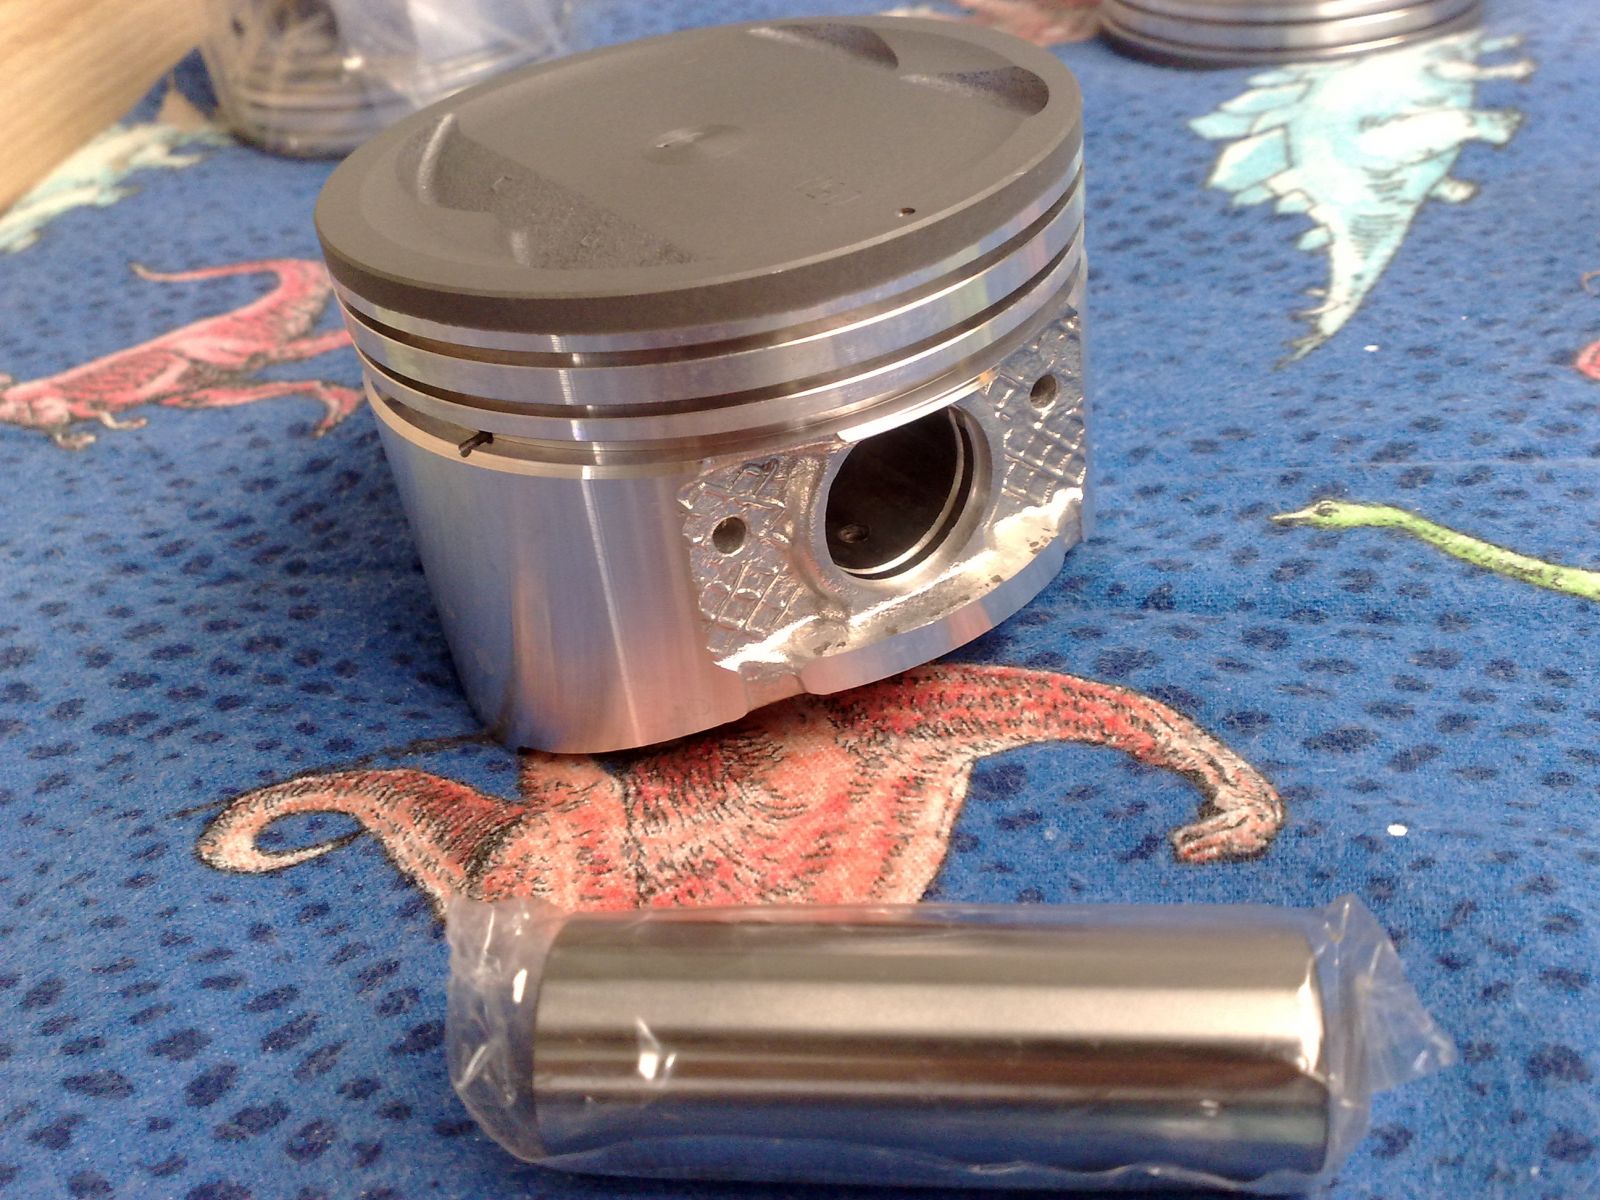
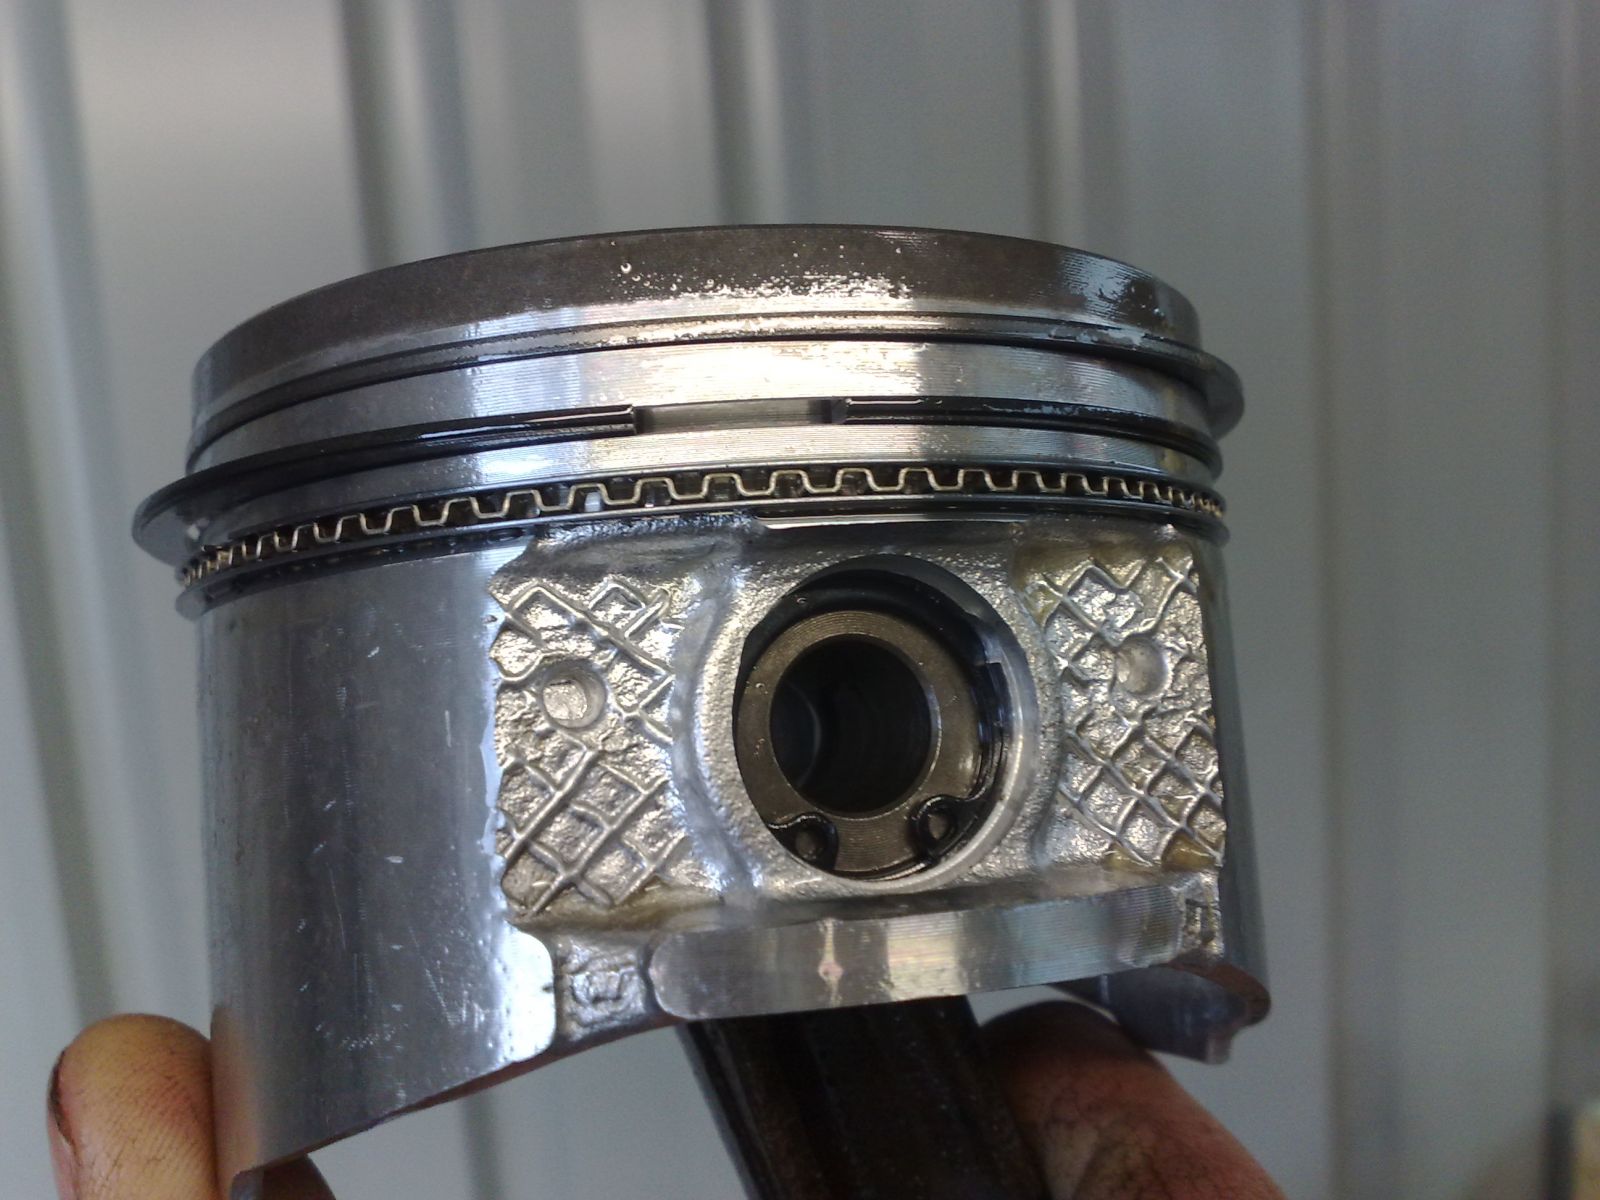
The pistons:
Download Full Size Image
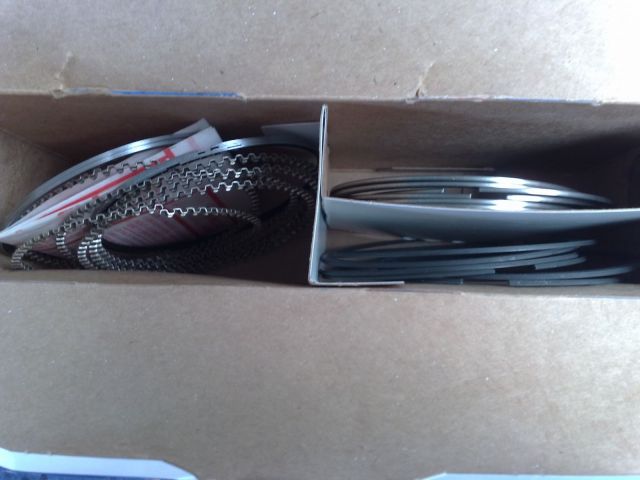
The rings:
Download Full Size Image
Cost - $725.00 (work & supply of piston kit & rings)
Total Spent - $1175.00
The name of the company that performed the work is Classic & Performance Engineering. The guy's name is Tony and his number is 0408 718 574.
The crank came back with the seal surfaces polished down to minimum. There is still a small ridge remaining, but it's an acceptable level. The bearing surfaces were polished up and remain standard. Now that I know this, I can order the bearings for the build.
Tomorrow I will clean the block.
The bores:
Download Full Size Image
The crank:
Download Full Size Image
Download Full Size Image
The pistons:
Download Full Size Image
The rings:
Download Full Size Image
Cost - $725.00 (work & supply of piston kit & rings)
Total Spent - $1175.00
The name of the company that performed the work is Classic & Performance Engineering. The guy's name is Tony and his number is 0408 718 574.
#17
Posted 19 October 2011 - 08:52 PM
2LV8ETR
-
- Vice President
-
- 3017 posts
Grampa Spec Cockhead
- Real Name:Allen
- LocationArmadale WA
- Car(s):RB30DET R32 Gts-t Sedan, Hilux SSR-G Surf 4x4
- Bike(s):Hyosung GT250-R, My wife...
Step 4: Bottom End Assembly
Pistons & Rods
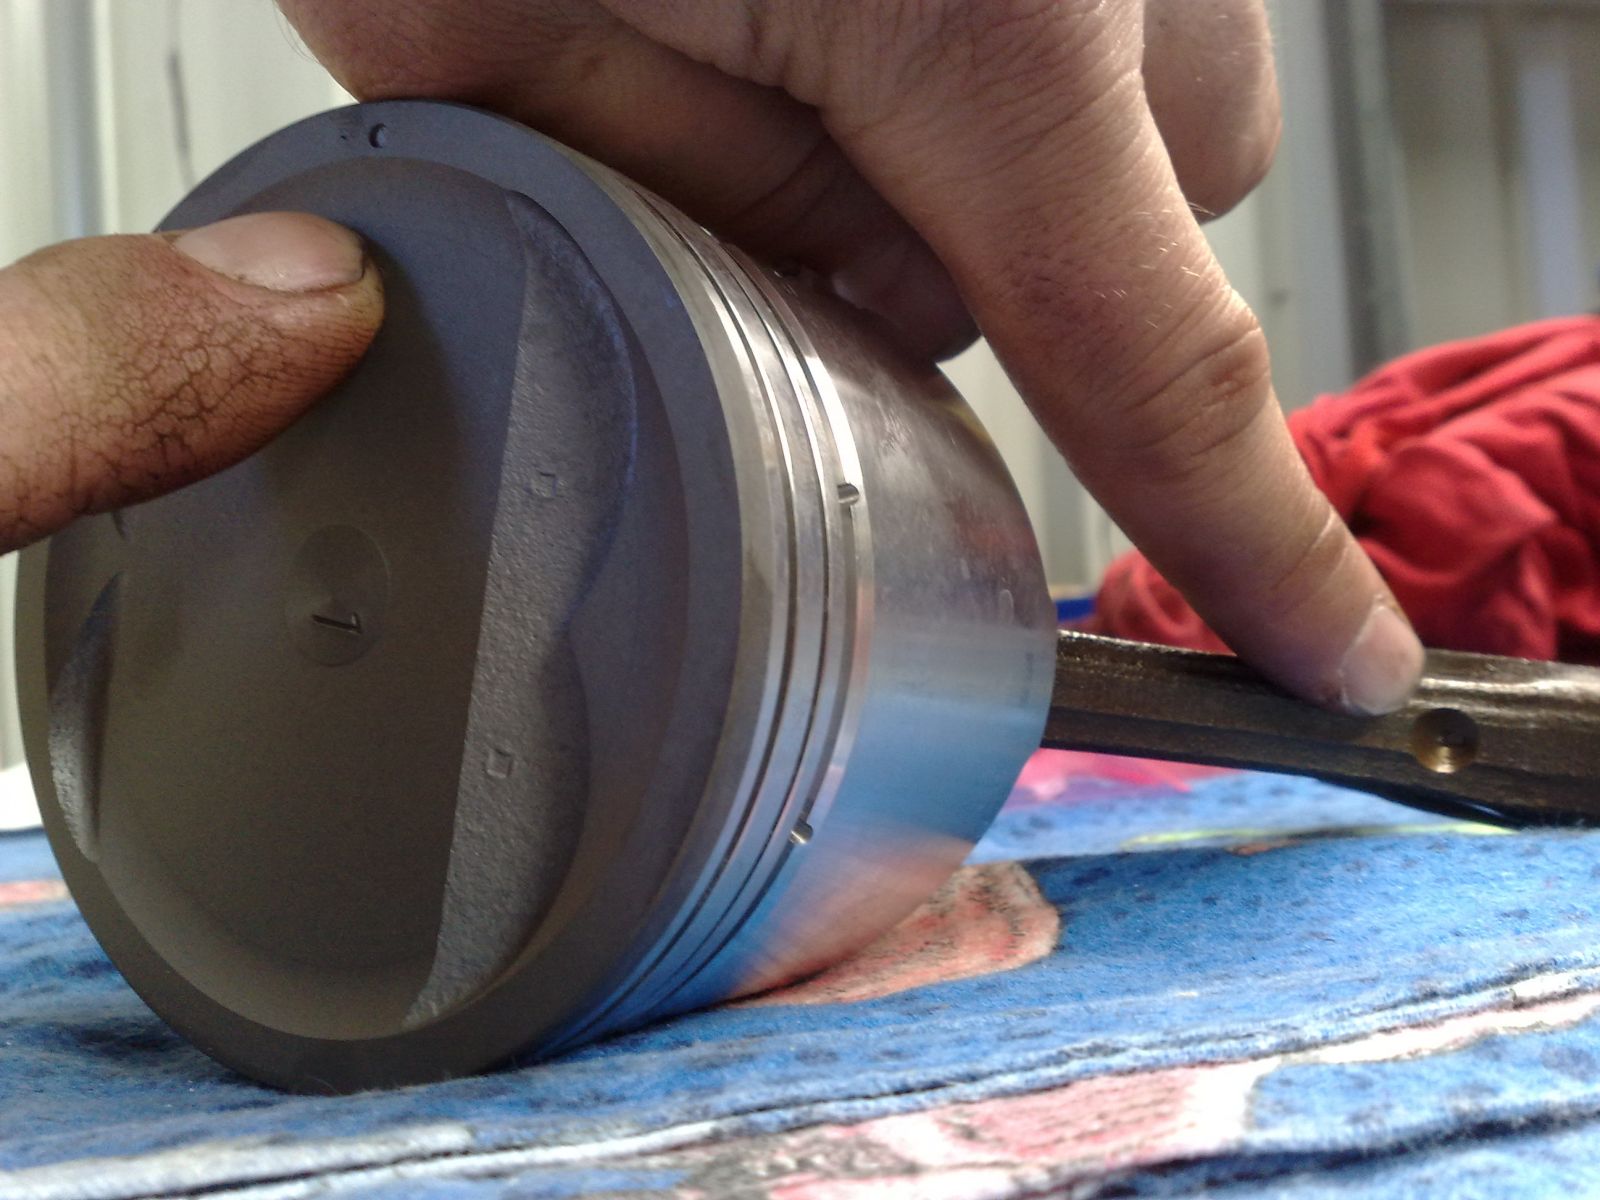
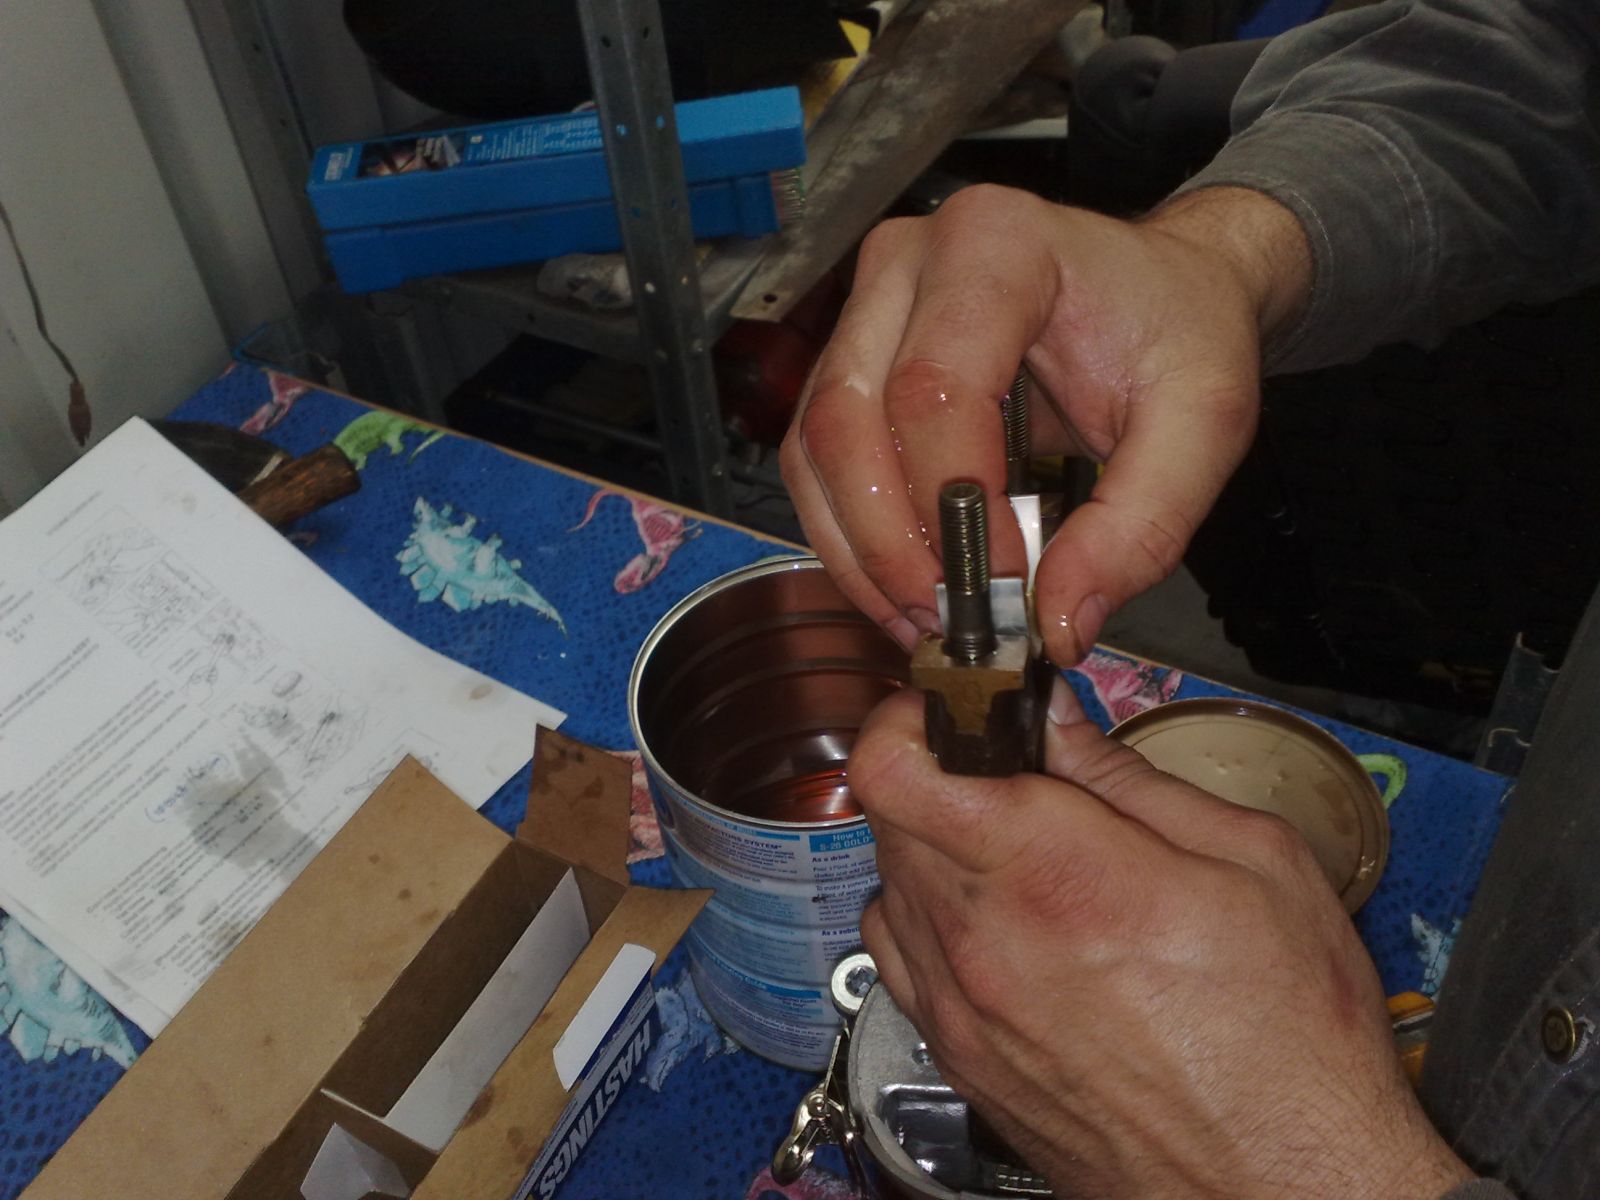
Firstly, I'll assemble the rods to the pistons. The kit I bought has new gudgeon pins to use and if you buy a kit with these supplied, use them.
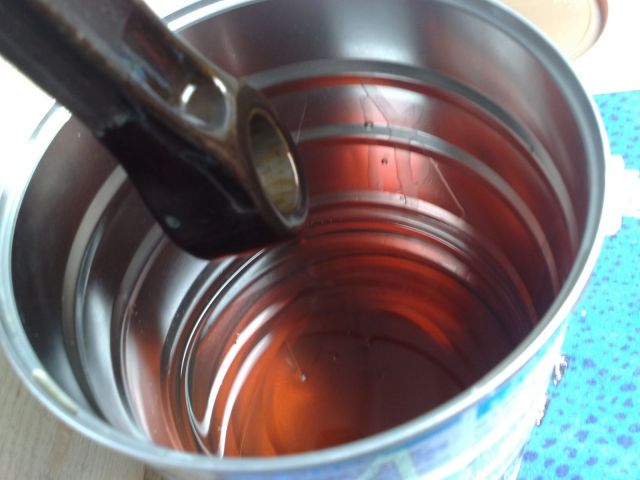
Dip the gudgeon pin in engine oil. As you can see, I have a clean tin with a lid that I use so I can cover the oil in between steps to prevent foreign matter contamination.
Download Full Size Image

Position the gudgeon pin, leaving enough room to allow for the location of the rod.
Download Full Size Image

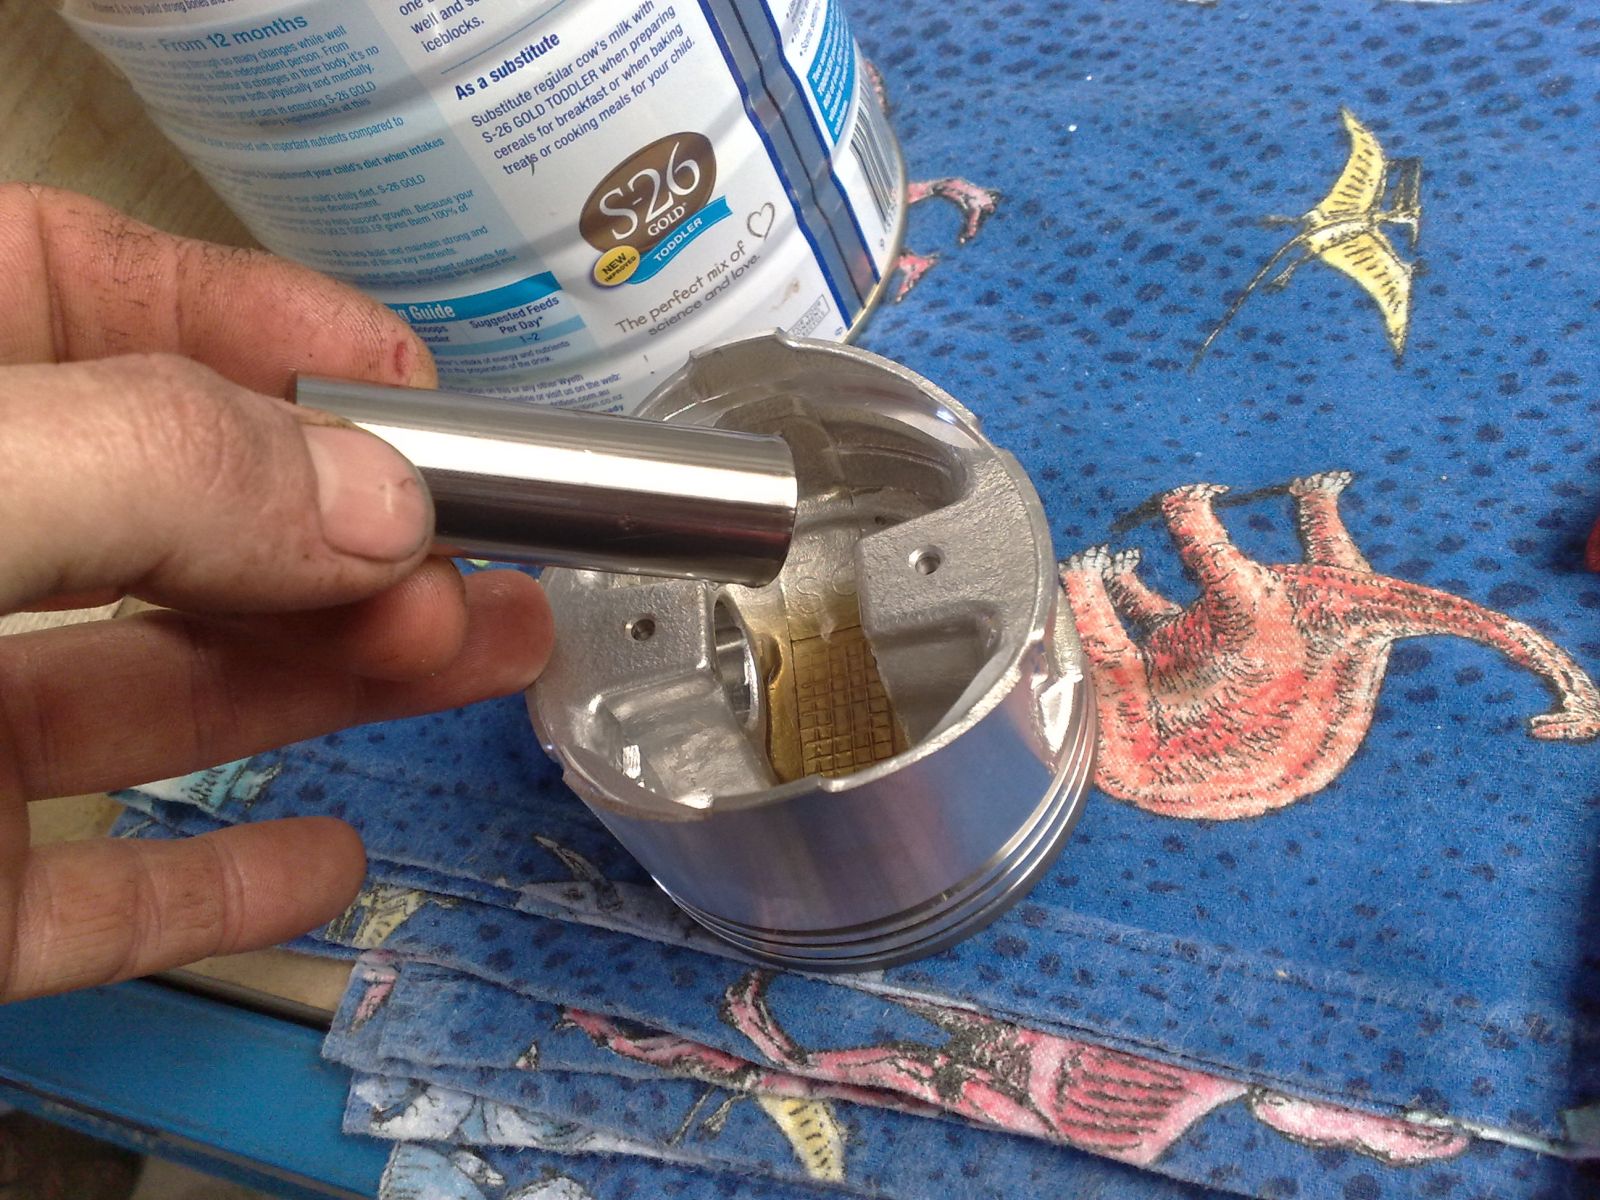
Now dip the top of the rod into the oil.
Download Full Size Image
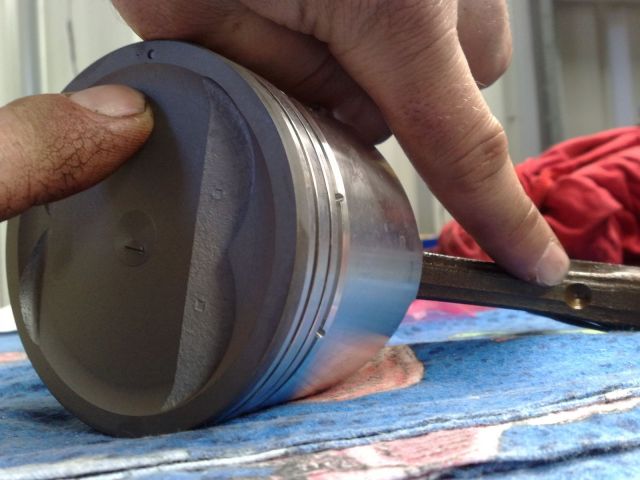
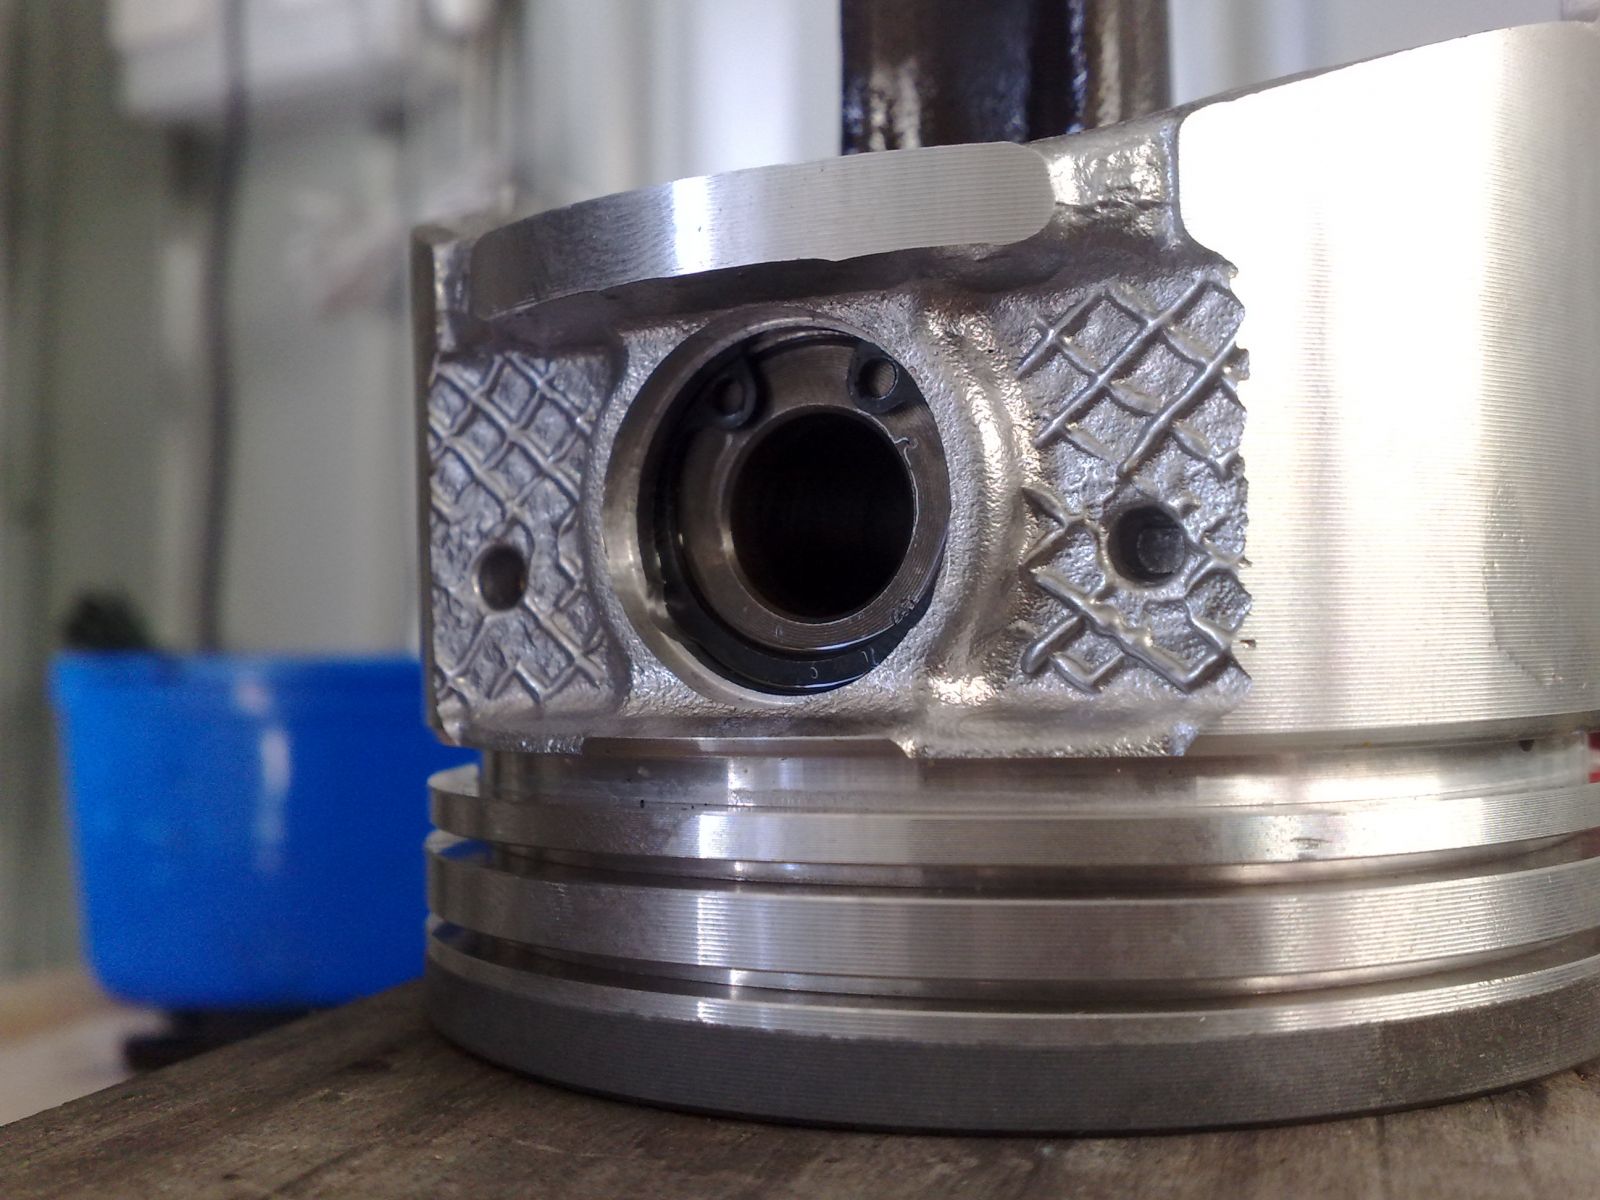
Locate the rod into the piston and push the gudgeon pin into place (Refer to next step for orientation).
Download Full Size Image

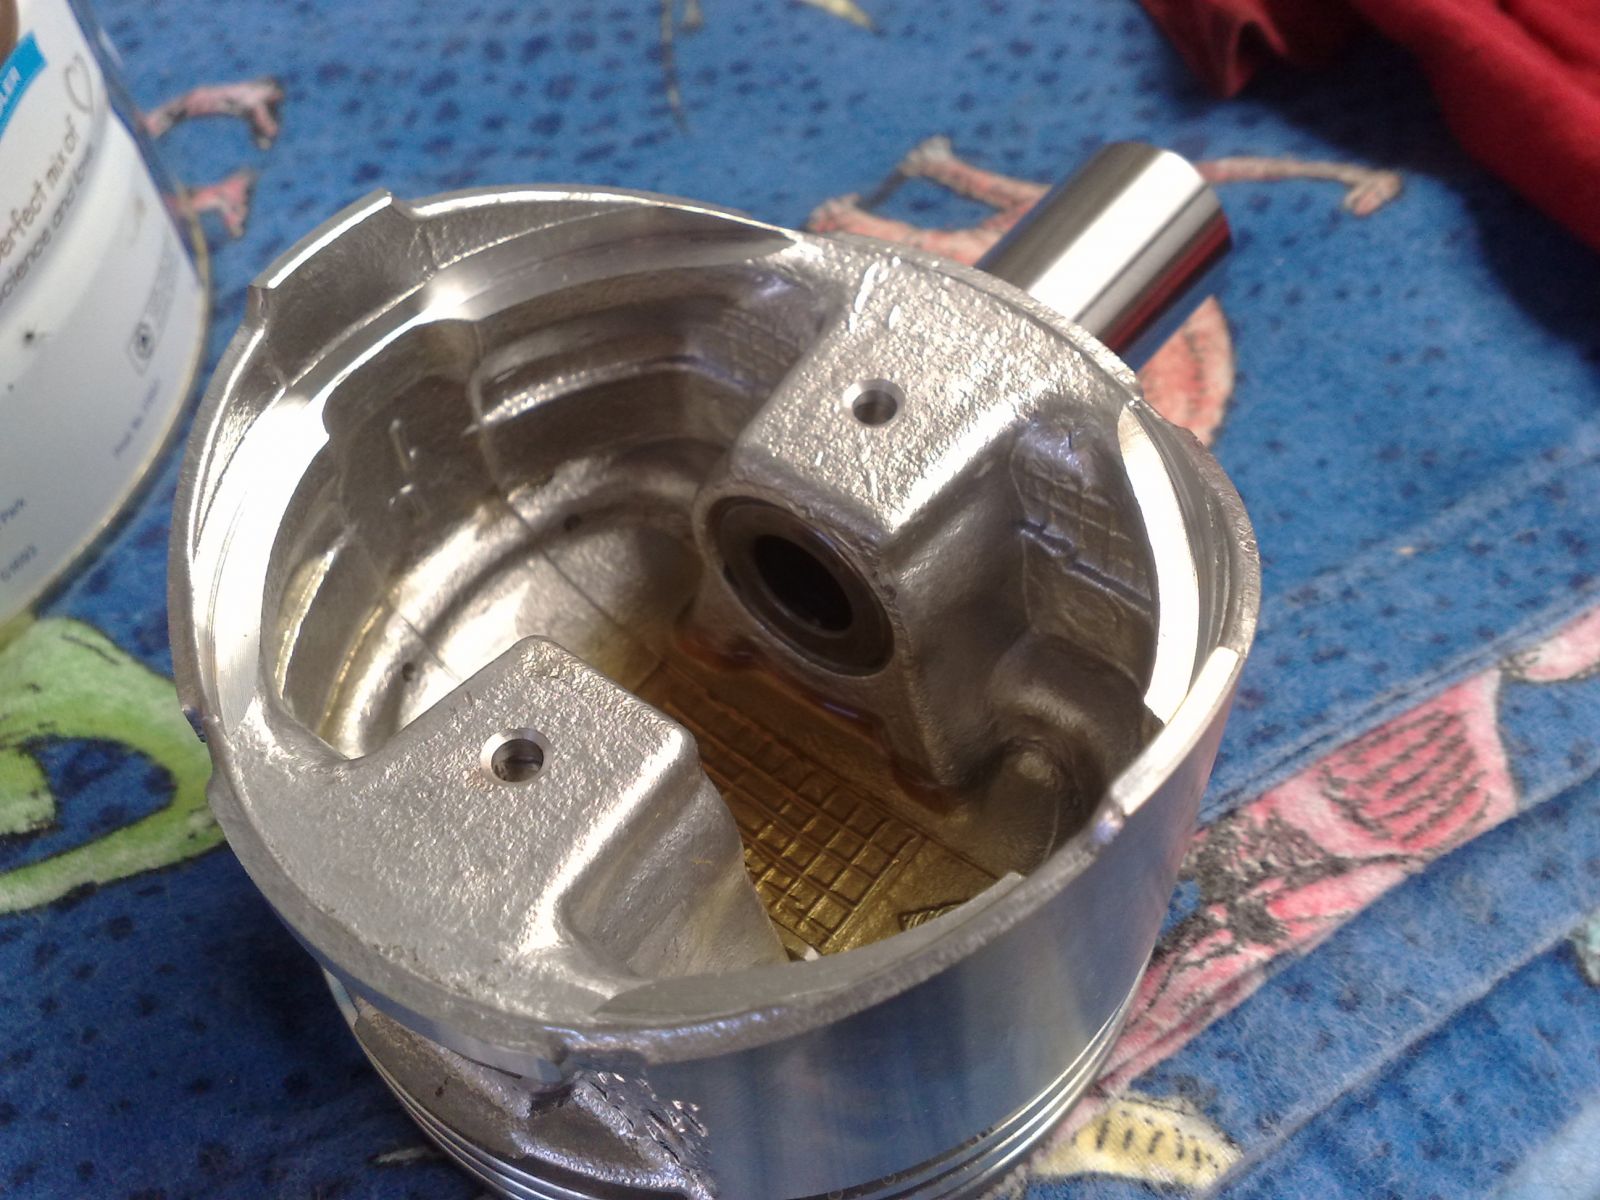
Make sure that the rod oil gallery lines up with the forward mark on the piston as shown in the following image.
Download Full Size Image
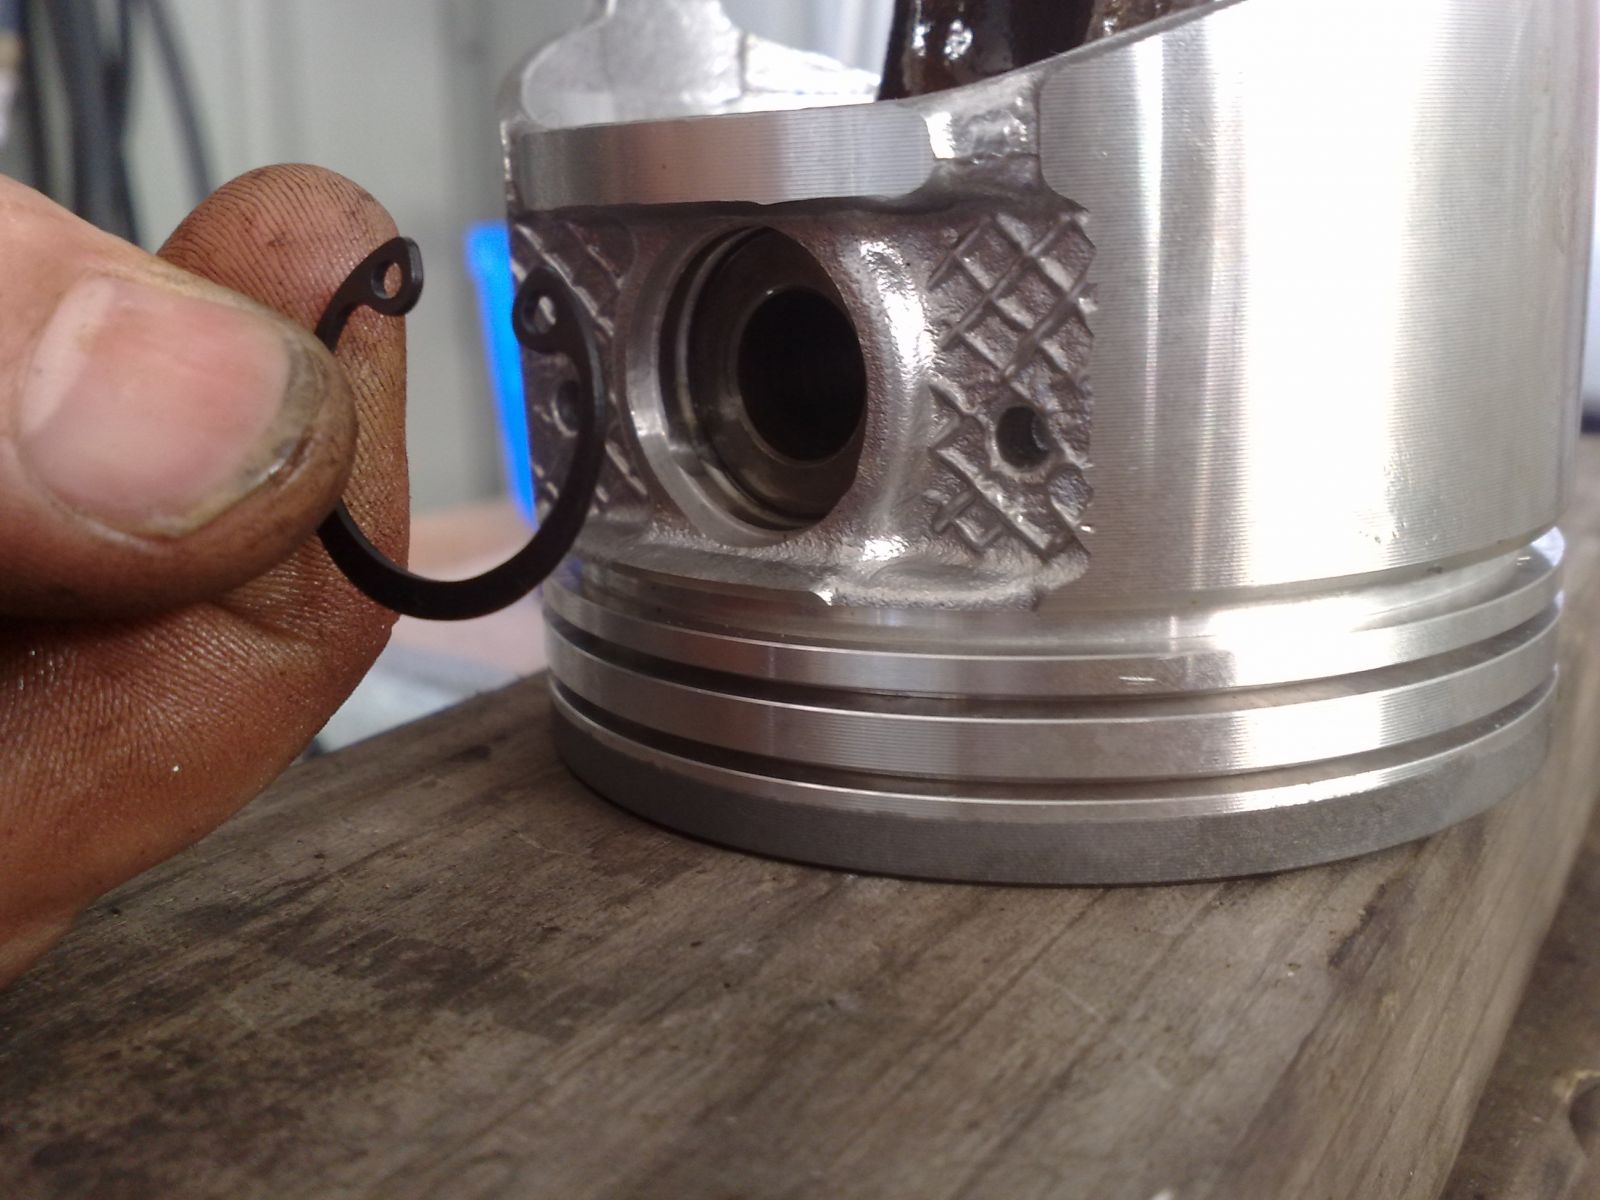
Position the circlip using circlip pliers into the piston recess and make sure that it has snapped into position and is locked in.
Next push the gudgeon pin from the opposite side so it sits hard up against the circlip you just fitted.
Spin the whole assembly 180 degrees and fit the circlip to the other side.
The gudgeon pin should now be fully seated and locked into position.
Download Full Size Image
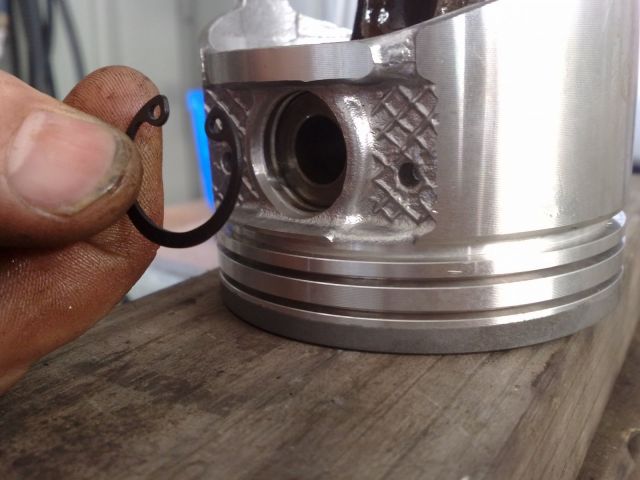
Download Full Size Image

Repeat the previous steps until all 6 piston/rod assemblies are complete.
Pistons & Rods
Firstly, I'll assemble the rods to the pistons. The kit I bought has new gudgeon pins to use and if you buy a kit with these supplied, use them.
Dip the gudgeon pin in engine oil. As you can see, I have a clean tin with a lid that I use so I can cover the oil in between steps to prevent foreign matter contamination.
Download Full Size Image
Position the gudgeon pin, leaving enough room to allow for the location of the rod.
Download Full Size Image
Now dip the top of the rod into the oil.
Download Full Size Image
Locate the rod into the piston and push the gudgeon pin into place (Refer to next step for orientation).
Download Full Size Image
Make sure that the rod oil gallery lines up with the forward mark on the piston as shown in the following image.
Download Full Size Image
Position the circlip using circlip pliers into the piston recess and make sure that it has snapped into position and is locked in.
Next push the gudgeon pin from the opposite side so it sits hard up against the circlip you just fitted.
Spin the whole assembly 180 degrees and fit the circlip to the other side.
The gudgeon pin should now be fully seated and locked into position.
Download Full Size Image
Download Full Size Image
Repeat the previous steps until all 6 piston/rod assemblies are complete.
#18
Posted 19 October 2011 - 09:06 PM
2LV8ETR
-
- Vice President
-
- 3017 posts
Grampa Spec Cockhead
- Real Name:Allen
- LocationArmadale WA
- Car(s):RB30DET R32 Gts-t Sedan, Hilux SSR-G Surf 4x4
- Bike(s):Hyosung GT250-R, My wife...
Crank
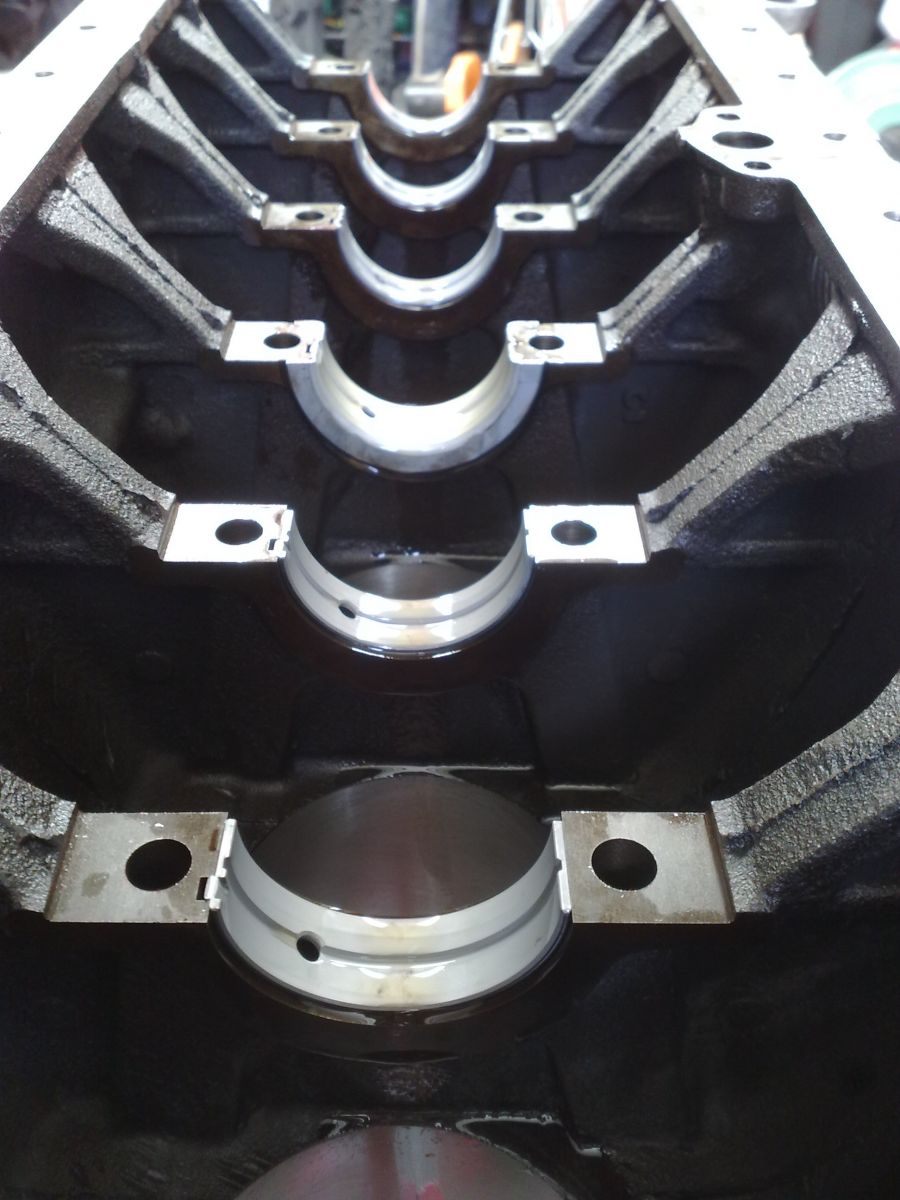
Now line the main bearing recesses with the bearings. They can only go in one way due to a small notch, have a look and you'll see what I'm on about.
One thing to be aware of is that there will be one set of bearings that have a "wall" on them. These are the thrust bearings and need to be situated in the dead centre of the block. You will notice a half moon cutout on the block where these are meant to go.
Also, don't forget to bomb the bearings with oil before installing them.
Download Full Size Image

GENTLY locate the crank into the block. Make sure you put it in the correct way. The flat end goes to the rear of the block, and the long end goes toward the front.
Download Full Size Image

Position the other half of the bearings into the girdle taking care to ensure that the thrust bearing is in the correct location.
Again, don't forget to bomb the bearings with oil before installing them.
Gently lower the girdle over the crank making sure that the skinny end points towards the rear of the block.
Download Full Size Image
Locate all of the mains bolts into their respective positions. You will notice that some are longer than others. Have a good look and you'll see that the girdle has high and low spots. You don't have to be a bright one to work out which ones go where. If you really need to ask, go slit your wrists now to do yourself a favour......
Download Full Size Image

Tighten the bolts down starting from the middle and work your way alternating left to right working towards both ends of the block. At the moment you only want to tighten them enough so that the bolts are just nipped up and the gaps between the girdle and the block are closed up.
The mains bolts should be torqued down in 2-3 stages in sequence to a total of 4.7-5.3kgM, I went halfway and chose 5kgM. In other words, divide the final torque setting into 2 or 3 and tighten down respectively. I personally used the 2 stage option, but the figures are both shown for you to choose from.
2 stages:
First torque setting - 18 lbft (25 nM / 2.5 kg-m)
Second torque setting - 36 lbft (50 nM / 5 kg-m)
3 stages:
First torque setting - 12 lbft (16 nM / 1.6 kg-m)
Second torque setting - 24 lbft (33 nM / 3.3 kg-m)
Third torque setting - 36 lbft (50 nM / 5 kg-m)
Below is a guide to the correct sequence:
....13..9..5..1..3..7..11
F
....14.10..6..2..4..8..12
F denotes the front of the engine.
Now line the main bearing recesses with the bearings. They can only go in one way due to a small notch, have a look and you'll see what I'm on about.
One thing to be aware of is that there will be one set of bearings that have a "wall" on them. These are the thrust bearings and need to be situated in the dead centre of the block. You will notice a half moon cutout on the block where these are meant to go.
Also, don't forget to bomb the bearings with oil before installing them.
Download Full Size Image
GENTLY locate the crank into the block. Make sure you put it in the correct way. The flat end goes to the rear of the block, and the long end goes toward the front.
Download Full Size Image
Position the other half of the bearings into the girdle taking care to ensure that the thrust bearing is in the correct location.
Again, don't forget to bomb the bearings with oil before installing them.
Gently lower the girdle over the crank making sure that the skinny end points towards the rear of the block.
Download Full Size Image
Locate all of the mains bolts into their respective positions. You will notice that some are longer than others. Have a good look and you'll see that the girdle has high and low spots. You don't have to be a bright one to work out which ones go where. If you really need to ask, go slit your wrists now to do yourself a favour......
Download Full Size Image
Tighten the bolts down starting from the middle and work your way alternating left to right working towards both ends of the block. At the moment you only want to tighten them enough so that the bolts are just nipped up and the gaps between the girdle and the block are closed up.
The mains bolts should be torqued down in 2-3 stages in sequence to a total of 4.7-5.3kgM, I went halfway and chose 5kgM. In other words, divide the final torque setting into 2 or 3 and tighten down respectively. I personally used the 2 stage option, but the figures are both shown for you to choose from.
2 stages:
First torque setting - 18 lbft (25 nM / 2.5 kg-m)
Second torque setting - 36 lbft (50 nM / 5 kg-m)
3 stages:
First torque setting - 12 lbft (16 nM / 1.6 kg-m)
Second torque setting - 24 lbft (33 nM / 3.3 kg-m)
Third torque setting - 36 lbft (50 nM / 5 kg-m)
Below is a guide to the correct sequence:
....13..9..5..1..3..7..11
F
....14.10..6..2..4..8..12
F denotes the front of the engine.
#19
Posted 19 October 2011 - 09:49 PM
2LV8ETR
-
- Vice President
-
- 3017 posts
Grampa Spec Cockhead
- Real Name:Allen
- LocationArmadale WA
- Car(s):RB30DET R32 Gts-t Sedan, Hilux SSR-G Surf 4x4
- Bike(s):Hyosung GT250-R, My wife...
Piston Rings
Just about every set of rings has a different way to install them and set them up.
The best advice I can give here is to read the leaflet that comes with the set you buy, and follow it to the letter.
Anyways, at the end of it all they should look like this:
Download Full Size Image
Just about every set of rings has a different way to install them and set them up.
The best advice I can give here is to read the leaflet that comes with the set you buy, and follow it to the letter.
Anyways, at the end of it all they should look like this:
Download Full Size Image
#20
Posted 19 October 2011 - 09:58 PM
2LV8ETR
-
- Vice President
-
- 3017 posts
Grampa Spec Cockhead
- Real Name:Allen
- LocationArmadale WA
- Car(s):RB30DET R32 Gts-t Sedan, Hilux SSR-G Surf 4x4
- Bike(s):Hyosung GT250-R, My wife...
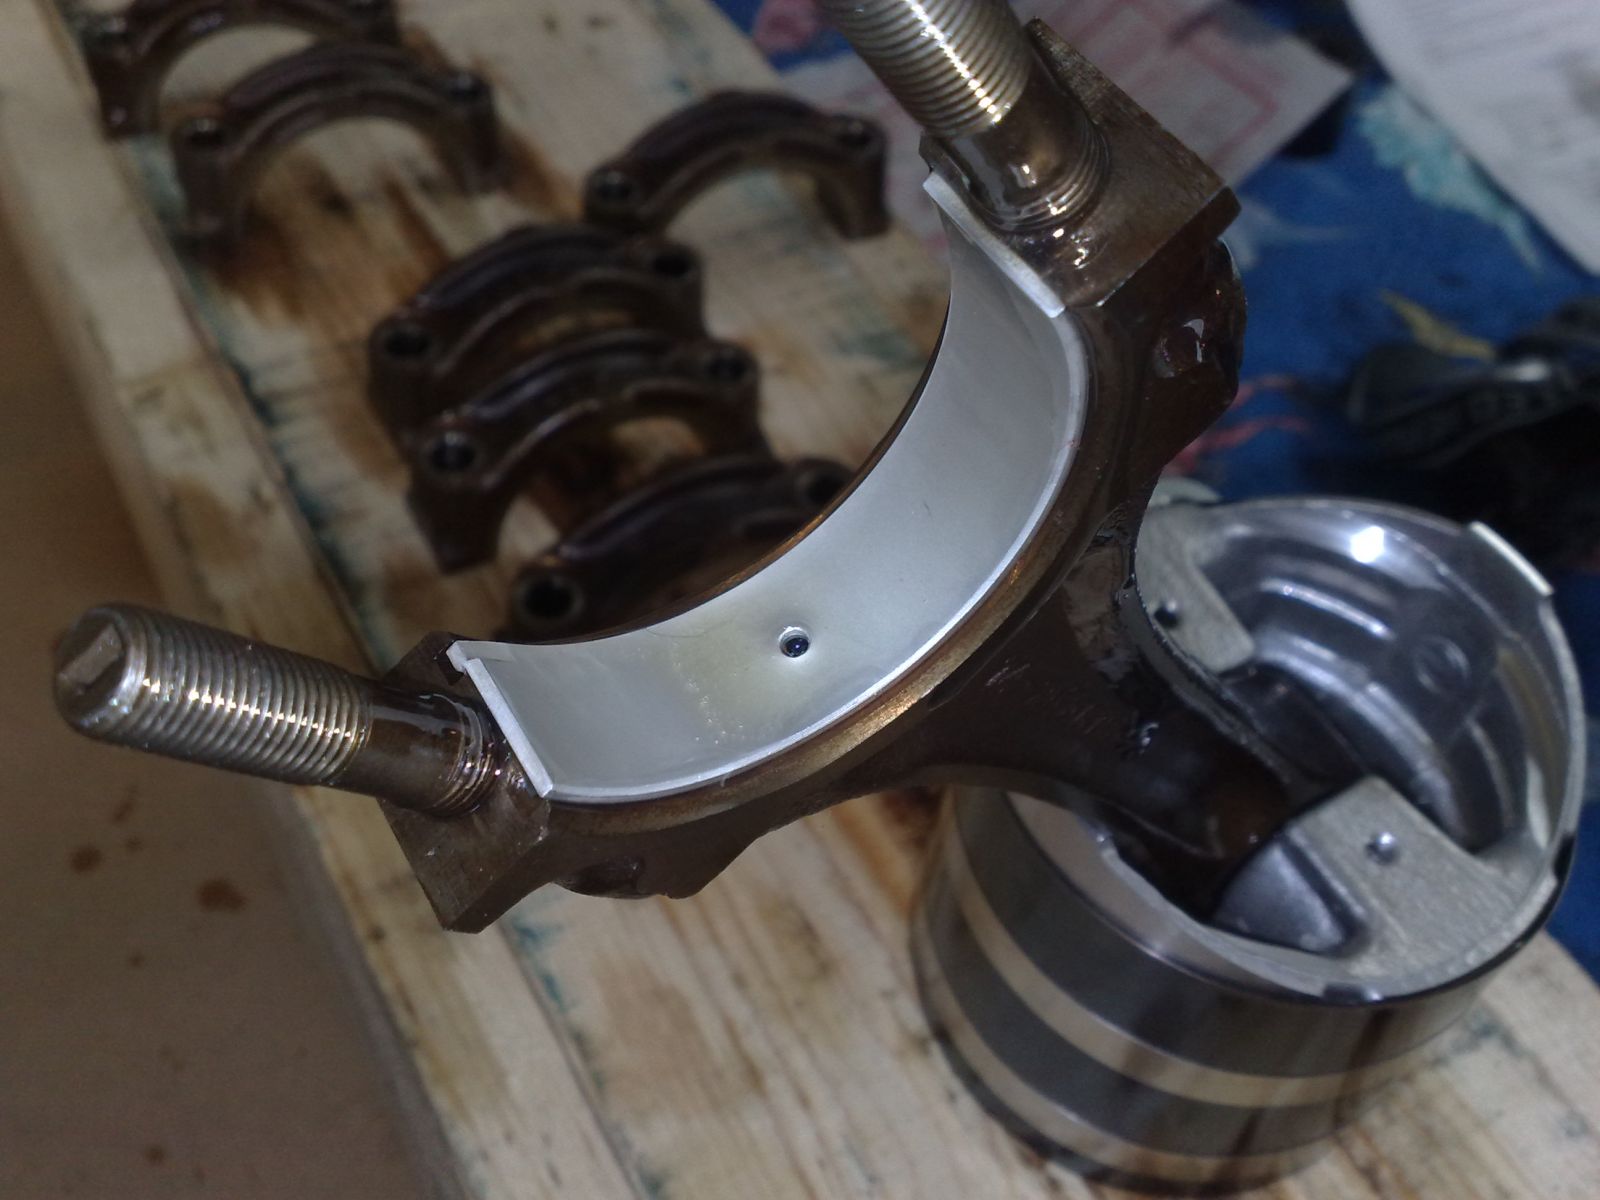
Big End Bearings
Line the big end bearing recesses on the rods with the bearings. Again they can only go in one way due to a small notch, have a look and you will see what I'm on about.
Again, don't forget to bomb the bearings with oil before installing them.
Download Full Size Image

Download Full Size Image

Line the big end bearing recesses on the rods with the bearings. Again they can only go in one way due to a small notch, have a look and you will see what I'm on about.
Again, don't forget to bomb the bearings with oil before installing them.
Download Full Size Image
Download Full Size Image


Community Forum Software by IP.Board
Licensed to: West Coast Cruisers, 2012
